
Chocolate Croissants (with Photo Tutorial)
Enjoy warm Chocolate Croissants fresh out of the oven. Making these flaky and buttery pastries will greatly reward you with a feeling of accomplishment and a whole tray of irresistible chocolate hazelnut goodness.

One of my baking dreams is to make croissants. Those flaky, buttery layers of pastries seem so elusive and look absolutely beautiful sitting inside bakery shelves, stunning in their golden color.
Although the process is long and the instructions may seem lengthy, I have told myself before that one day, someday, I am going to make croissants and enjoy my own creation.
That day did arrive. I conquered my fear and made croissant dough. And while the first attempt was messy and took longer than necessary, my first ever batch of croissants was absolutely heavenly.
Since then, I got more comfortable making them, and with practice, making croissants has become more familiar and doable.

I have made these cream cheese croissants and Tartine’s Morning Buns, and it was an absolute delight to have them for breakfast, snack or simply, anytime. Nothing is more rewarding than having freshly baked croissants in your own home that you made yourself.
And now, to add to the delicious lineup, We are making chocolate croissants. While the traditional chocolate croissants or pain au chocolat is made by filling the croissant dough with chocolate batons, these ones we have now is filled with the chocolate goodness of hazelnut spread.
Yes, yes, like Nutella.
As you might expect, this is gonna be a long post. but it is for a good reason. We are going to make croissants and today I am going to show you in a photo heavy post the process of making it.
Before we begin, let’s look at the breakdown of the process of making chocolate croissants:
- Making the Dough
- Making the Block of Butter
- Encasing the Butter In the Dough
- Rolling and Folding of The Dough (4x)
- Assembling of the Pastries
Notes:
- We will fold the dough for a total of four times. In between each fold (except the last one), the dough needs time to chill in the fridge for 1 hour, covered in plastic wrap. This is to avoid the dough from getting too warm and the butter from melting inside.
Chocolate Croissants: The Process
Make the Dough
Warm the milk to 105- 110 F. This temperature of the liquid is the most ideal for the yeast to proof. Combine warm milk, sugar and yeast in the bowl of your stand mixer. Let this stand until thick and foamy, about 5 minutes.
Some bakers skip the waiting time and go ahead with the next process. I would say that is fine, but for a long process like making croissants, it is always a good practice to ensure that your yeast is alive and working.
If the mixture does not foam at all even after waiting longer, discard the mixture and start again.
Add 3 and 3/4 cups of unbleached all-purpose flour and salt to the yeast mixture. Attach the dough hook and mix on low speed for about 7 minutes, until the dough is smooth and soft.
Transfer dough into a clean, floured surface and knead briefly for about two minutes, adding flour a little at a time as necessary. You will only need about 1-3 tablespoons of the flour.
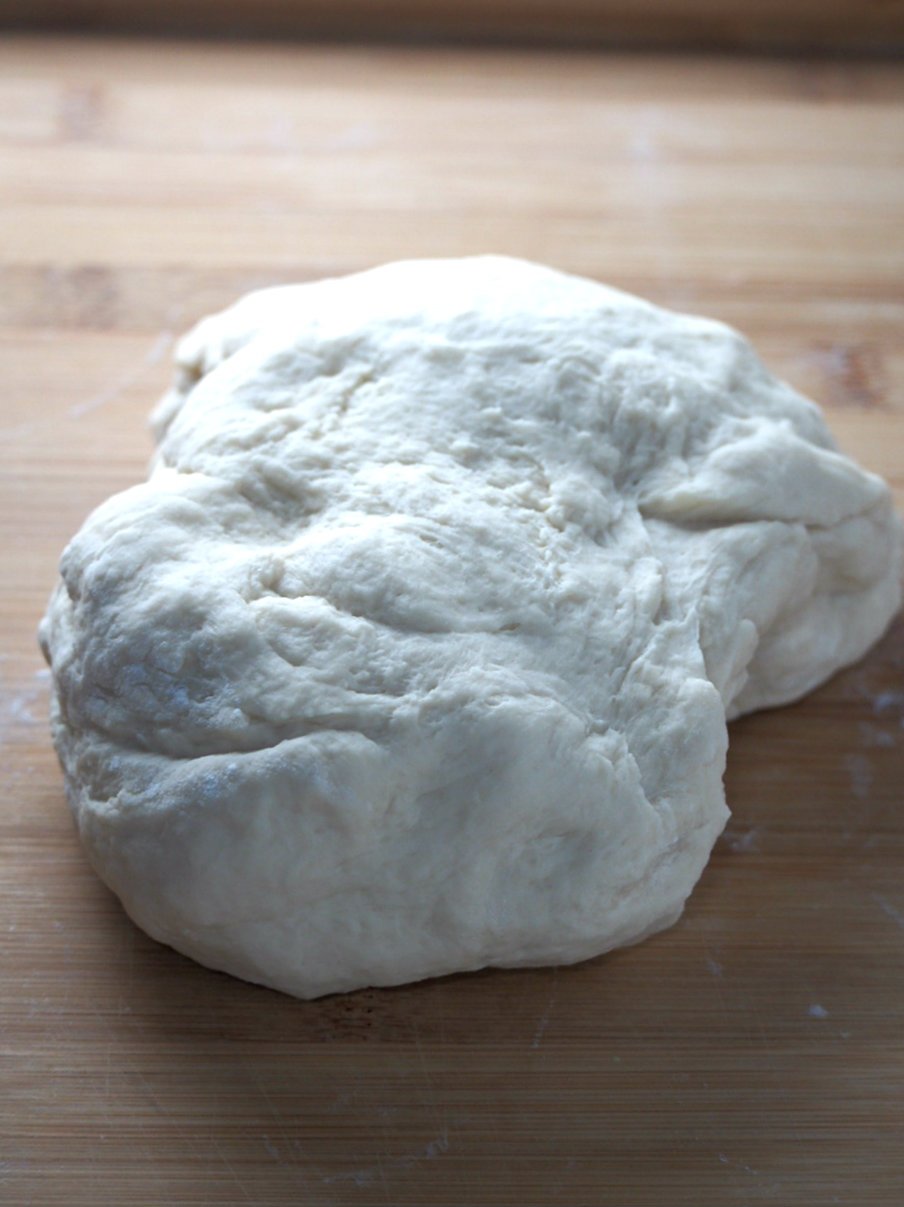
Pat and shape the dough to a 1 and 1/2 inch thick rectangle. Wrap it in plastic and chill in the fridge for 1 hour.
Prepare the Butter Block
- While the dough is in the fridge, prepare the butter. Combine butter in the bowl of a stand mixer.
- Beat butter and flour in the bowl of a stand mixer fitted with paddle attachment until incorporated and smooth.
- Transfer the butter into a large plastic film.
- Wrap it and pat into a 5 inch rectangle that is about 1 inch thick. Make sure to tap and pack it well to release any air pockets. Chill this in the fridge until the dough is ready.

Enclose the Butter Inside the Dough
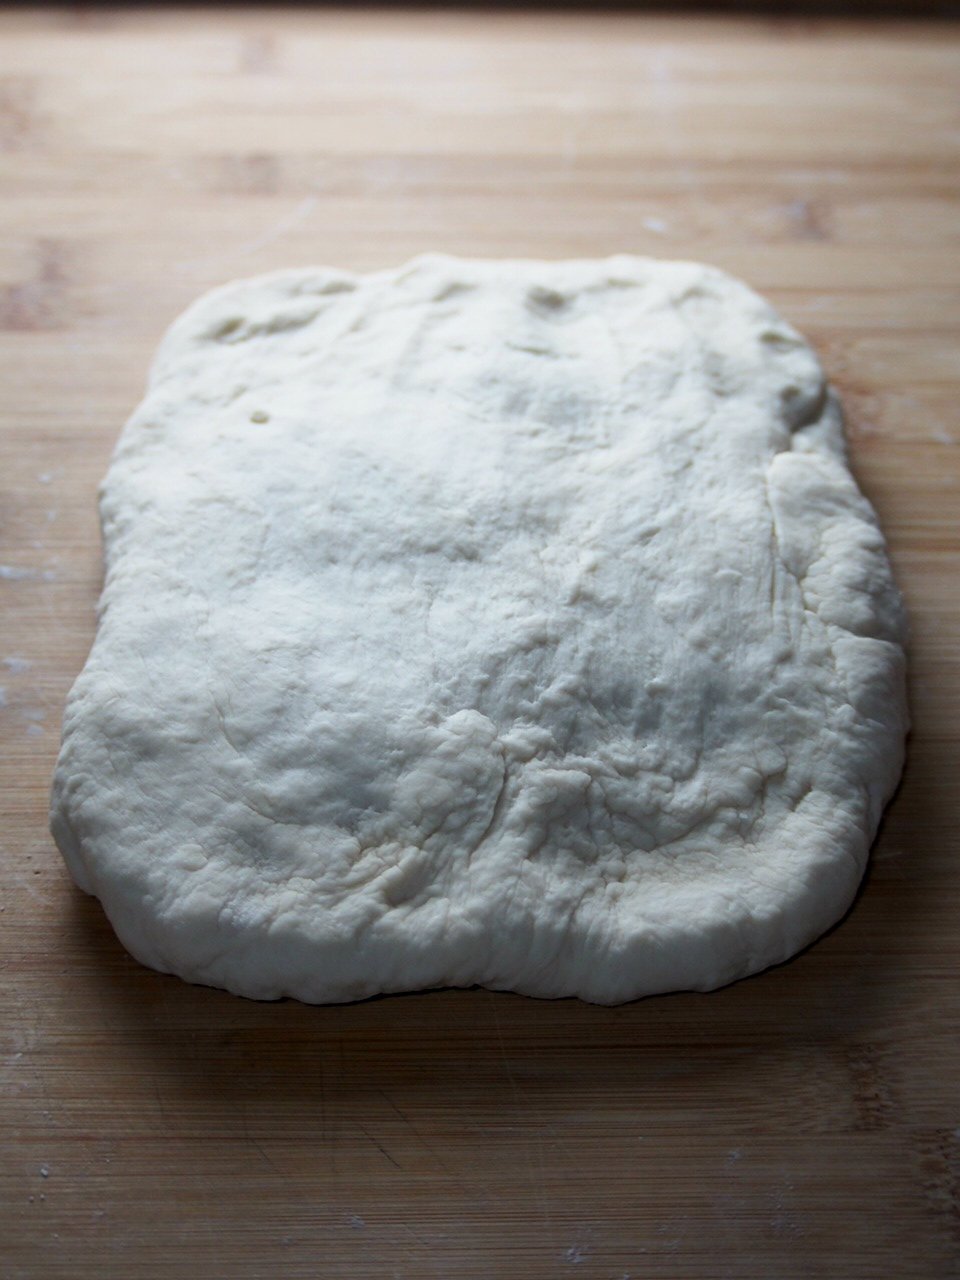
After chilling the dough, unwrap it and roll it into a 16 x 10 inch rectangle. Lay the butter block on the center of the dough. The long side of the butter should be parallel to the short side of the dough.

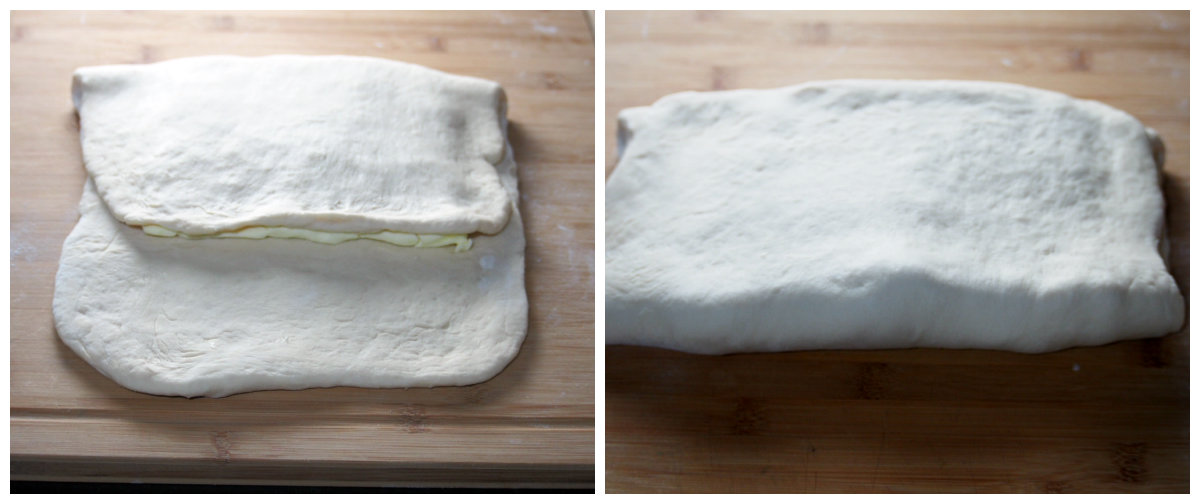
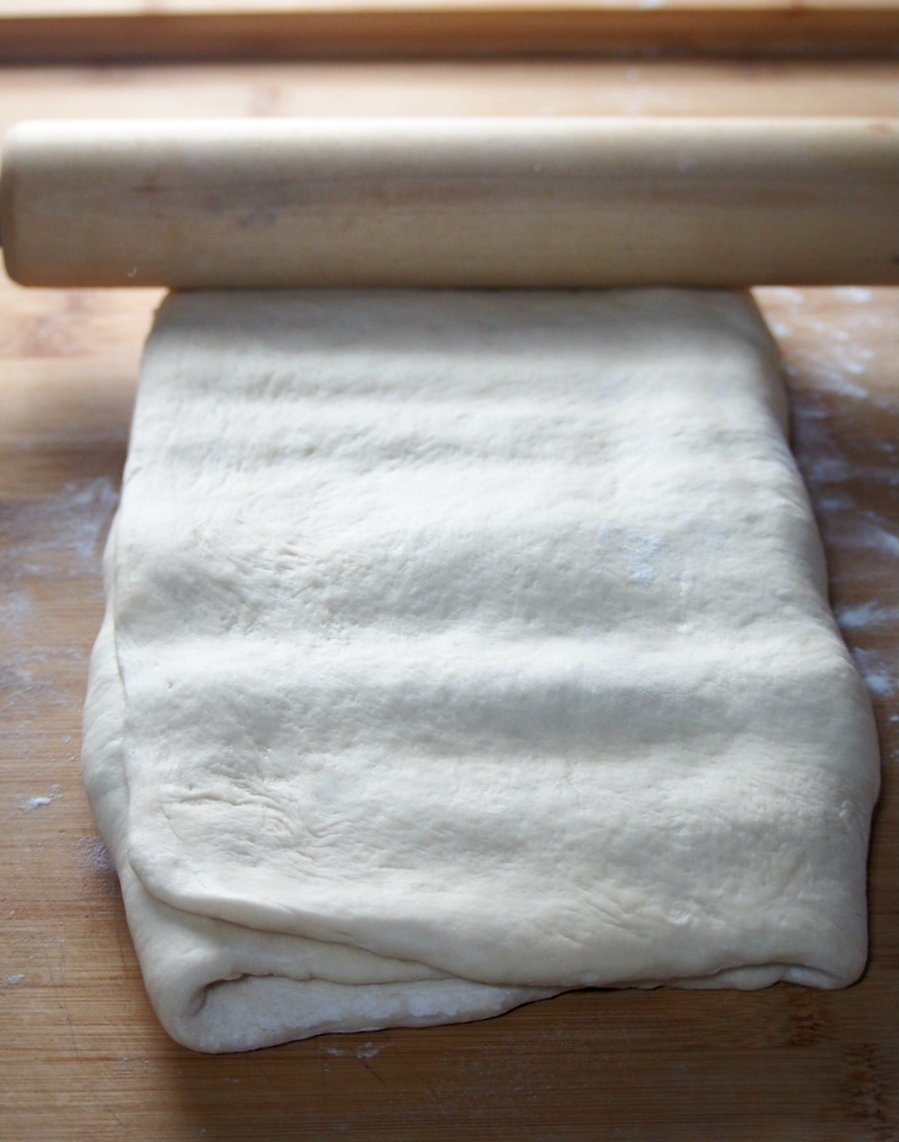
Fold the dough business letter style: fold the upper part over to the center to fully cover the butter. Stretch the dough as necessary to keep the edges straight. Fold the lower part of dough over to the center, fully covering the first flap.
Rolling and Folding of the Dough
Now we begin the rolling and folding. So after the enclosing the butter, turn the dough so that the short side is facing you.
Now we need to make that block of butter inside more flexible for easier rolling. To do that, use a rolling pin and press its body against the entire rectangular dough, making indentions across the surface of the dough. Flour your rolling pin and your working area as necessary.
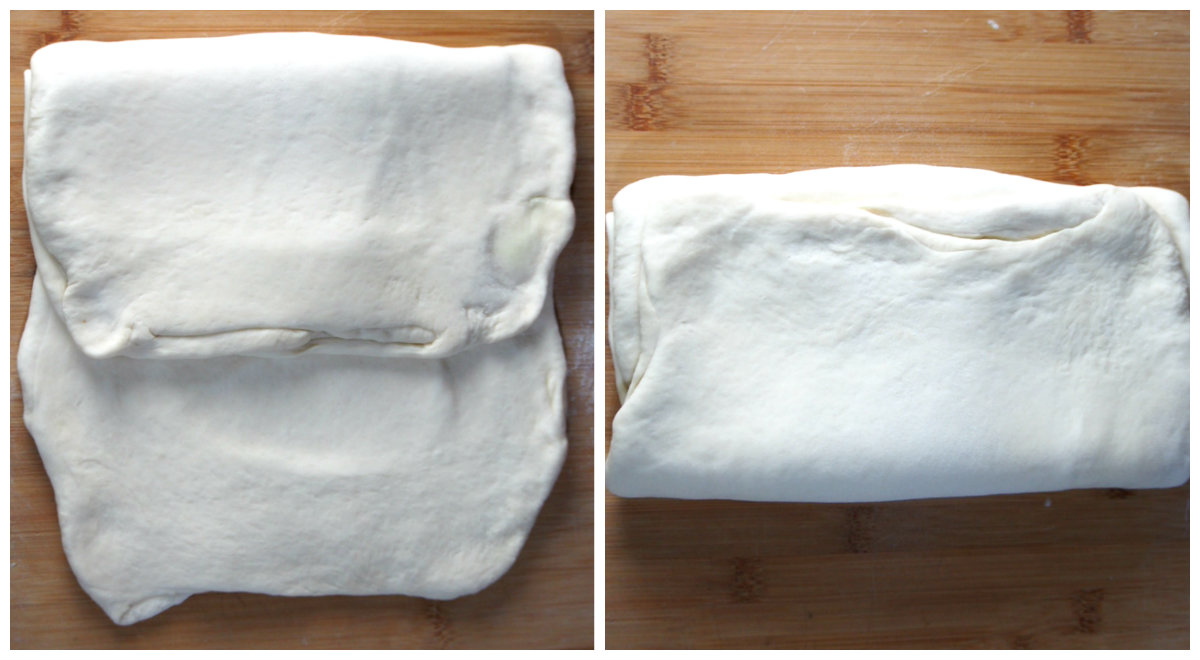
Roll the dough to form a 15 x 10 inch rectangle. Remember to roll to the ends but not over the very edges. You don’t want to seal closed the layers in there.
To keep the rectangle straight, lift the dough and stretch the corners. Now you have a 15 x 10 inch rectangle.

Fold the dough again, business letter style. You now have completed one fold. Chill the dough in the fridge for 1 hour, wrapped in plastic ( You can also freeze for 30 minutes).
Repeat Rolling and Folding Three More Times
We need to repeat this rolling and folding three more times. Again, after chilling the dough, position it so that the short side is facing you. Repeat the process, rolling the dough to a 15 x 10 inch rectangle then folding it business letter style.
After each fold (except the final one), chill the dough in the fridge for 1 hour or freeze for 30 minutes. After the fourth and final fold, refrigerate the dough for at least 8 hours, but not more than 18 hours.
Assemble the Chocolate Croissants
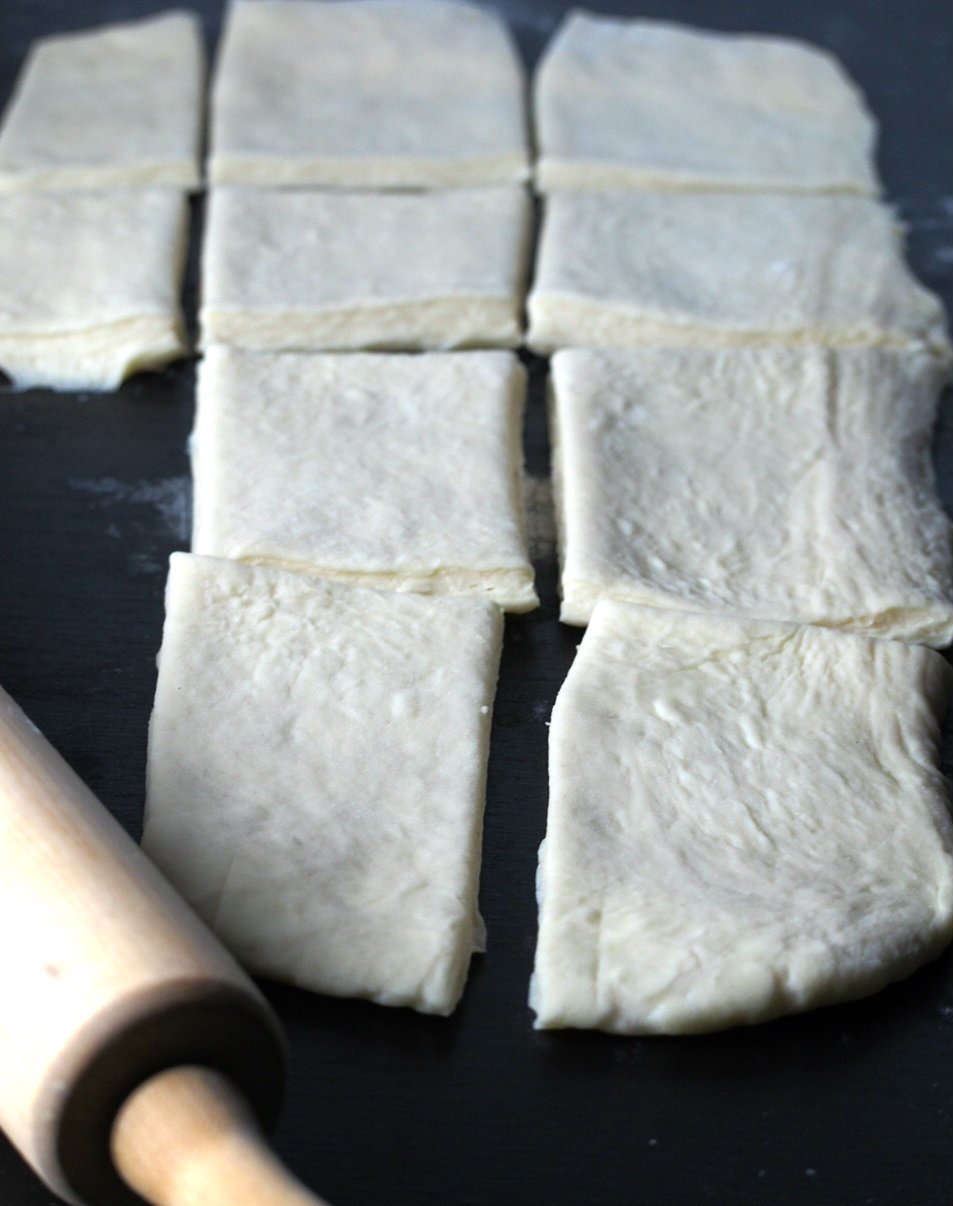
Once you have chilled your croissant dough, roll the other half into a 10 x 18 inch rectangle.
Using a sharp knife or a pizza cutter, cut the dough into 4 sections horizontally, and four sections vertically so that you have 16 small rectangles.
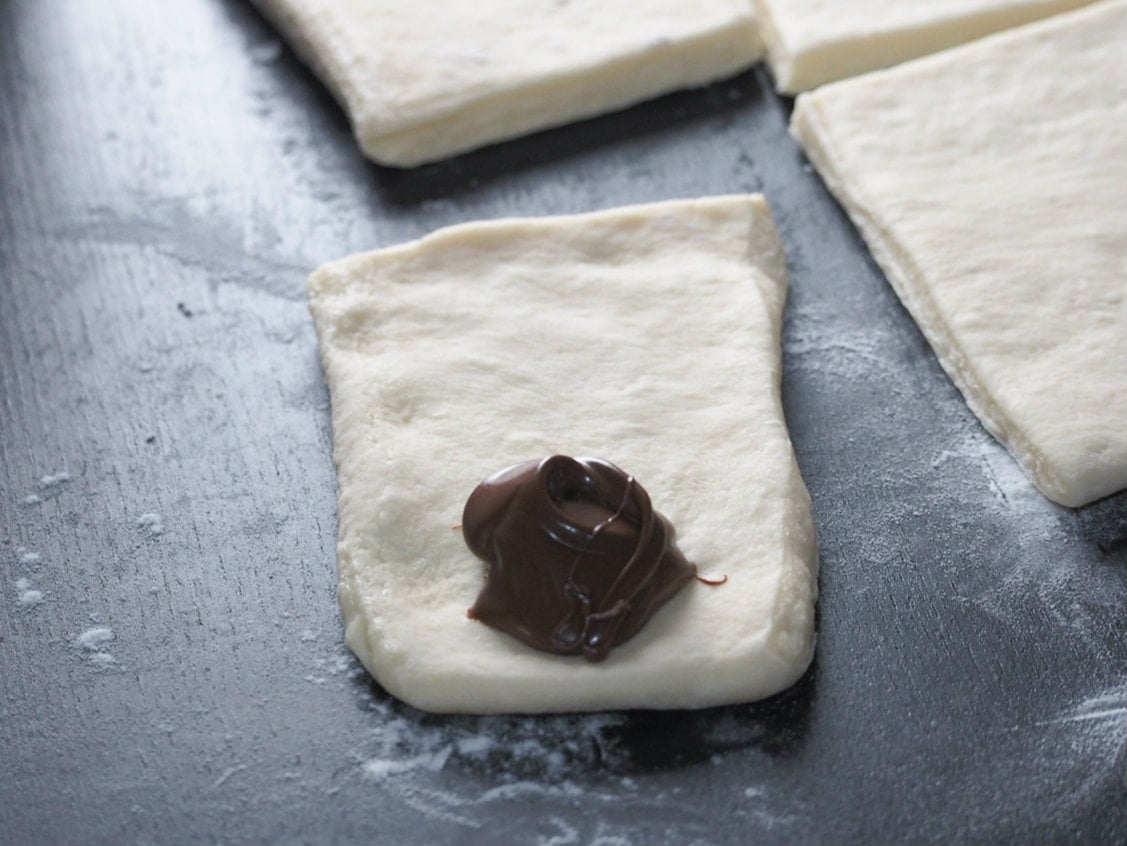
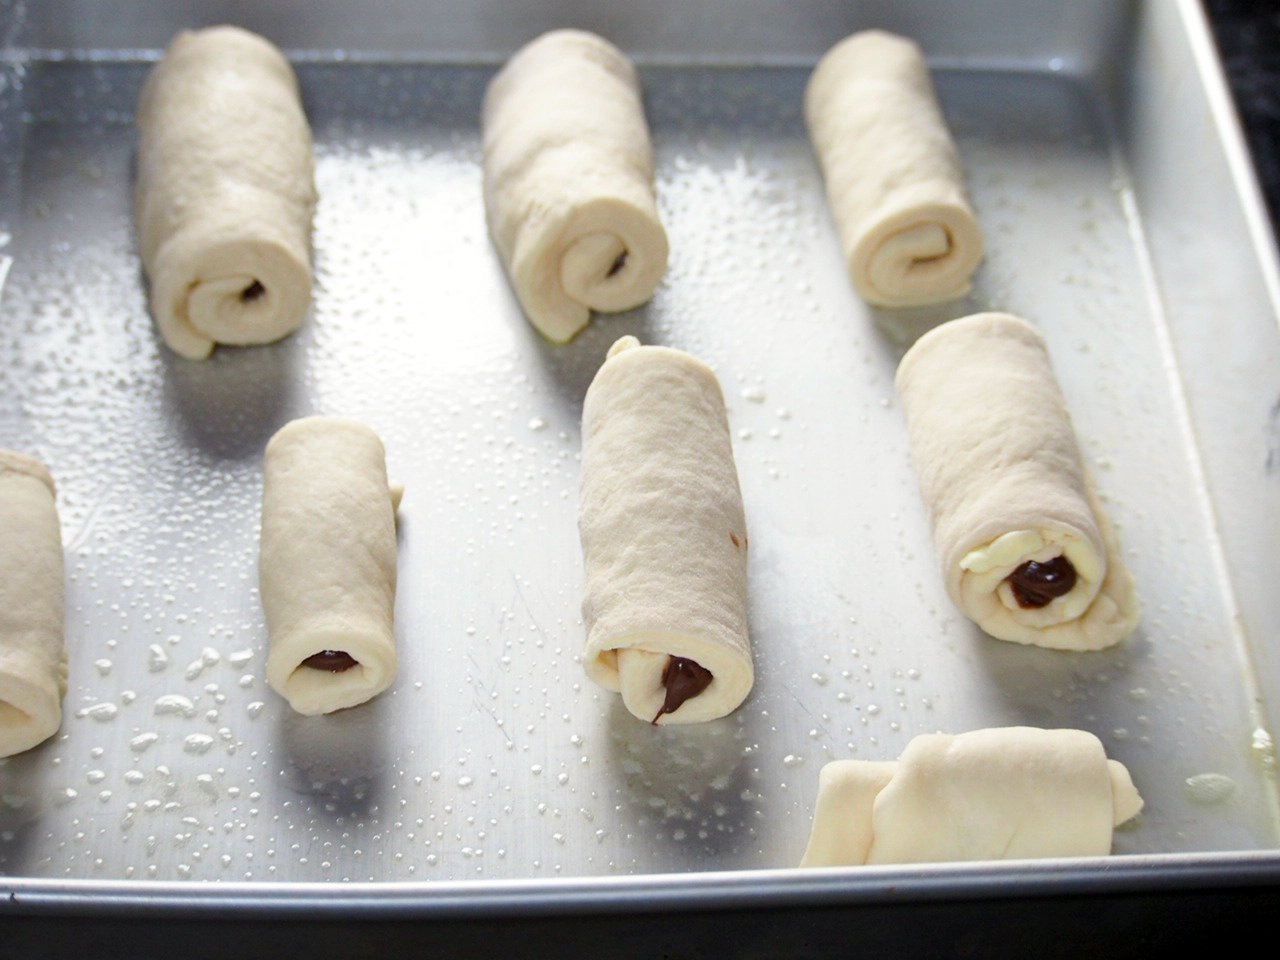
Place about a tablespoon of the chocolate spread on one of the short edges of a rectangle.
To make a tight log, begin rolling the short side of the rectangle while slightly stretching the other end. Continue to roll until you make a tight log.
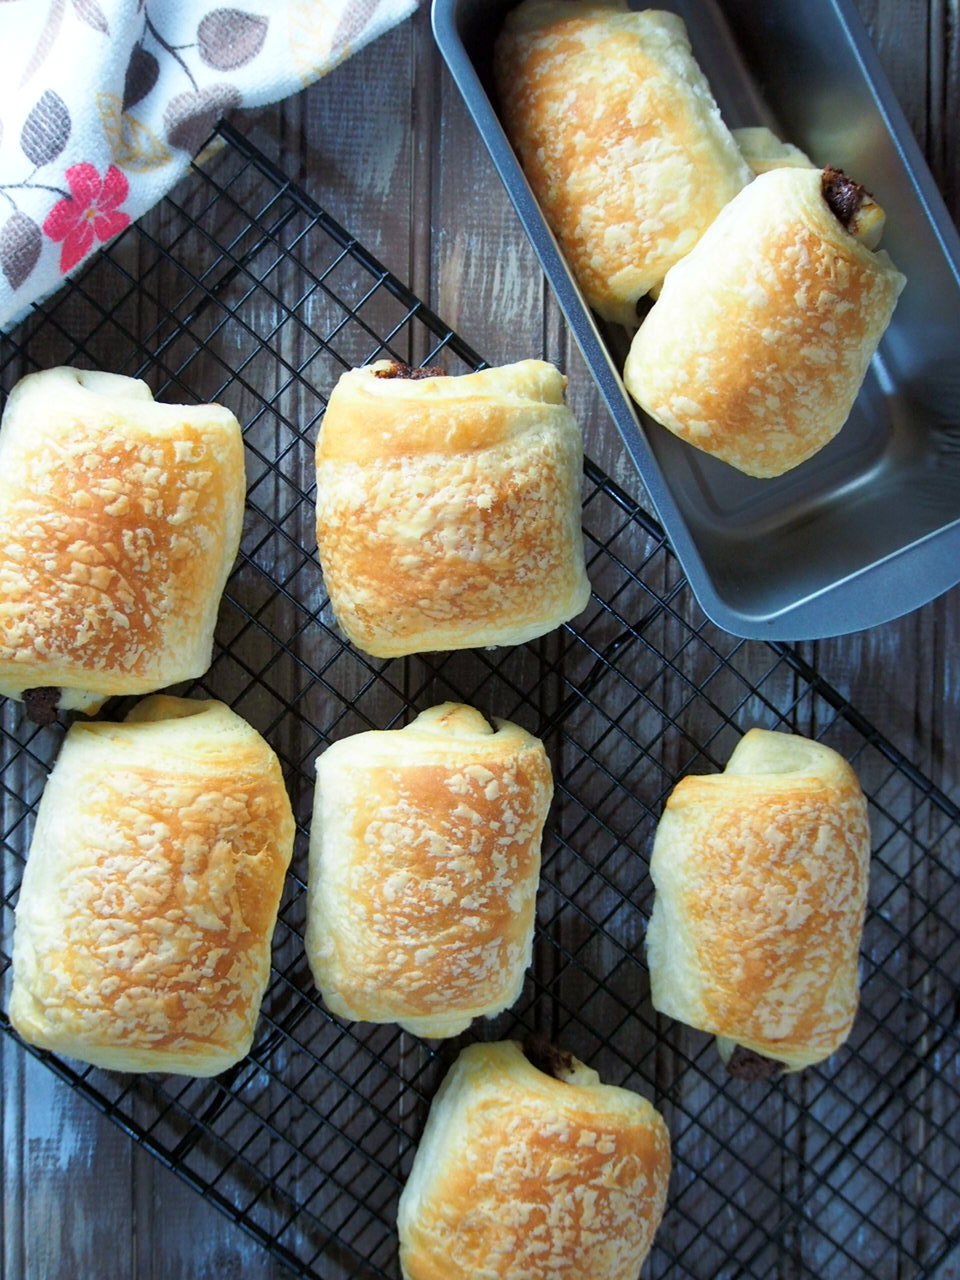
Repeat the process with the rest of the rectangles and place them on a large baking tray. Leave about 2 inches space in between each pastry. You are going to need two trays. Cover the pastries loosely with plastic wrap and let them rise for 2 hours.
Note: Line your baking trays with a double layer of parchment paper to avoid over browning on the bottom of the croissants.
Preheat oven to 425 F. Once the temperature is achieved, use a spray bottle to spritz water generously inside the oven. Close the door briefly then put in the baking trays. Spritz with water once more, then close the door.
Once the trays are inside, immediately lower the temperature to 400 F. Bake the croissants for 8 minutes without opening the oven door.
Then, switch the position of the trays and rotate them 180 degrees. Lower the temperature to 375 F and bake the chocolate croissants for 5-8 more minutes or until the tops are golden.
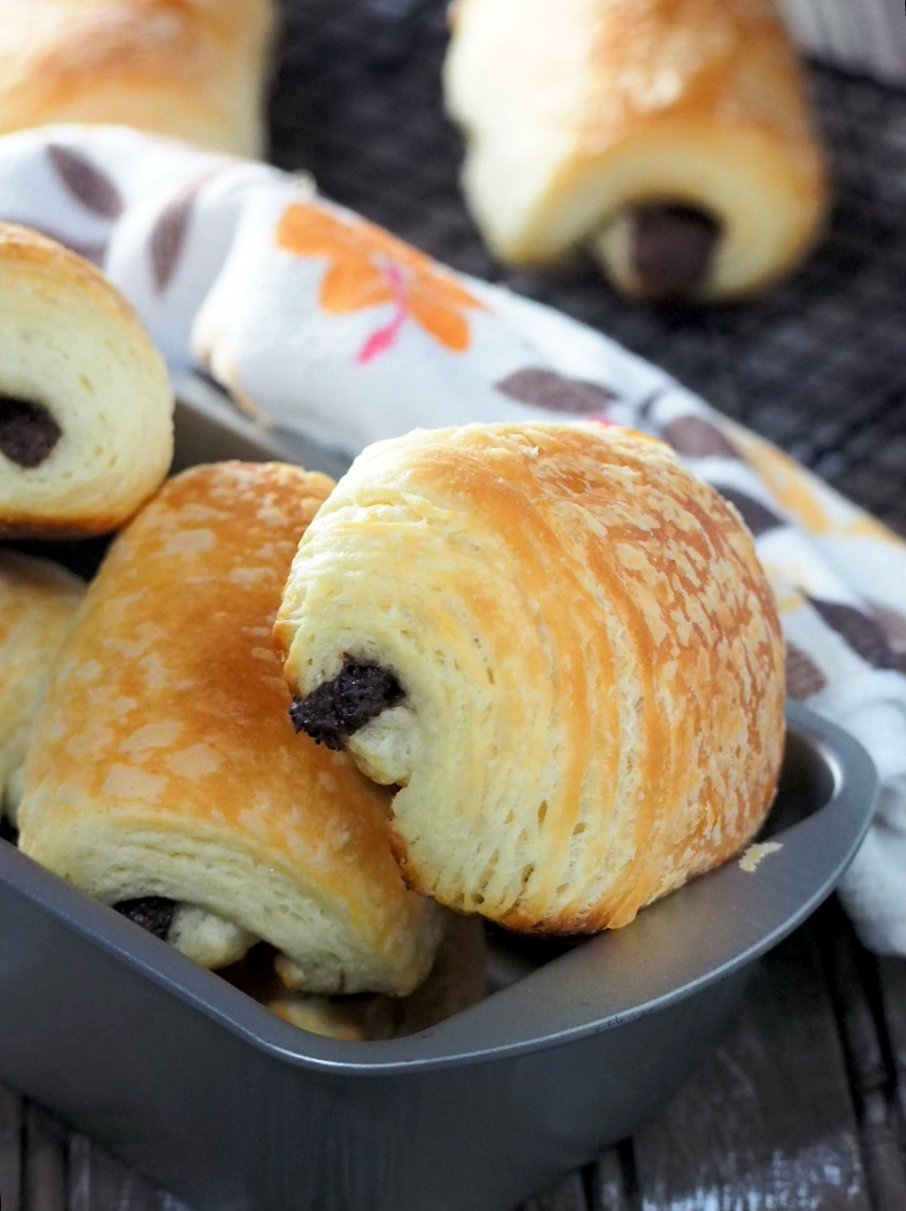
Now, step back and admire your creation. Lastly, devour. you are worth every bite of these warm, fresh from oven chocolate croissants.

Chocolate Croissants
Ingredients
- 1 1/2 cups (1 1/2 cups) whole milk heated to 105°F–110°F
- 1 tablespoon plus 1/4 teaspoon active dry yeast
- 1/4 cup (58.12 g) packed light brown sugar
- 3 ¾ cups (495.32 g) unbleached all-purpose flour
- ½ tablespoon salt
- 3 (340 g) sticks cold unsalted butter 1 1/2 cups
- ¼ cup all-purpose flour
- 1/2 to 3/4 cup Chocolate hazelnut Spread, like Nutella chilled
Instructions
Make dough:
- In the bowl of your stand mixer, stir together warm milk, brown sugar, and yeast. Let mixture stand for about 5 minutes until foamy and thick . If it doesn’t foam, discard and start over. Add 3 3/4 cups flour and salt and using the dough hook attachment, mix on low for about 7 minutes, until dough is soft and smooth.
- Transfer dough to a work surface and briefly knead by hand for about 2 minutes. Add flour, a little at a time as needed to make a soft, slightly sticky dough. Once your dough is smooth and not to sticky, you have needed enough. You only need to use about 1-3 tablespoon of flour. You can use the rest during rolling and folding. Pat and shape dough into a roughly 1 1/2-inch-thick rectangle, wrap in plastic and chill in the fridge for 1 hour.
Prepare and shape butter:
- While the dough is in the fridge, prepare the butter. Combine butter and flour in the bowl of a stand mixer. Beat butter and flour with paddle attachment until incorporated and creamy.
- Transfer the butter into a large plastic film.Wrap it and pat into a 5 inch rectangle that is about 1 inch thick. Make sure to tap and pack it well to release any air pockets. Chill this in the fridge until the dough is ready.
Enclose the Butter
- After the dough has chilled, unwrap it and transfer onto a clean, floured surface. Roll the dough into a 16 x 10 inches rectangle. Flour your surface and rolling pin as needed. Lift the dough often and stretch the corners to maintain the rectangular shape. Unwrap the butter by gently peeling off the towels and place on the center of the dough. The long side of the butter should be parallel to the short side of the dough. Fold the bottom part of the dough over the butter, then fold the upper part of the dough over it, fully enclosing the butter inside the dough. This is called the business letter style fold.
Roll and Fold the Dough
- Turn dough so a short side is facing you. Make impressions on the surface of the dough by pressing the body of the rolling pin against the dough. Repeat until dough is flattened. Roll the dough into a 15 x 10 inch rectangle. When you roll, make sure to roll to the ends but not over the very edges, so as not to seal the layers in there.
- Brush off any excess flour. Fold dough, business letter style: bottom third over the butter and upper third over it, stretching the corners to maintain the sharp edges. This is your first fold. Wrap dough in plastic and chill in the fridge for 1 hour, or freeze for 30 minutes.
Repeat the Rolling and Folding
- Repeat the rolling and folding three more times: After chilling, unwrap dough and roll in the same manner with the short side facing you. Fold in business letter style and chill. After the final fold, refrigerate the dough for at least 8 hours but not more than 18 hours.
Assemble the Chocolate Croissants
- Divide the chilled dough into two. In a lightly floured surface, roll the croissant dough into an 18 x 10 inch rectangle. Dust off flour from the dough. Using a sharp knife or a pizza cutter, cut the dough into 5 sections horizontally, and 2 sections vertically to form 10 rectangles.
- Spoon about a tablespoon of chocolate hazelnut spread on one of the short edge of a rectangle. Stretch the dough briefly, then fold the dough over the filling. Roll it to form a tight log while keeping the dough taut and stretched using the other hand. Place each rolled dough on a large baking tray that is lined with two layers of parchment paper. Repeat process with the rest of the dough. Position the rolls two inches apart from each other. You may need two trays. Cover the dough loosely with plastic wrap and let rise for 2 to 2 1/2 hours. Repeat the process with the other half of dough.
- Preheat oven to 425 F. using a spray bottle, spritz water generously on the inside of the oven and close the door briefly. Place the croissant trays inside the oven and spritz with water once more before closing the oven door. Lower the temperature to 400 F and bake the croissants for 8 minutes without opening the door.
- After 8 minutes, switch the position of the baking trays and rotate them 180 degrees. Lower heat to 375 F. Bake for another 5-8 minutes or until the pastries are golden.
Notes
- Dough recipe from Epicurious.
- You can also use a quality bar of dark or milk chocolate to fill the croissants. I put 3-4 squares in each portion, then roll as directed.


This recipe looks and sounds fantastic!
I have a dumb question though… when you say to spritz twice, does it mean that the water can land on the croissants?
Hello,Linet! Yes, the water mist may land on the croissants, but don’t spray directly towards them.:) Good luck and I hope you love them.
I’ve made croissants a few times and others do not realize how easy this dough is to handle. Thank you for sharing this.
Btw, you should rename your site to ORGAZMIC CARBS. Just a thought. 🙂
You are welcome and always my pleasure, Jean! ORGAZMIC CARBS!I love the site name idea 🙂
I made Homemade Croissant before and I swore I would never make them again because the process is too long. These look amazing and has me seriously reconsidering.
YOu should, you should … 🙂
Oh wow…you wrked s hard on this recipe. Labor of love – truly. Thanks for sharing. I bet these were delicious
They were amazing! 🙂
Your croissants look amazing and you make it look so easy with your detailed instructions. I definitely want to try it.
Hi Michelle, You will love them!
Thanks for the detailed instruction. We love croissants but never tried making it at home. Can’t wait to give your recipe a try!
Good luck! You will love these!
Love how you show every step of making these chocolate croissants from scratch. Can’t wait to make these!
Thank you for such detailed instructions.
I had never made a croissant dough before, it took time but it was really worth it, so buttery and flaky.
My whole family loved these 😀
Oh, my goodness. Those look amazingly flaky. As much as I’d love to do these homemade, I don’t think I have the patience for this!
Making my own puff pastry has been on my agenda for so long! I should really finally give it a try! The look of these flaky and buttery chocolate croissants might give me the final push I needed! They look PERFECT!
Thank you! I hope you enjoy them! They are amazing.
I still have never had a chocolate croissant, which is CRAZY, haha. I always see them and want them! This recipe looks so delicious and I’d love to make my own. My hubs would love them, too!
You will love chocolate croissants! Heavenly!
I really appreciate that you listed step-by-step instructions for how to prepare the dough and combine with butter. This is such an involved step and you made it look super easy!
Thank you! It is totally worth it!
I’m so glad I came across this. I’ve always been looking for a recipe that explained the procedure of making that dough so beautifully. Love the detailed step by step procedure. Thank you. I’m going to keep you posted on how it turns out when I bake some of these.
Good luck! These are heavenly. You will love them.
I love o bake and one day, I promised myself, I will make croissants. Thanks for the step by step instructions. Really helpful! I cannot imagine waking up to the wonderful smell of croissants baking in the oven…:-)
One of my favorite aroma in the world.:)
Holy cow. These look perfect. I have always wanted to try making these because they are my favorite indulgence. I am definitely going to try your recipe when this heat wave breaks!
Thank you and good luck! These are amazing!
Love the detailed instructions! I’ve always wanted to make croissants but the whole process intimidates me. You make it look so easy! Thanks for the recipe.