
How To Make Croissants
Want to learn How to Make Croissants? This a complete guide to make this beautiful, buttery and flaky pastry. With step by step photos, and guided instructions, this will walk you through and help you how to make delicious croissants at home!

I have put aside making croissants for a looong time. But once I gathered the courage to make it at home, I was hooked! There is something so elating about making these buttery pastries at home that gives me so much satisfaction.
The time I have finally decided that I can’t live another day and not make croissants at home was truly one worth remembering. Homemade Chocolate Croissants? Oh Yes!
The big question is How to Make Croissants? Well…croissant dough can be very intimidating, yes? So I will not lie, this is a long post with loads of photos.
But all you need is time, a little bit of muscle strength, and patience plus make sure to read through this post and take note of the guidelines, and you are guaranteed to make this beautiful pastry at home.


The Perfect Croissant Recipe
- I have come face to face with lots of croissants recipe. After countless times of studying recipes one after another, staring at them and then blinking my eyes at the long, laborious process. I have finally settled on one recipe to start.
- I have seen croissant recipes that use a starter. I have seen some using fresh yeast. I have seen some using a combination of flours. This Croissant recipe wins over them because it is simpler and straightforward. It is a perfect fit for me.
How to Make Croissants: An Overview
- Making the Dough
- Making the Butter Block
- Enclosing the Butter in the Dough
- A Series of Folding and Rolling ( 4 Times)
- The Double Fold and Long Chill
- Shaping the Croissants
- Resting and Baking
Important Pointers and Tips for Success
- Adequate Dusting of Flour to Prevent Sticking During Rolling Out. Making croissants is a series of rolling out the dough and folding it into a neat package (you will see below). Make sure the surface for rolling the dough is adequately dusted with flour to prevent sticking. It helps to lightly dust the top of the dough too during rolling.
- Cracking of Dough. You will fold the rectangular dough 4 times in this process, with chilling time in between. Between second and fourth fold, you may see the dough is starting to have some cracks or peeling. This is normal because the yeast is doing it’s work. To fix this, simply patch the teared area with flour. Brush any excess flour in the dough before folding and chilling.
- Resting the Dough for Easier Rolling. If anytime during rolling you feel the dough is retracting or getting harder to roll, simply leave it alone for about 5 minutes to let it rest. Once it is rested, it will be easier to roll it out. If it is too hot here you are, allow the dough to rest in the fridge, covered well.
- Keeping the Dough and Butter Cold. If at anytime during rolling, the dough starts to feel warm, wrap it in plastic film and give it a quick chill in the freezer for 10-15 minutes.
- Freezing the Dough to Continue the Process at a Later Time. If you are short on time, you can freeze the dough at any point after every fold. To continue, thaw the dough in the fridge and then carry on with the instructions.
Let’s Make Croissants!
Make the Dough
- In the bowl of a stand mixer, combine warm milk, yeast and the brown sugar. Let this sit for about 5 minutes, until the mixture is thick and foamy.
- Combine 3 ¾ cup of flour and salt. Attach the dough hook to the mixer. Gradually add the flour mixture in three additions to the yeast mixture, beating at low speed after each addition,
- Then slowly speed up to fully incorporate the flour. At this point, if the dough is separating into long, dry and powdery chunks, drizzle about 1-2 tbsp. of milk, then mix until the dough comes together. If your dough is coming together well, there is no need to add extra milk.
- Continue to run the mixer until the dough is smooth and cleans the sides of the bowl.
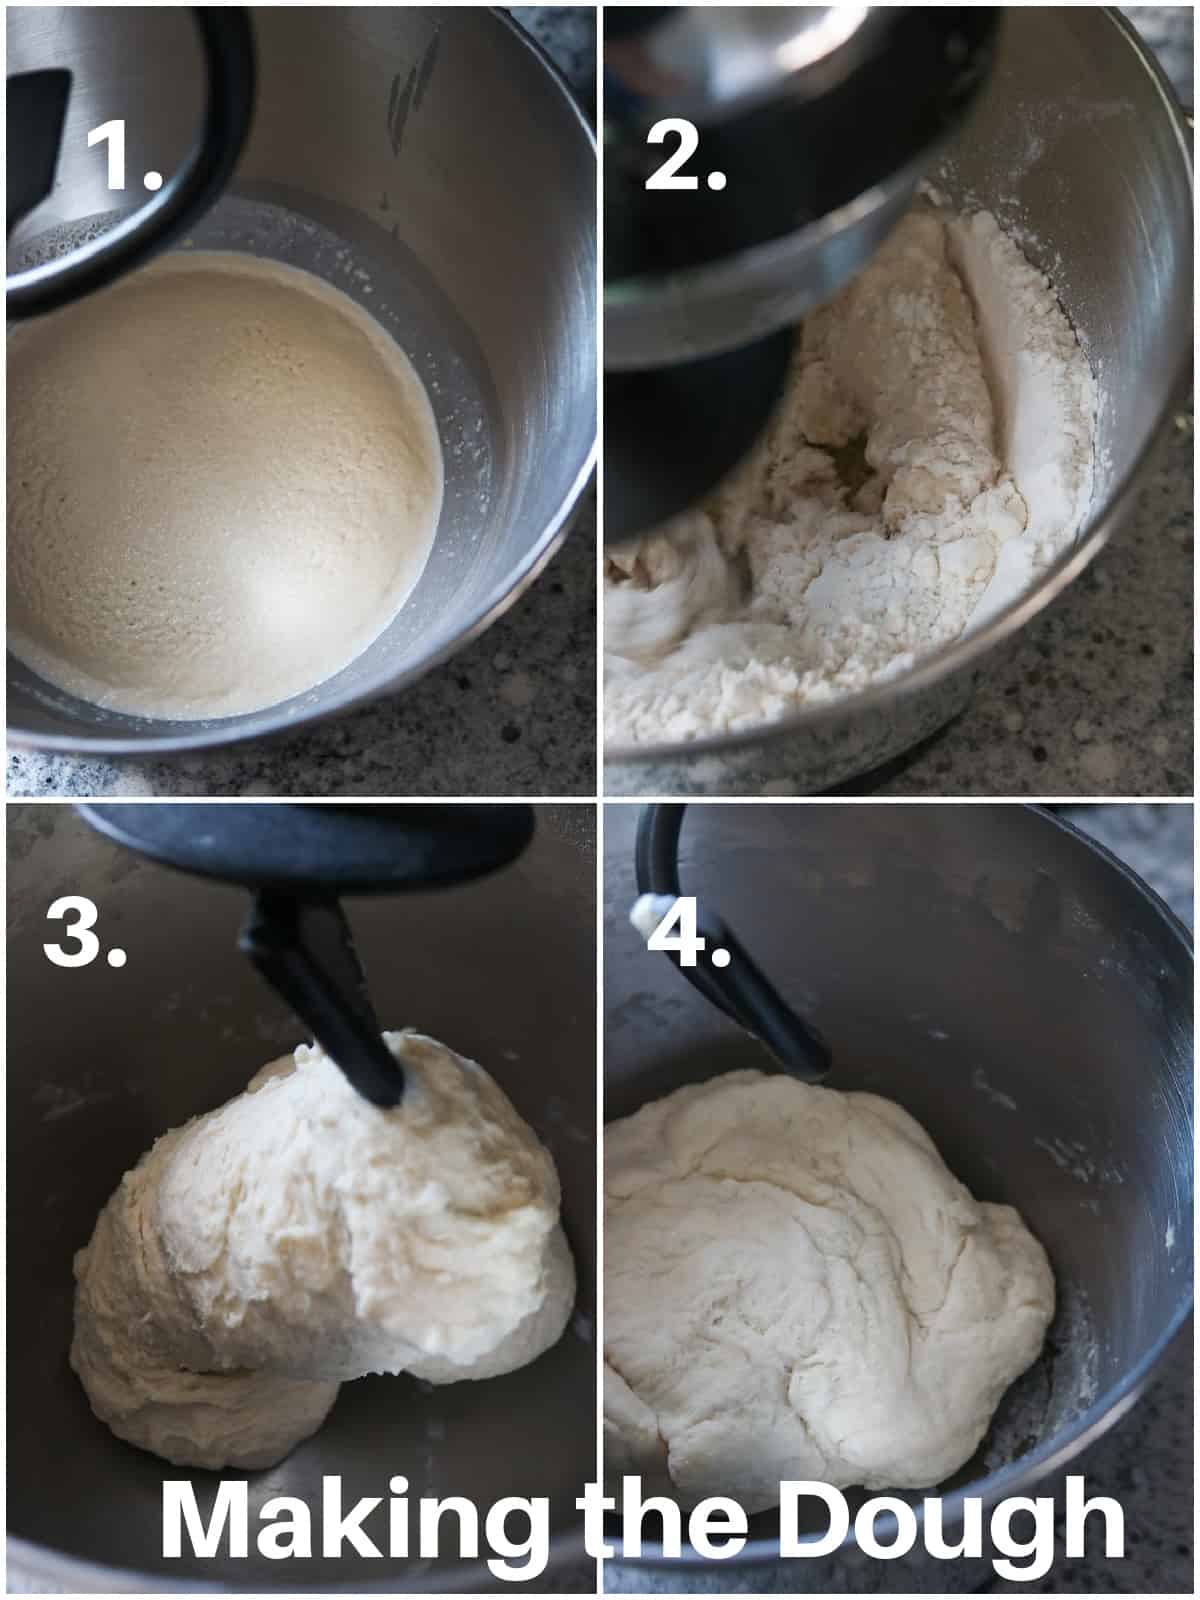
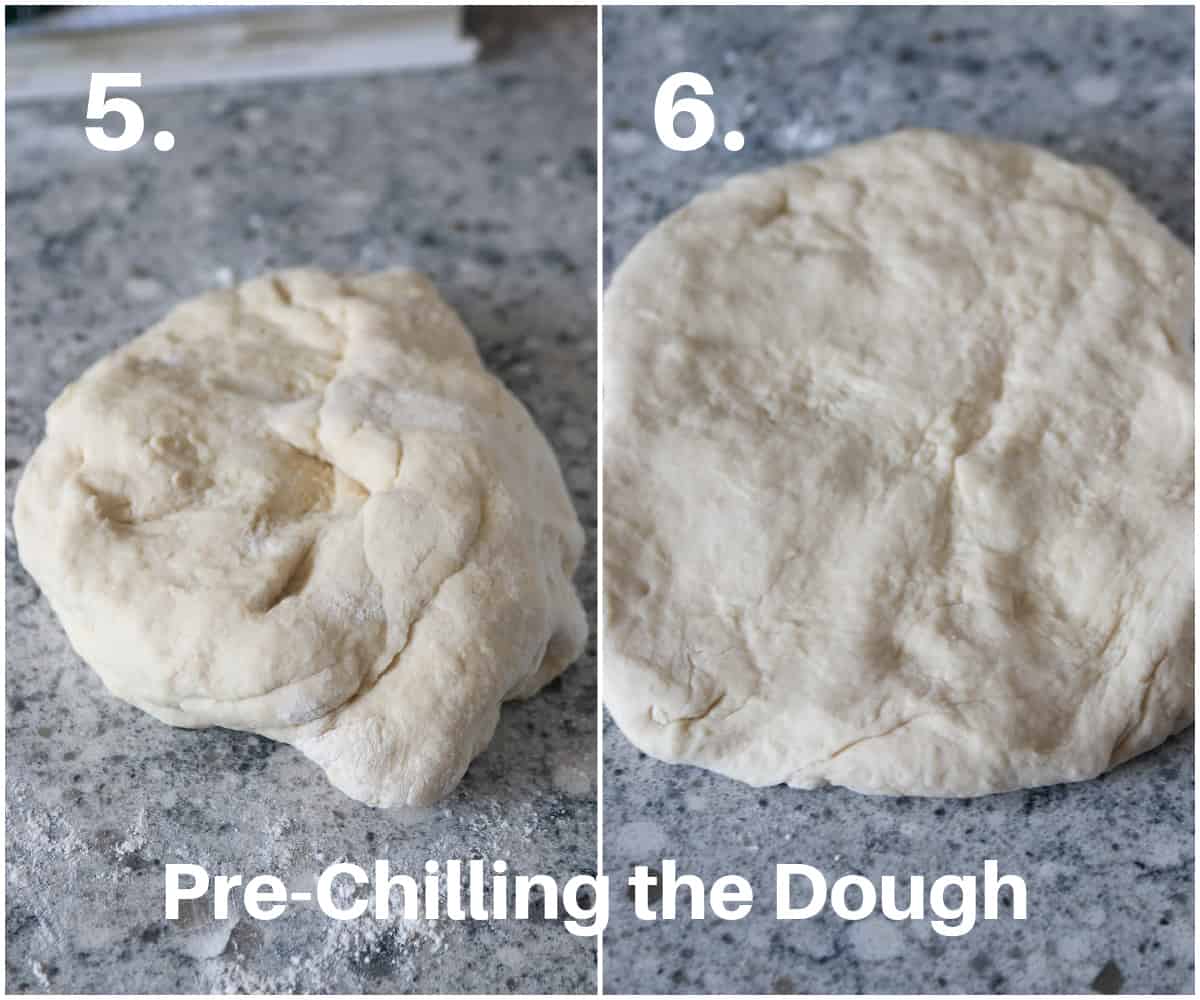
- Turn the dough over into a clean surface, and knead briefly.
- Pat it into a 1 ½ inch thick rectangle. Wrap it in plastic film and chill for 1 hour.
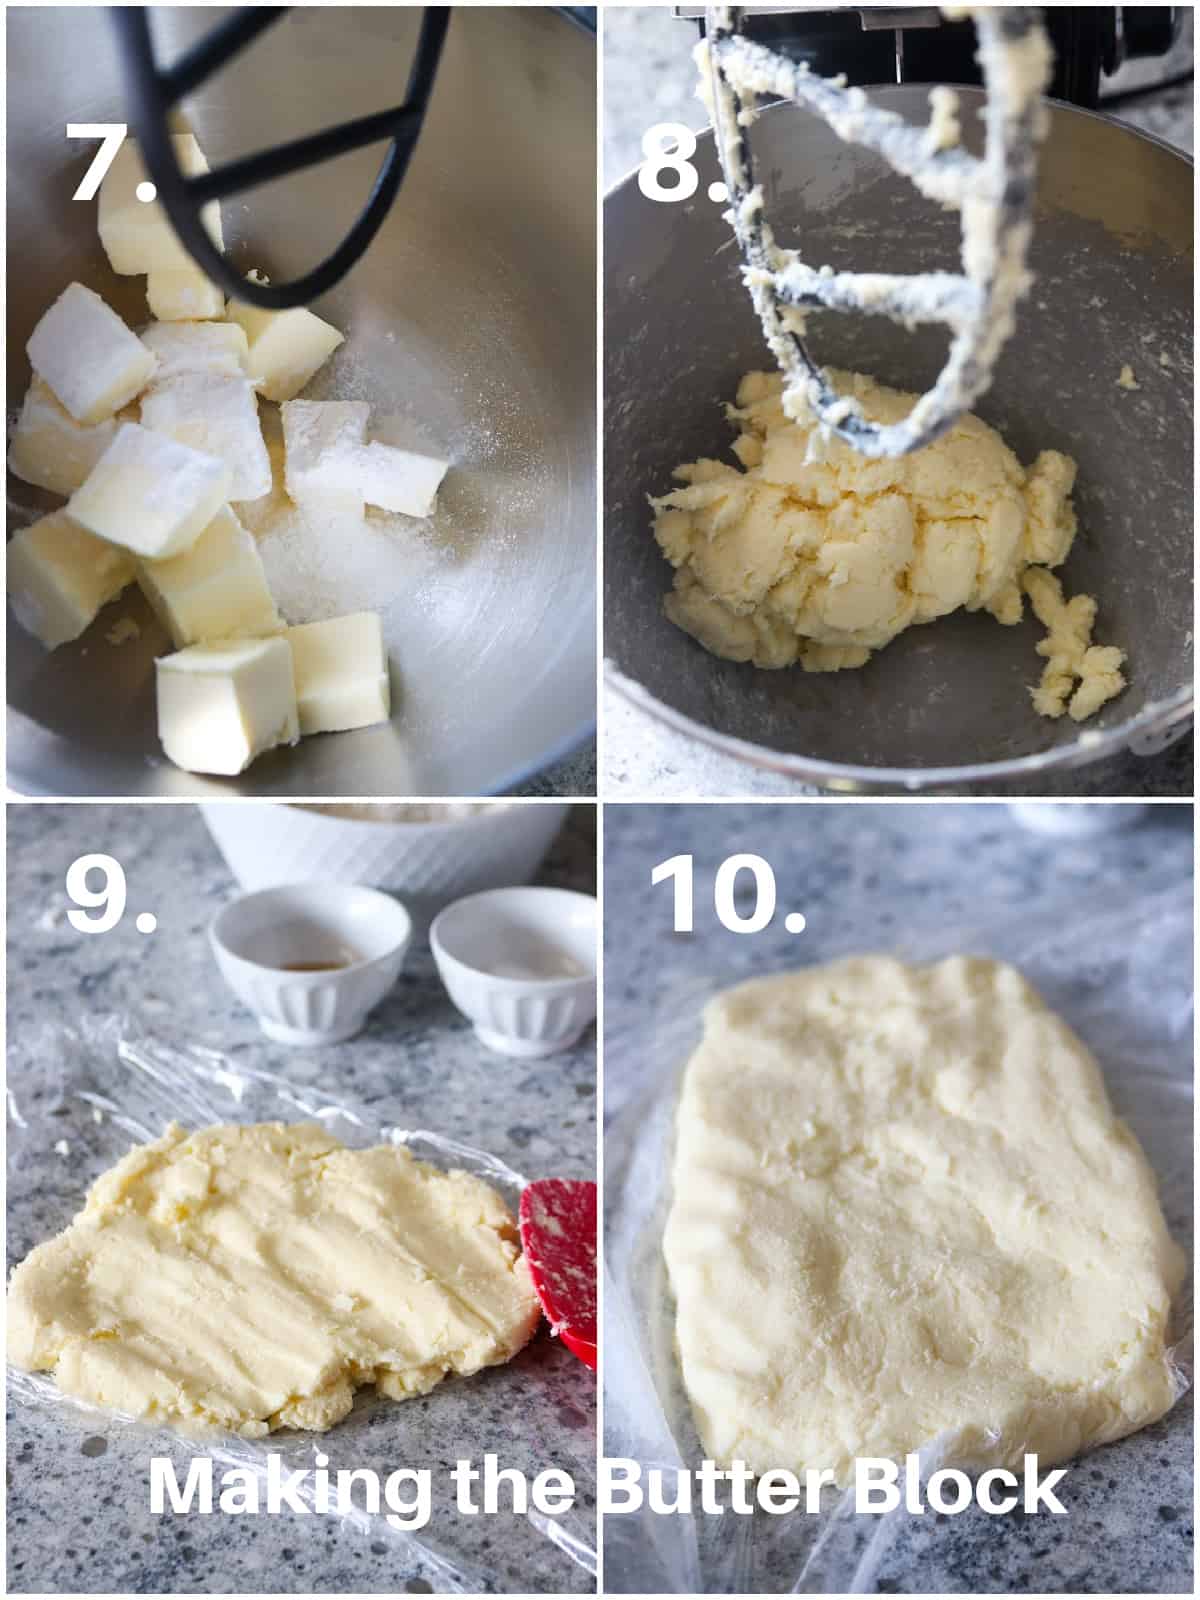
Prepare the Butter Block
- While the dough is in the fridge, prepare the butter. Combine butter in the bowl of a stand mixer.
- Beat butter and flour in the bowl of a stand mixer fitted with paddle attachment until incorporated and smooth.
- Transfer the butter into a large plastic film.
- Wrap it and pat into a 5 inch rectangle that is about 1 inch thick. Make sure to tap and pack it well to release any air pockets. Chill this in the fridge until the dough is ready.
Enclose the Butter Block Inside the Dough
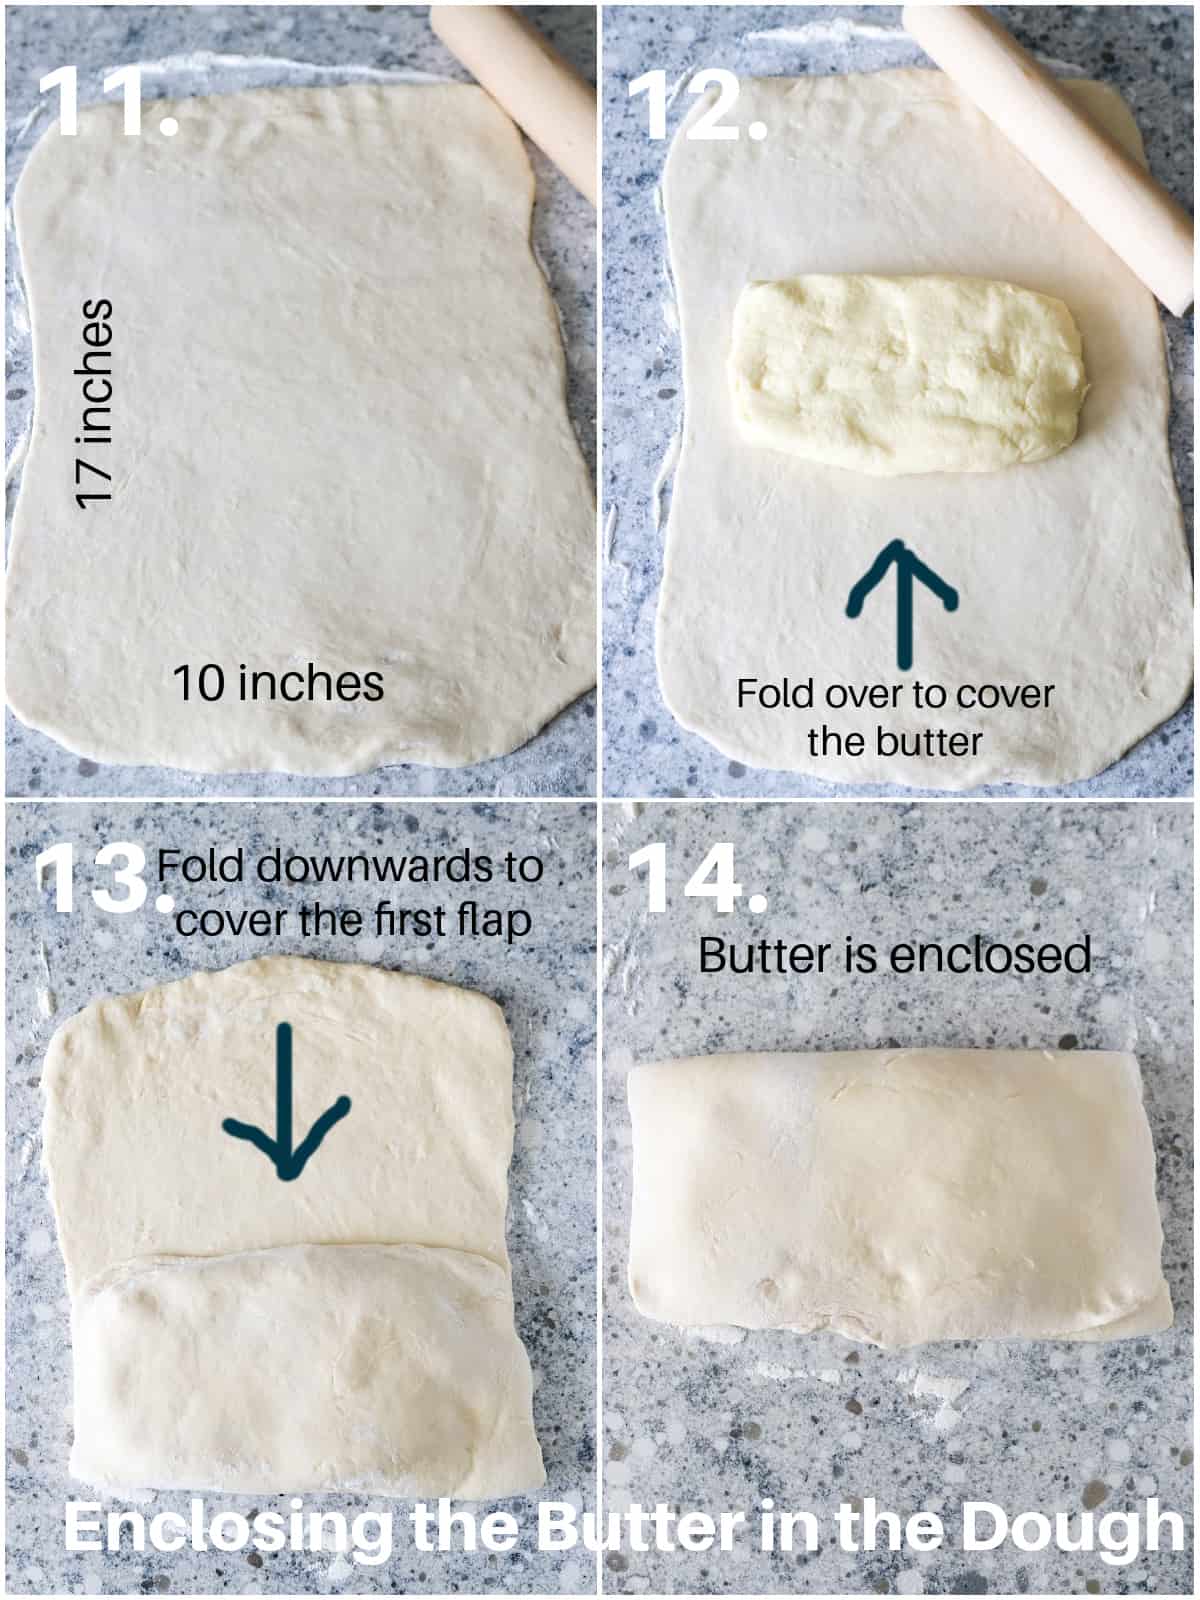
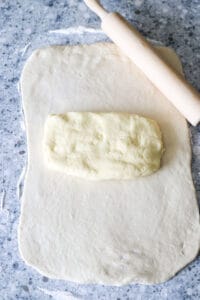
- After chilling the dough, unwrap it and roll it into a 17 x 10 inch rectangle.
- Lay the butter block on the center of the dough. The long edge of the butter should be parallel to the short edge of the dough.
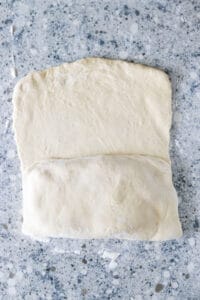
- Fold the dough business letter style: Fold the bottom part over to the center to fully cover the butter. Stretch the dough as necessary to keep the edges straight.
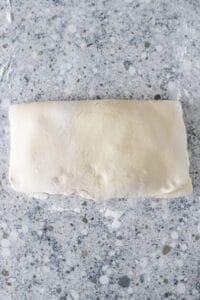
- Fold the upper part of dough over to the center, fully covering the first flap. The butter is now enclosed in the dough. Brush any excess flour from the dough. if the dough has gotten warm at this point. Wrap it in plastic film, place it in a baking pan and chill it in the fridge for 30 minutes. Otherwise, let’s move on to the Rolling and Folding part.
Folding and Rolling the Dough ( 4x)
The First Fold
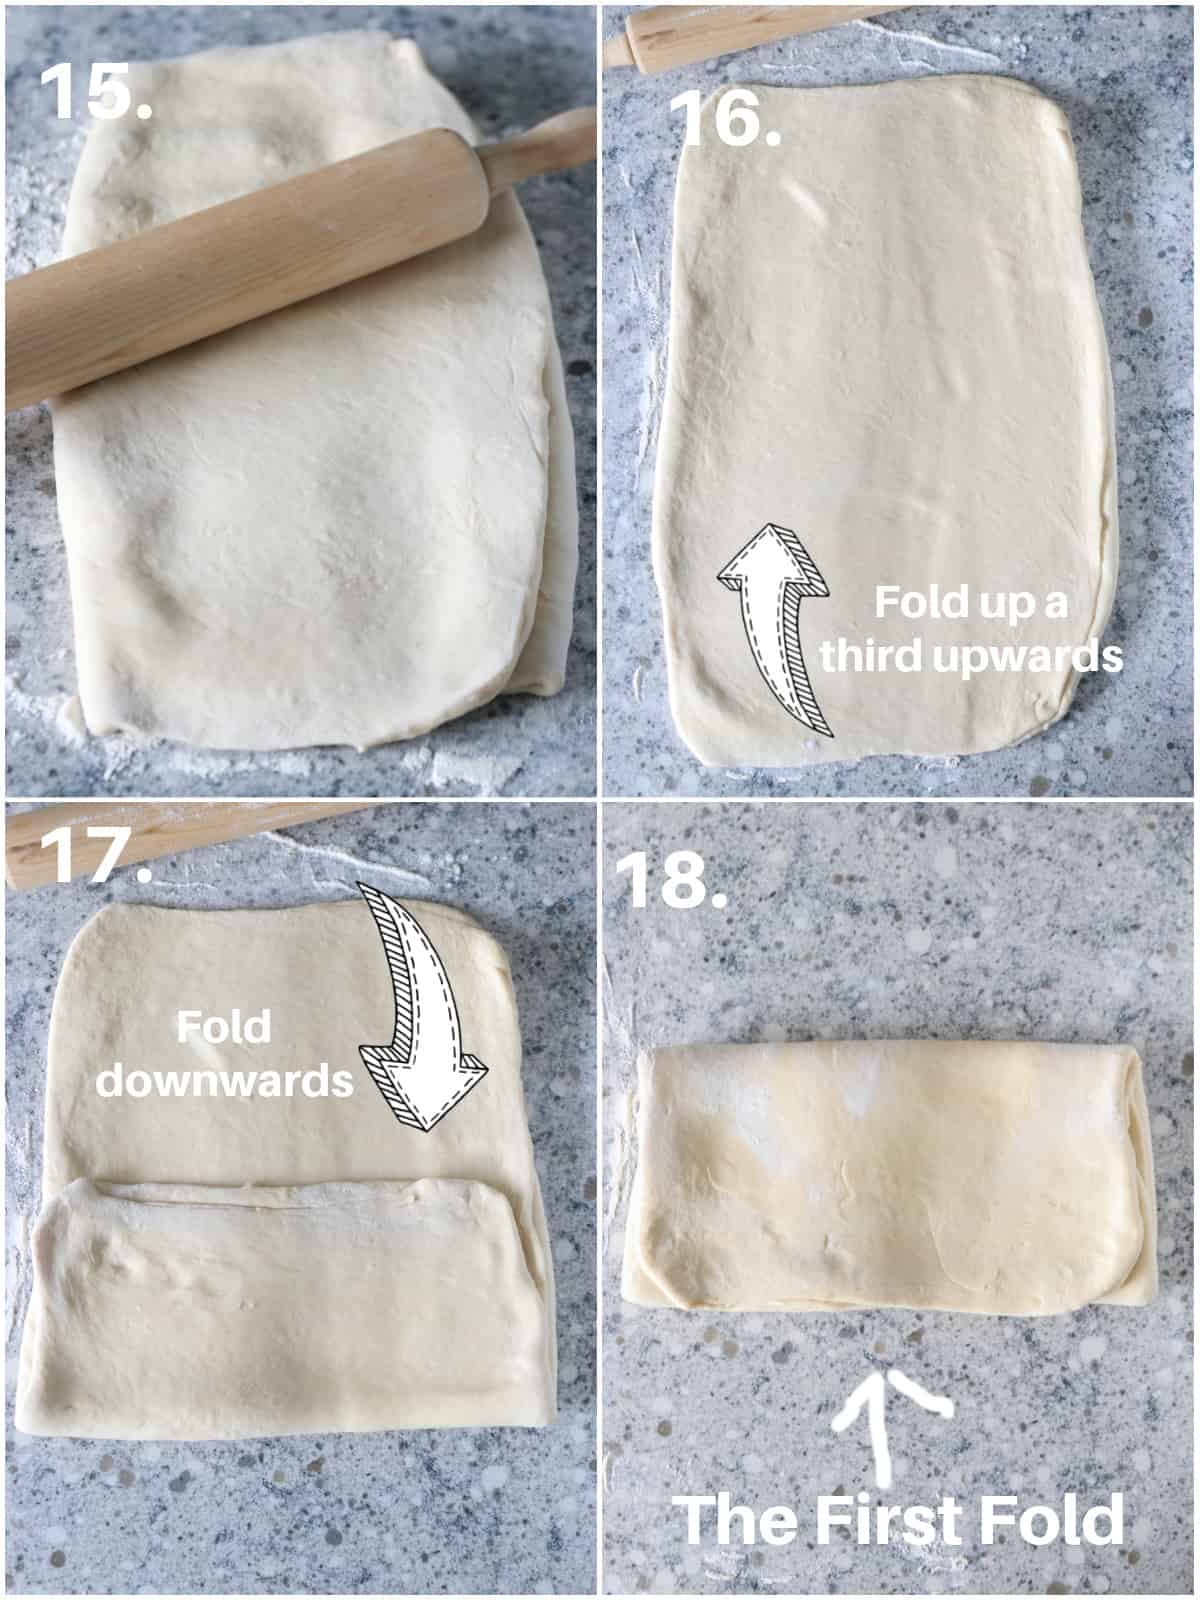
- On a floured surface, position the rectangle dough so that the short edge is closest to you. Using a rolling pin, gently pound the dough along its length to gently flatten the butter block inside.
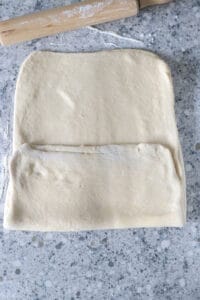
- Roll it out into 17 x 10 inches rectangle, keeping the edges straight as best as you can.
- Fold the lower flap of the dough towards the center.
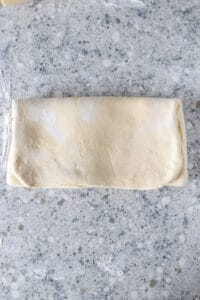
- Fold the upper flap over the center to cover the first flap. This is now now your first fold.
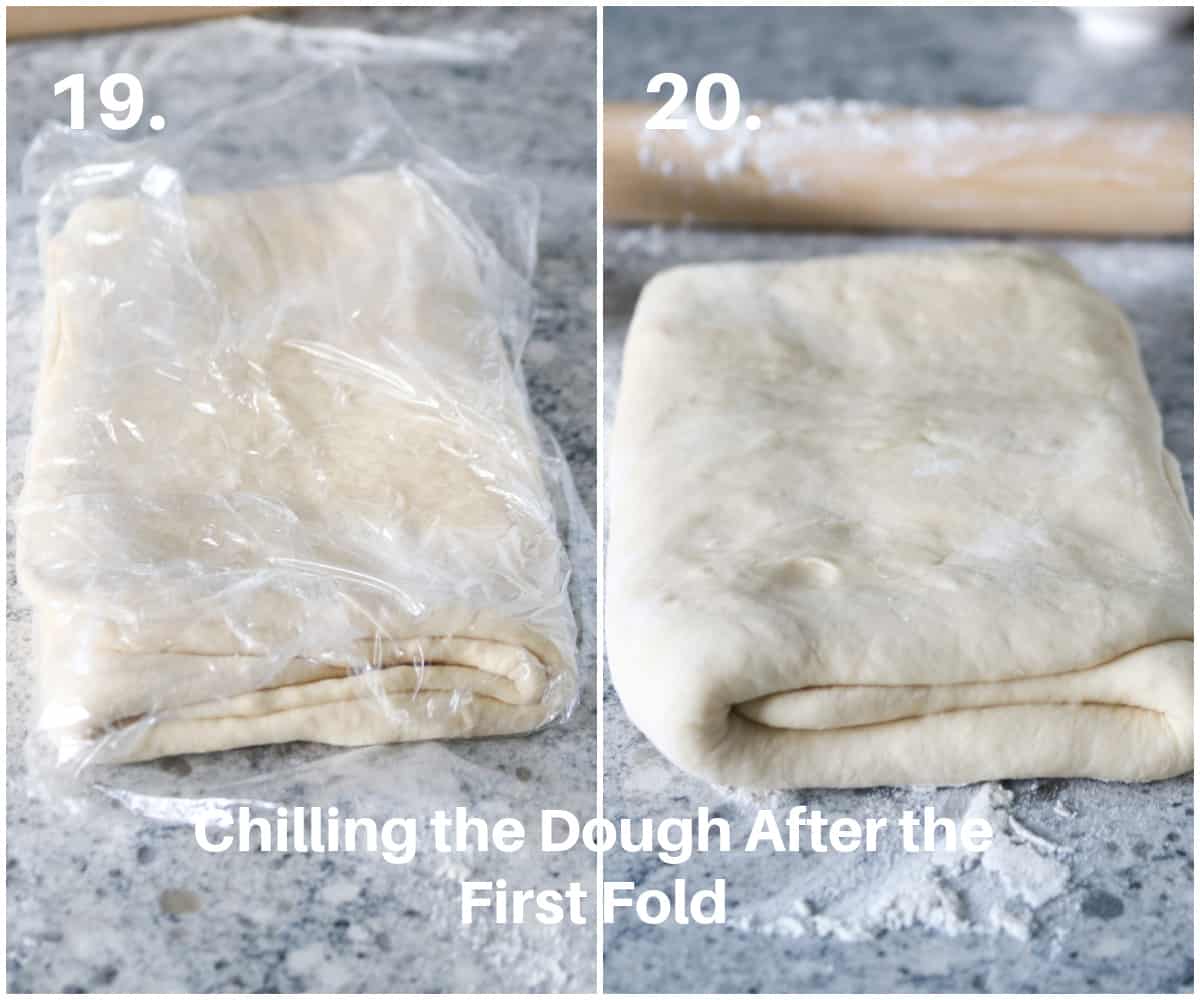
- Wrap the dough in plastic film. Place it in a baking pan.
- Cover it with a clean towel and chill in the fridge for 1 hour, or in the freezer for 30 minutes.
Repeat the Rolling and Folding Three More Times
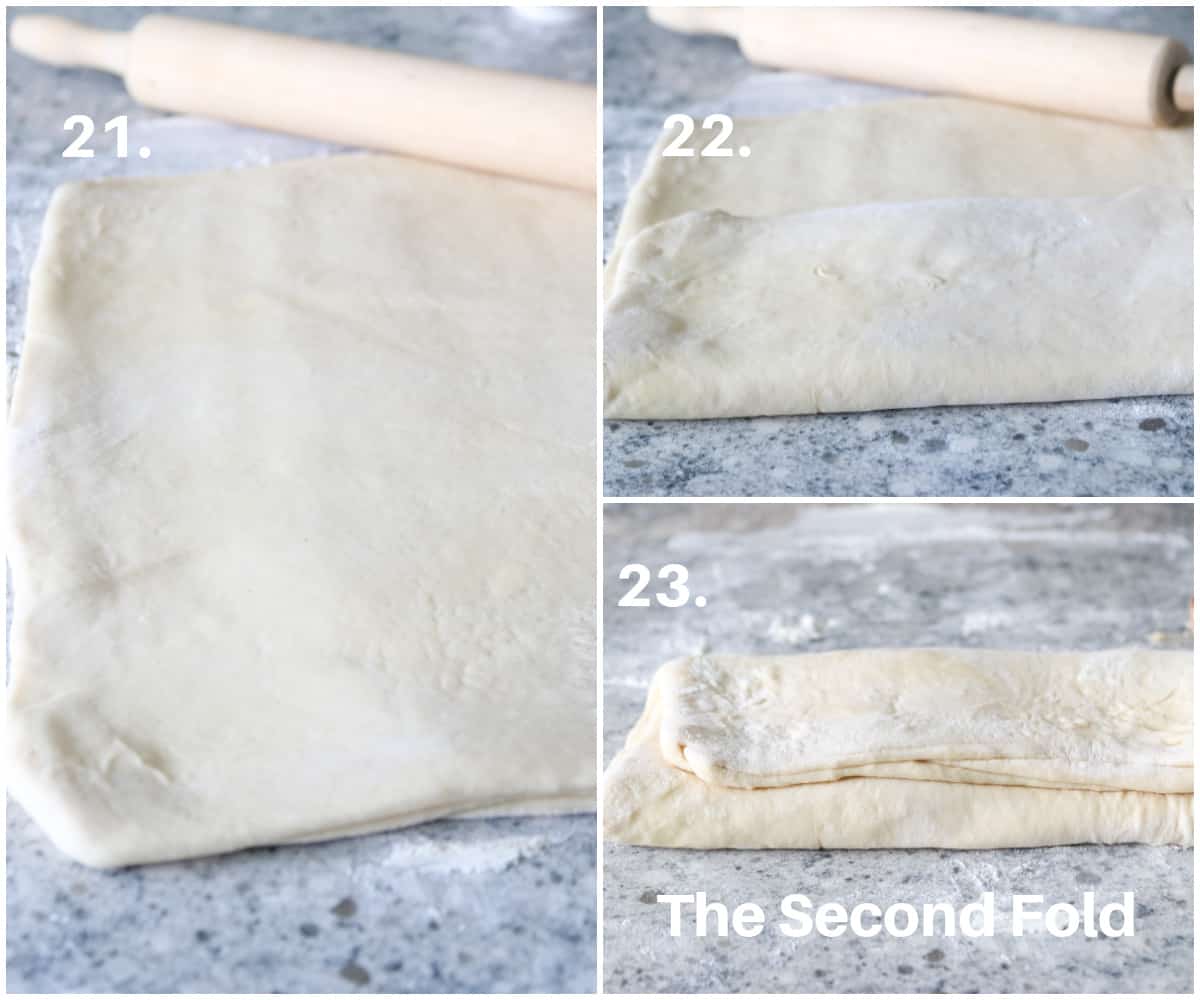
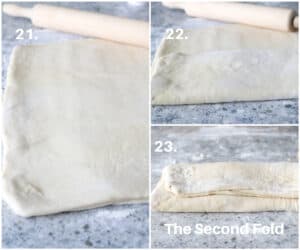
- So after the dough has chilled, position it in the surface so that the short edge is closes to you. Roll it out again into a 17x 10 inches rectangle. Each time you roll out the dough, make sure the surface is dusted with flour, as well as the top of the dough to prevent any sticking.
- Again, fold the lower flap over to the center, then fold the upper flap over to cover the first 23. flap. This is your second fold. Brush any excess flour. Wrap this again in the same manner as before. Chill in the fridge for 1 hour or in the freezer for 30 minutes.
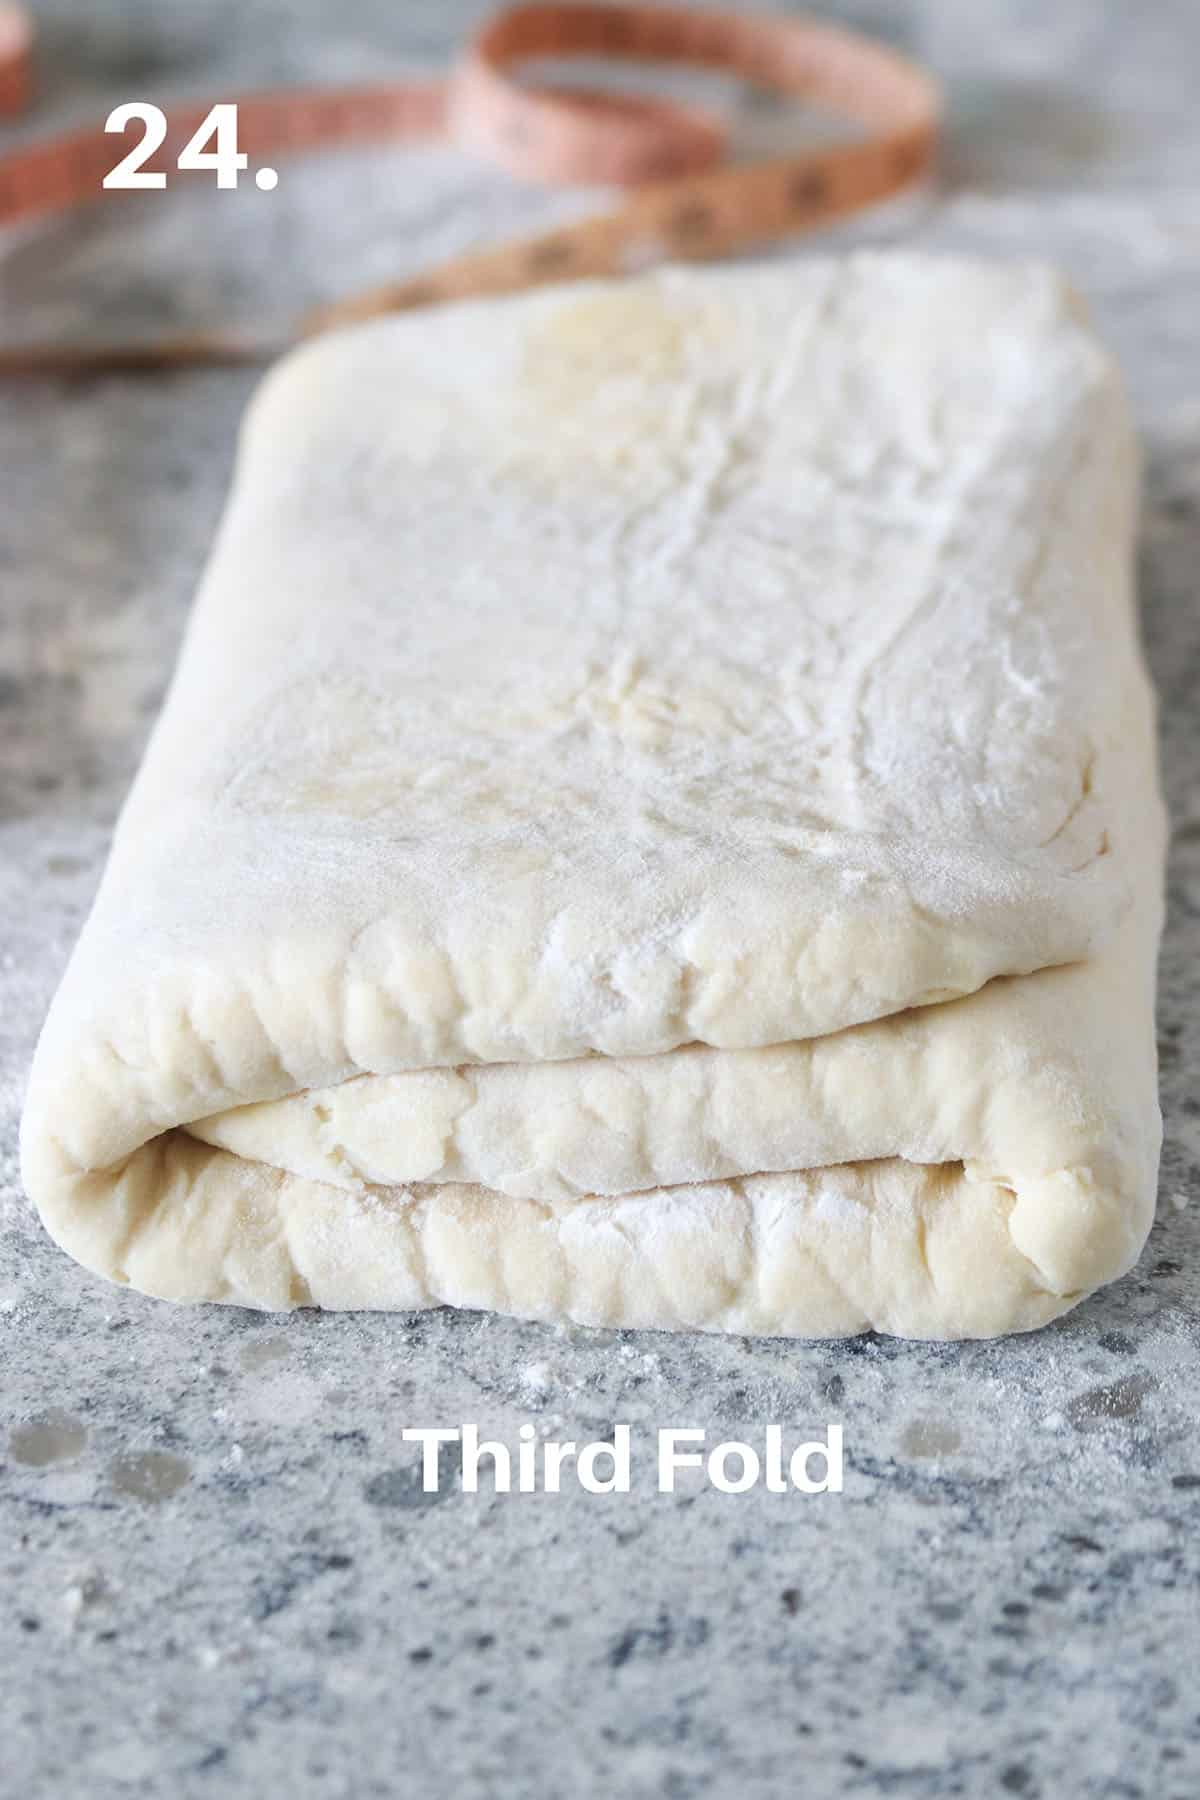
- Take out the dough from the freezer and repeat the roll out and fold to make your Third Fold. Brush any excess flour. Wrap again and Chill.
- Next, take out the dough from the fridge. Roll it out again. This time you will see the the dough is starting to have some cracks. This is normal. If you encounter one, simply patch the area with some dusting of flour. It is also important that the surface is floured to prevent any sticking. Fold the dough in the same manner. This is your Fourth Fold. If the dough as gotten warm at this point, pop it again the fridge for 30 minutes. If not, go ahead and continue to the next step.
The Double Fold and the Long Chill
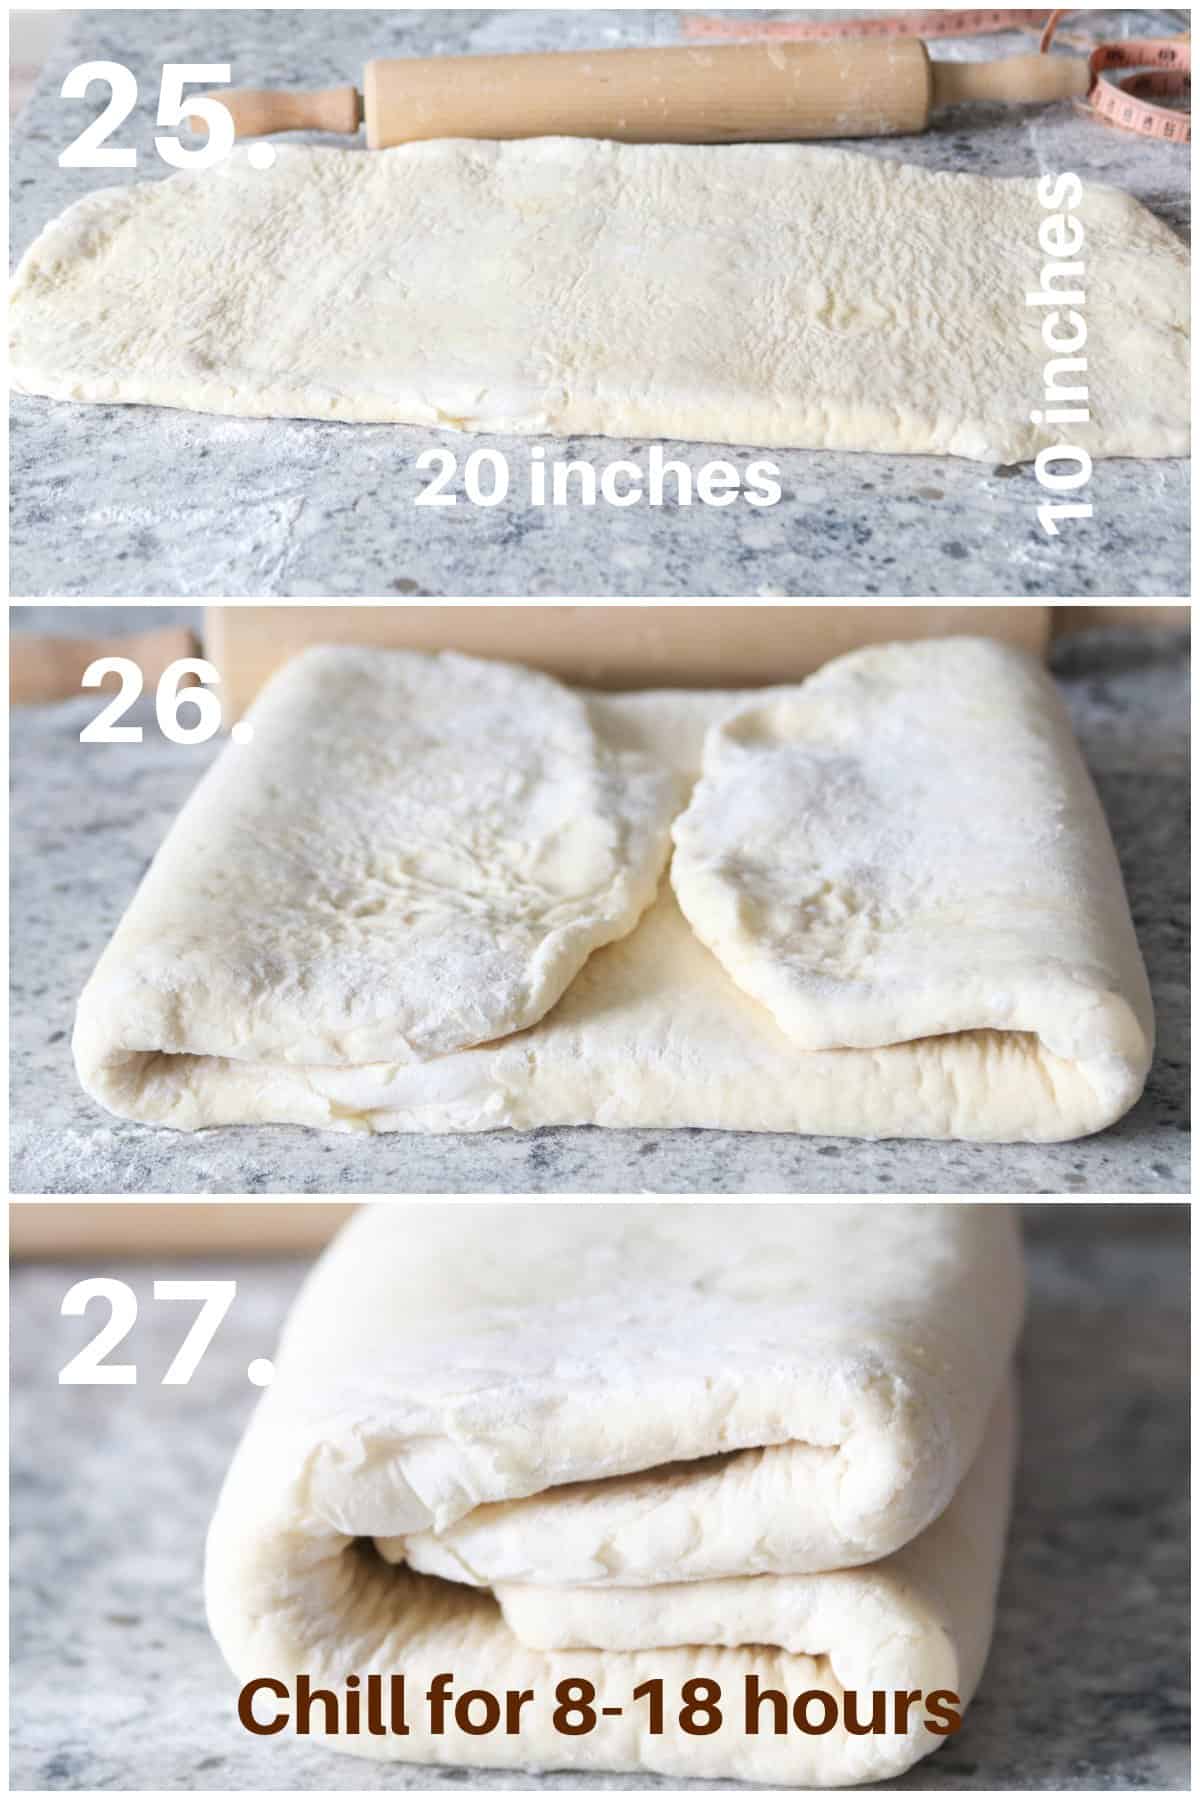
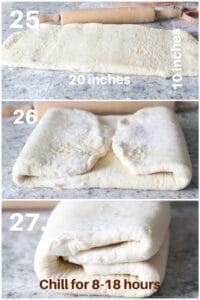
- Roll out the dough into a 20×10 inches rectangle.
- Then, with the long edge closest to you, fold the two sides so that the two short edges meet at the center.
- Fold the entire thing in half so that the opening is to the right, like a book. Wrap the dough again and chill it the fridge for at least 8 hours, but not more than 18 hours.
Shaping the Croissants
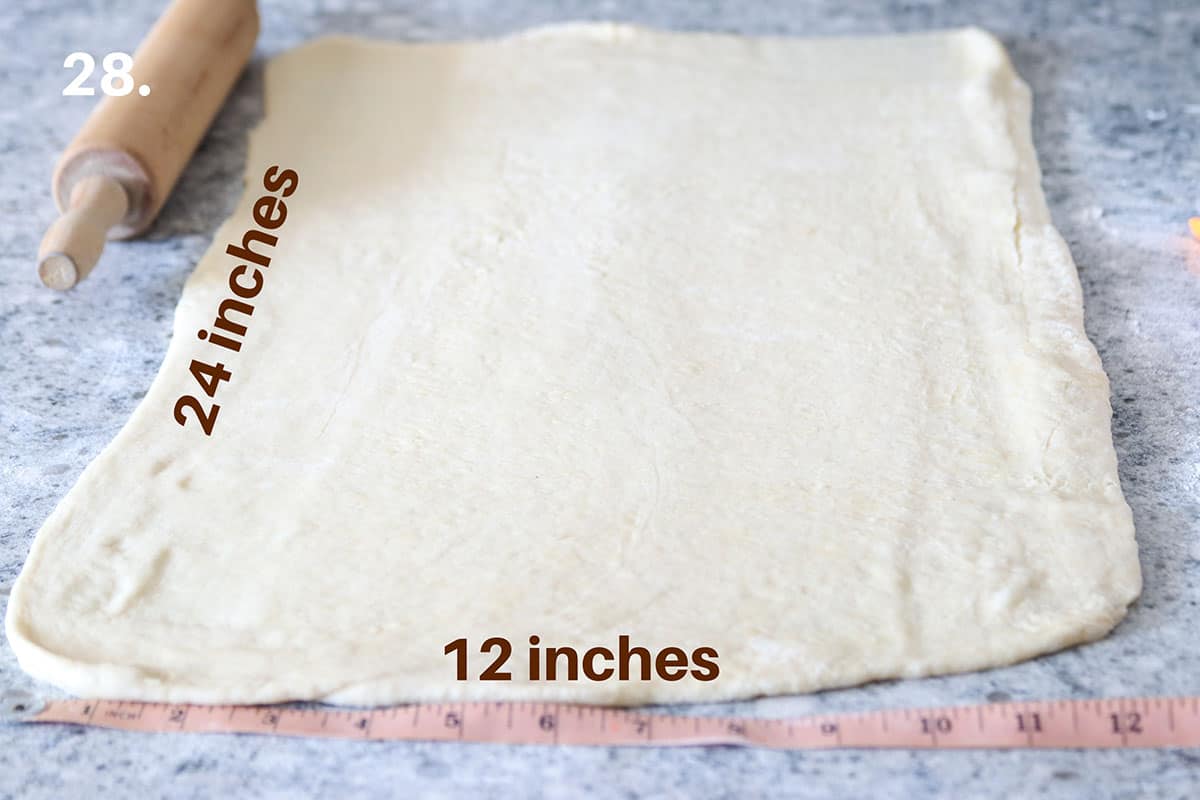
- After the long chill, let the dough rest at room temp for about 5 minutes. On a floured surface, roll it out into a 12x 24 inches rectangle.
- To do this easily, first roll out the dough as long as it is easy to do so. Once it starts to resists and it seems like its getting harder to roll it out, this means the dough needs to rest.
- Leave it alone for 5 minutes or so. When you come back to roll it out, you will see that it is more pliable and cooperative.
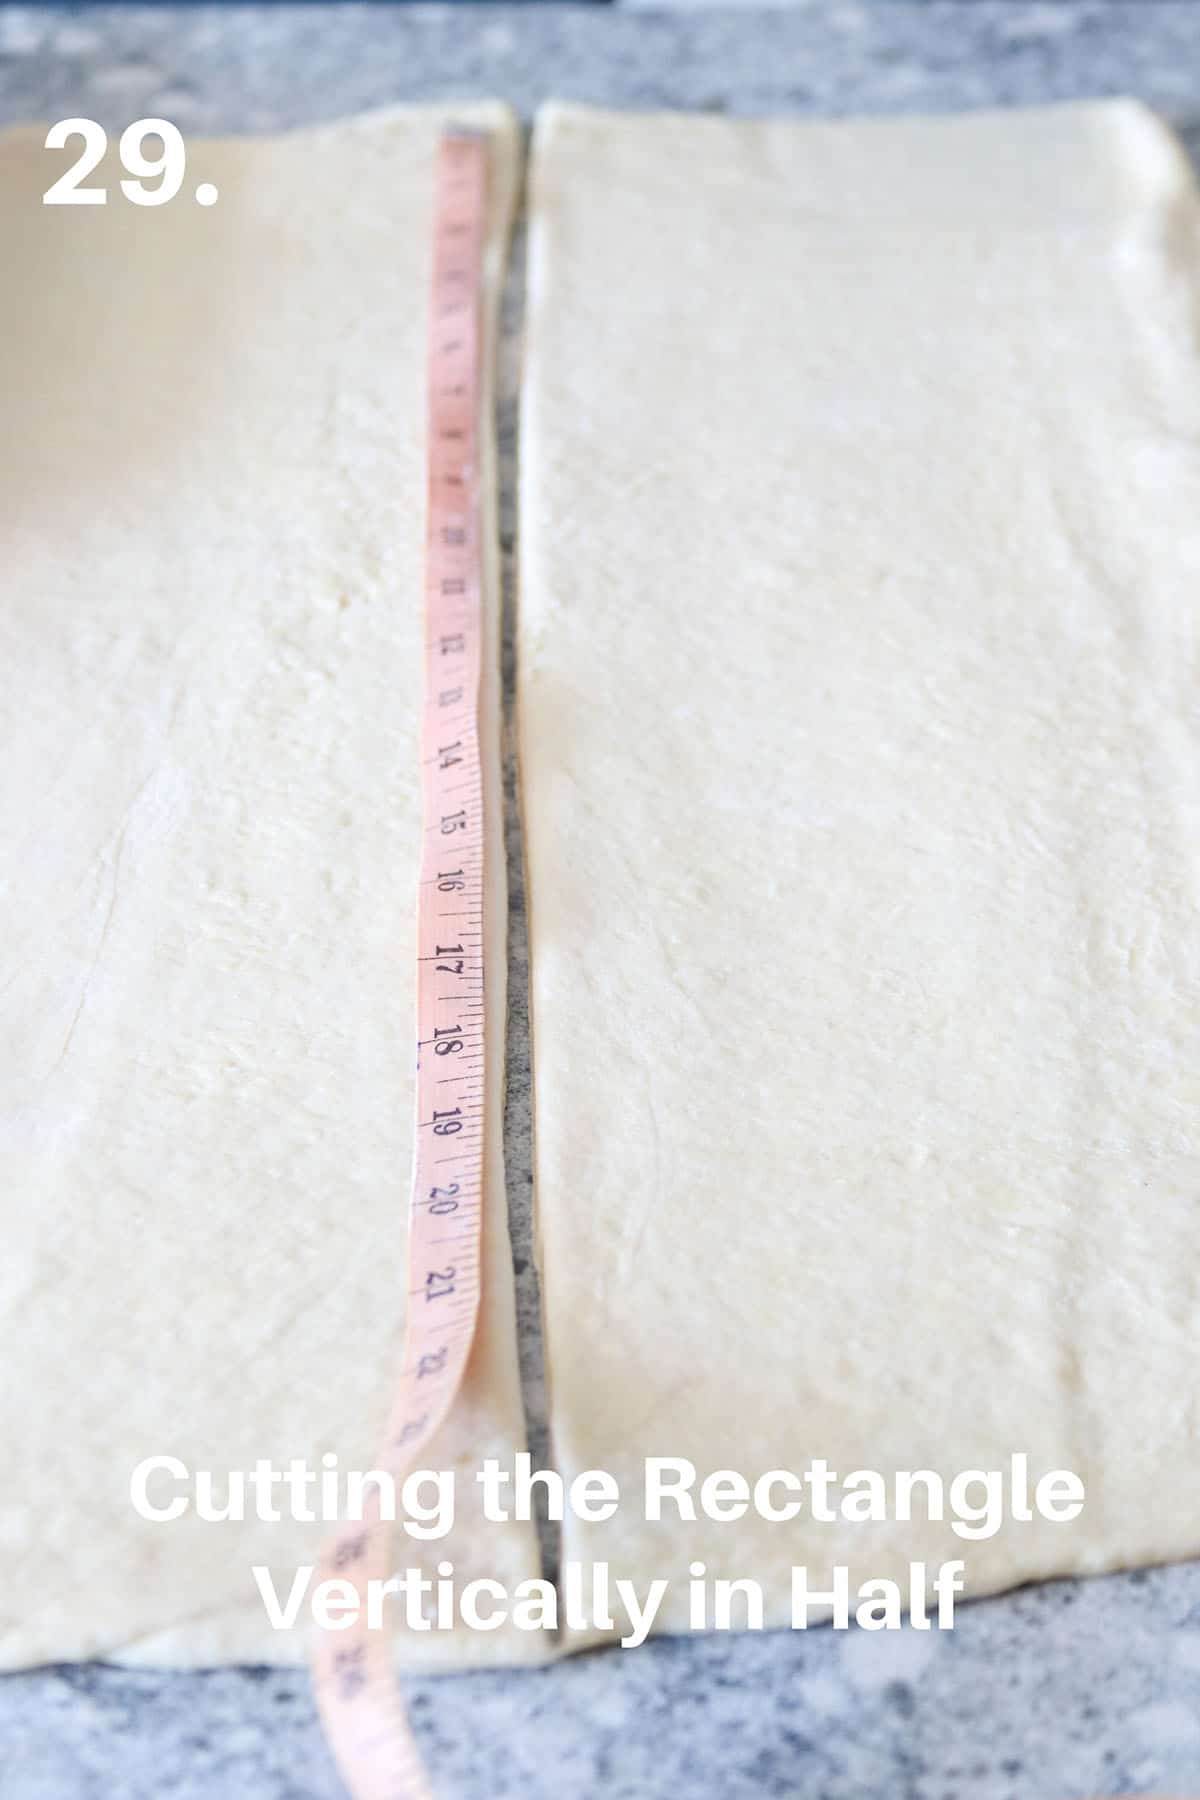
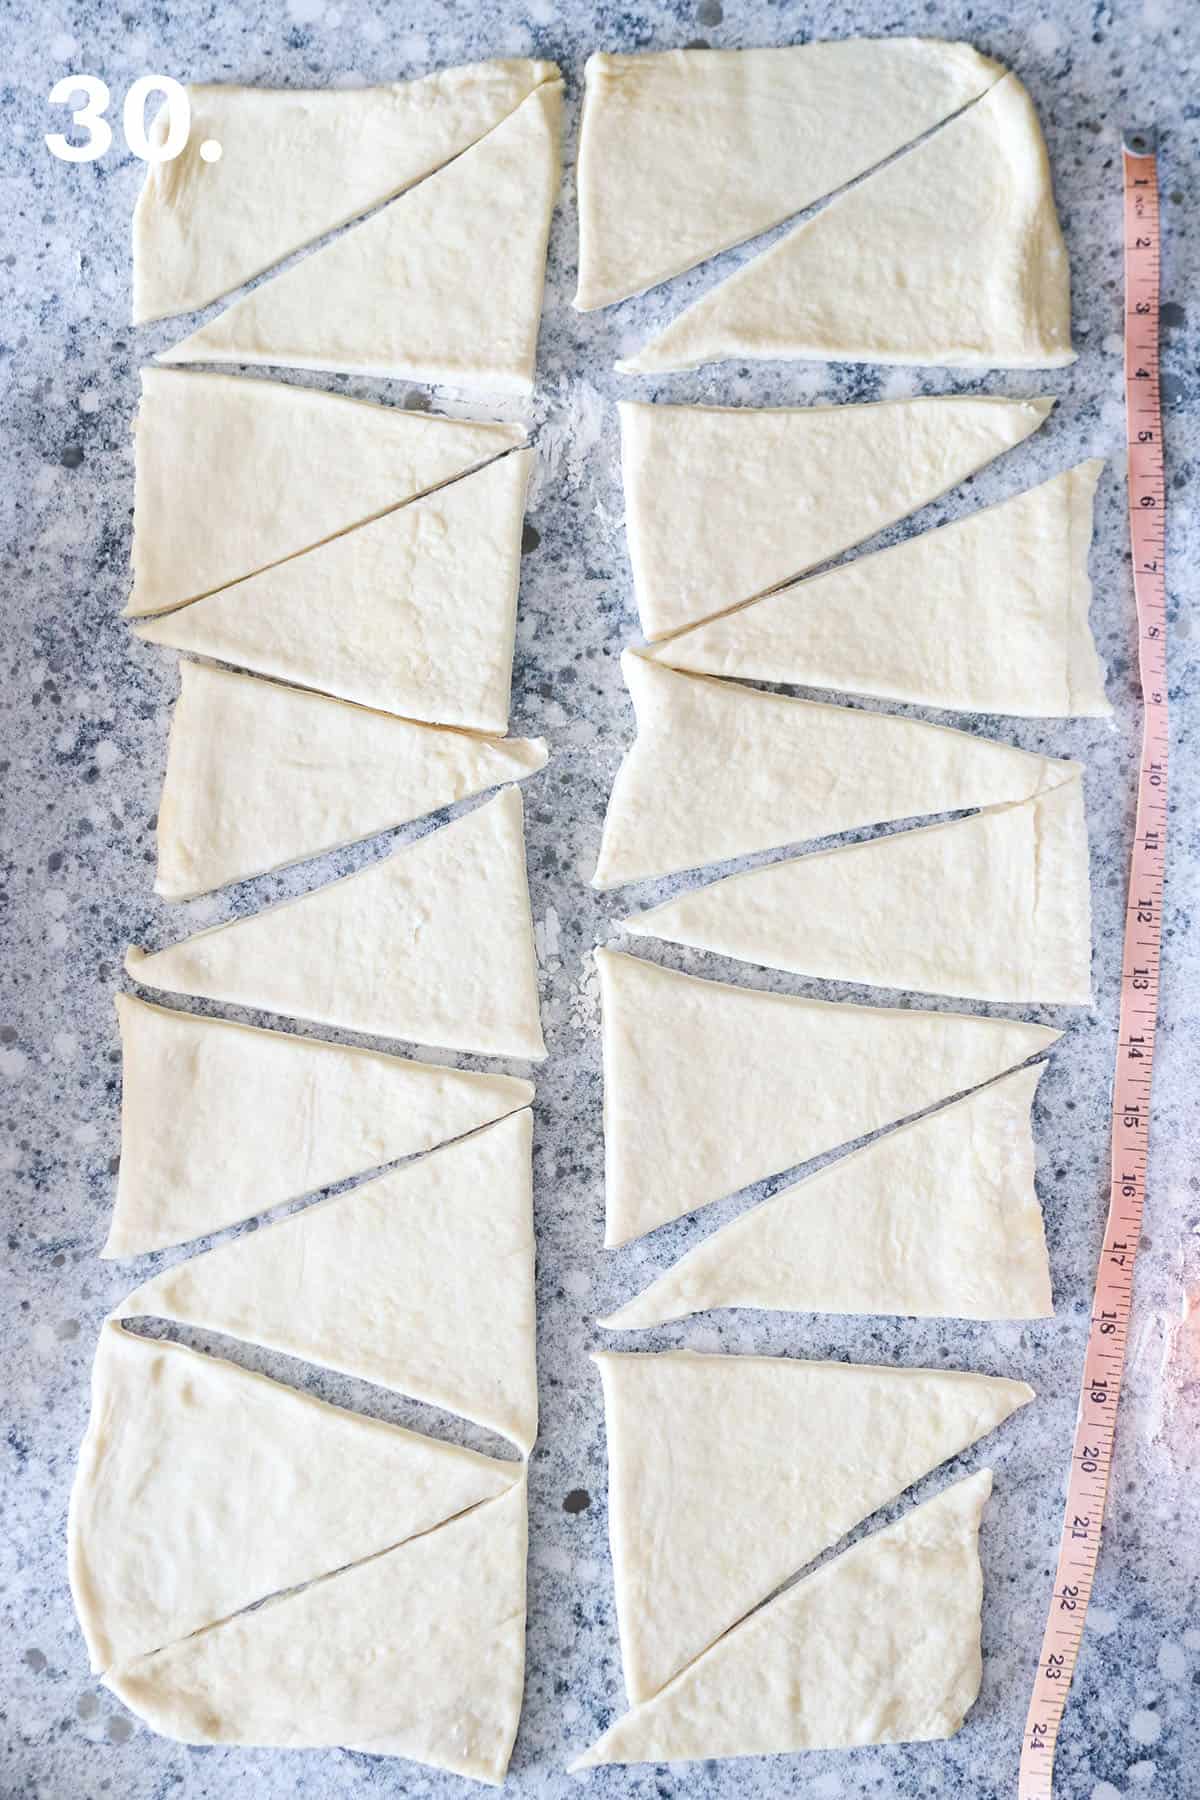
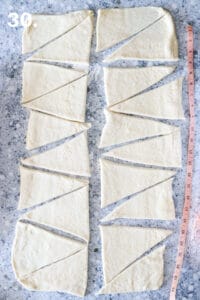
- Once you have the rectangle, cut it in half vertically using a pizza cutter or a sharp knife. You will end up with two long rectangles.
- Cut triangles from the two rectangles, producing 10 from each side.
- Note that the triangles that you cut from the corners of the rectangle will look a bit different than the others. You can choose to scrap it or keep it. I am always “team keep it”.
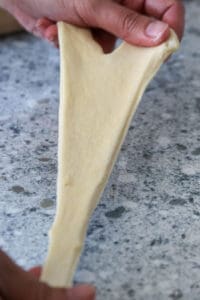
- To shape a croissant, first cut a small slit at the shortest base of the triangle using a knife.
- Then, gently stretch out the triangle by holding the triangle on the slit side, then pulling it out gently on the other side. Do this gently or you will tear the dough.
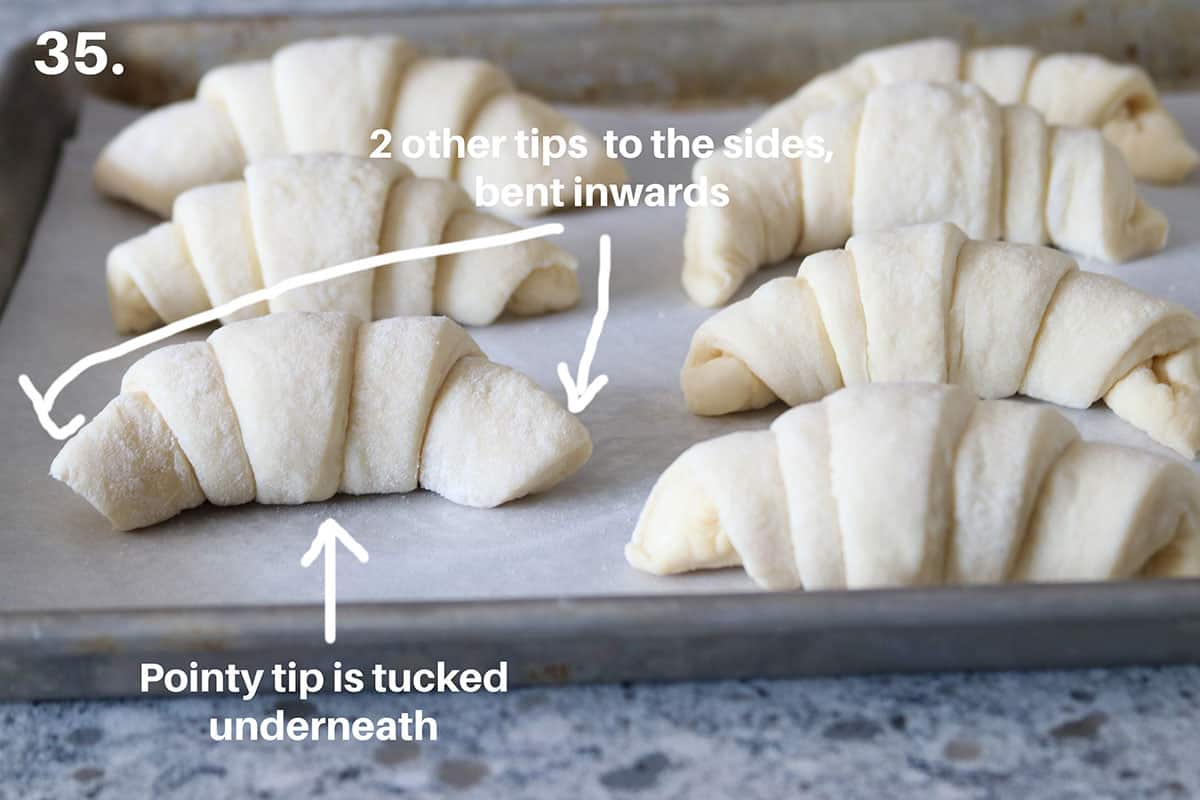
- Lay the triangle back the surface. Starting on the slit side, roll the riangle forward until you reach the end.
- Make sure the pointy tip of the triangle is tucked underneath and the two sides are bent inwards to make a half moon shape.

Allow the Shaped Croissants to Rest and then, Bake!
- Arrange the shaped croissants into two large baking sheets that is lined with parchment paper, 10 on each pan and evenly spaced. Cover this with a clean towel and let sit at room temperature for 1 hour. Then transfer to the fridge for another hour.
- Preheat oven to 400 ℉. Beat together 1 egg and 1 tbsp. of milk. Brush the surface of the croissants with this egg wash mixture. Bake the croissants for 22-25 minutes, rotating the pan halfway into the baking time. The croissant will be golden on top. Let the croissant cool slightly and then, savor every bite!
Frequently Asked Questions
Yes. You can freeze the croissant dough after the double fold. Wrap it well in plastic film, then in foil. To use it, thaw it in the fridge and proceed with the recipe.
you can freeze the dough in between folds if you need more time. Simply thaw it in the fridge and proceed with the recipe.
Yes. After the final chilling, the dough is pretty much ready to use in any recipe. You can make Tartines Morning Buns, and Cream Cheese Croissants. Yum!
Homemade and fresh pastries are very rewarding, so I hope that one of these days, you clear up some of your time and make this amazing croissant dough and be greatly rewarded with the divine results!

Here are more recipes using croissant dough:

How to Make Croissants
Equipment
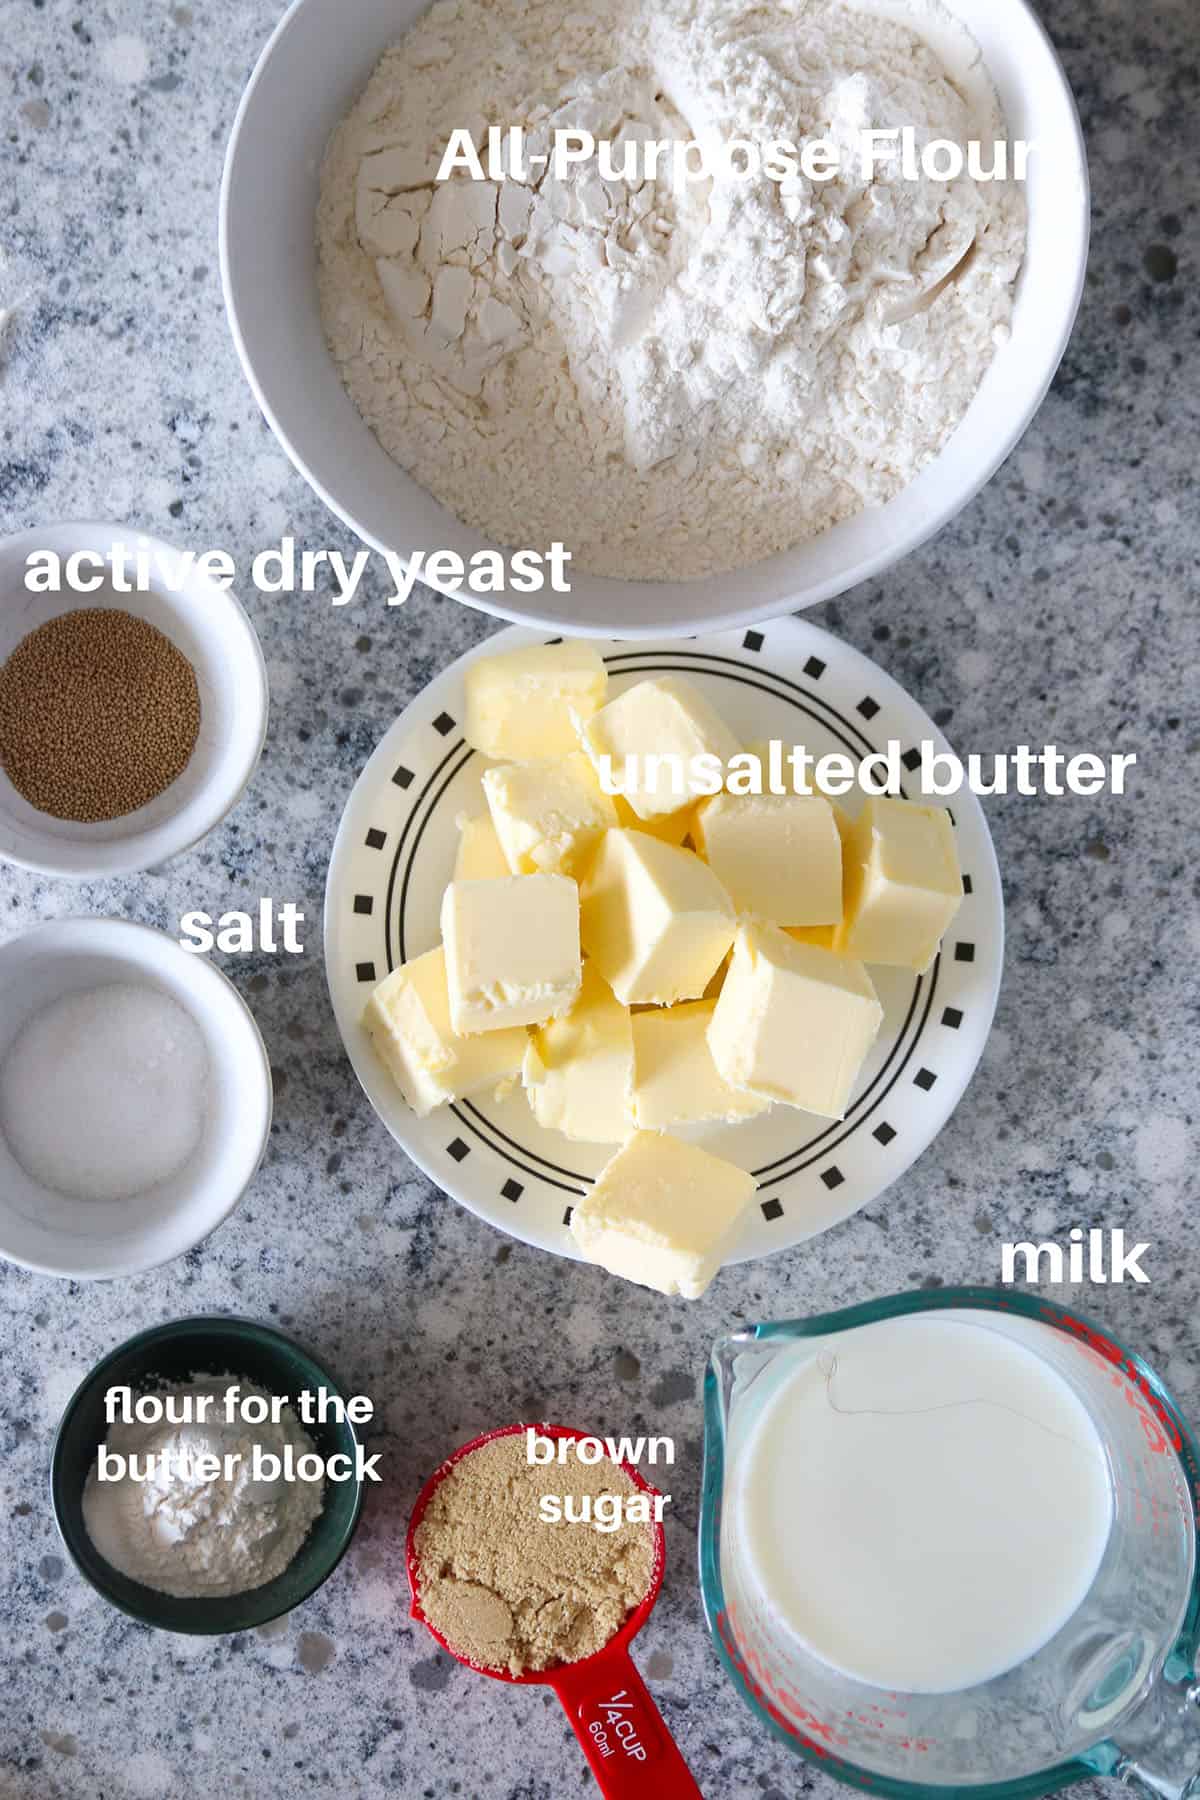
Ingredients
- 1 ¼ cup (322.29 g) warm milk heated to 105-115 ℉
- 1 tbsp. active dry yeast
- ¼ cup (58.12 g) brown sugar
- 3 ¾ cup (495.32 g) all-purpose flour weighed or scooped and levelled
- ½ tbsp salt
- 1 ½ cup (340 g) cold unsalted butter cut into cubes
- 1 ½ tbsp (11.41 g) all purpose flour
For the Egg Wash
- 1 large egg
- 1 tbsp milk
Instructions
Make the Dough
- In the bowl of a stand mixer, combine warm milk, yeast and the brown sugar. Let this sit for about 5 minutes, until the mixture is thick and foamy.
- Combine 3 ¾ cup of flour and salt. Attach the dough hook to the mixer. Gradually add the flour mixture in three additions to the yeast mixture, beating at low speed after each addition, then speeding up to fully incorporate the flour. At this point, if the dough is separating into long, dry and powdery chunks, drizzle about 1-2 tbsp of milk, then mix until the dough comes together. If your dough is coming together well, there is no need to add extra milk.
- Continue to run the mixer until the dough is smooth and cleans the sides of the bowl. Turn the dough over into a clean surface, and knead briefly. Pat it into a 1 ½ inch thick rectangle. Wrap it in plastic film and chill for 1 hour.
Make the Butter Block
- In the bowl of a stand mixer fitted with the paddle attachment, combine the cubed butter and 1 ½ tbsp all-purpose flour. Beat the mixture until it is smooth and incorporated. The butter may still be in chunks, but the flour should have been fully incorporated into it.
- Turn the mixture into a large plastic film. Wrap the butter and gently pat and mold it into a 5 inches rectangle that is about 1 inch thick. Make sure to press and pat the butter so that no air pockets remain. Chill this in the fridge until the dough is ready.
Enclose the Butter
- On a floured surface, roll out the dough into a 17x 10 inches rectangle. Unwrap the butter and position it at the center of this rectangle dough. The short edge of the butter should be parallel to the long edge of the dough.

- Fold the lower flap of the dough upward to cover the butter.
- Fold the upper flap downward to cover the first flap. The butter is now enclosed in the dough. If the dough has gotten warm, wrap it in plastic film and place it in a baking pan. Pop it in the fridge for 1 hour, if not, move on to the next step.
The First Fold
- On a floured surface, position the rectangle dough so that the short edge is closest to you. Using a rolling pin, gently pound the dough along its length to gently flatten the butter block inside. Roll it out into 17 x 10 inches rectangle, keeping the edges straight as best as you can.
- Fold the lower flap of the dough towards the center.
- Fold the upper flap over the center to cover the first flap. This is now now your first fold.
- Brush any excess flour from the dough. Wrap this in plastic film and place in a baking pan. Cover it with a clean kitchen towel. Chill it in the fridge for 1 hour or in the freezer for 30 minutes.
Repeat the Rolling and Folding 3 More Times
- So after the dough has chilled, position it in the surface so that the short edge is closes to you. Roll it out again into a 17x 10 inches rectangle. Each time you roll out the dough, make sure the surface is dusted with flour, as well as the top of the dough to prevent any sticking.
- Again, fold the lower flap over to the center, then fold the upper flap over to cover the first flap. This is your second fold. Brush any excess flour. Wrap this again in the same manner as before. Chill in the fridge for 1 hour or in the freezer for 30 minutes.

- Take out from the freezer and repeat the roll out and fold to make your Third Fold. Brush any excess flour. Wrap again and Chill.
- Next, take out the dough from the fridge. Roll it out again. This time you will see that the dough is starting to have some cracks. This is normal. If you encounter one, simply patch the area with some dusting of flour. It is also important that the surface is floured to prevent any sticking. Fold the dough in the same manner. This is your Fourth Fold. If the dough as gotten warm at this point, pop it again the fridge for 30 minutes. If not, go ahead and continue to the next step.
The Double Fold and the Long Chill.
- Roll out the dough into a 20×10 inches rectangle. Then, with the long edge closest to you, fold the two sides so that the two short edges meet at the center. Fold the entire thing in half so that the opening is to the right, like a book. Wrap the dough again and chill it the fridge for at least 8 hours, but not more than 18 hours.
Shaping the Croissants
- After the long chill, let the dough rest at room temp for about 5 minutes. On a floured surface, roll it out into a 12x 24 inches rectangle. To do this easily, first roll out the dough as long as it is easy to do so. Once it starts to resists and it seems like its getting harder to roll it out, this means the dough needs to rest. Leave it alone for 5 minutes or so. When you come back to roll it out, you will see that it is more pliable and cooperative.
- Once you have the rectangle. Cut it in half vertically using a pizza cutter or a sharp knife. You will end up with two long rectangles.
- Cut triangles from the two rectangles, producing 10 from each side. Note that the triangles that you cut from the corners of the rectangle will look a bit different than the others. You can choose to scrap it or keep it. But really, who is gonna want to discard 4 pieces of croissants?
- To shape a croissant, first cut a small slit at the shortest base of the triangle using a knife. Then, gently stretch out the triangle by holding the triangle on the slit side, then pulling it out gently on the other side. Do this gently or you will tear the dough.
- Lay the triangle back to the surface. Starting on the slit side, roll the triangle forward until you reach the end. Make sure the pointy tip of the triangle is tucked underneath and the two sides are bent inwards to make a half moon shape.

Final Rest and Bake
- Arrange the shaped croissants into two large baking sheets that is lined with parchment paper, 10 on each pan and evenly spaced. Cover this with a clean towel and let sit at room temperature for 1 hour. Then transfer to the fridge for another hour.
- Preheat oven to 400 ℉. Beat together 1 egg and 1 tbsp. of milk. Brush the surface of the croissants with this egg wash mixture. Bake the croissants for 22-25 minutes, rotating the pan halfway into the baking time. The croissant will be golden on top. Let the croissant cool slightly and enjooooy!
- Tip: Keep the other baking pan in the fridge while you bake the first pan of croissants.
Notes
- You can freeze the dough at any point after every fold. To continue, thaw the dough in the fridge and then carry on with the instructions.
- Make sure the surface for rolling is adequately dusted with flour to prevent sticking. It helps to lightly dust the top of the dough too during rolling.
- Between second and fourth fold, you may see the dough is starting to have some cracks or peeling, This is normal because the yeast is doing it’s work. To fix this, simply patch the teared area with flour.
- Brush any excess flour in the dough before folding and chilling.
- If anytime during rolling you feel the dough is retracting or getting harder to roll, simply leave it alone for about 5 minutes to let it rest. Once it is rested, it will be easier to roll it out. If it is too hot here you are, allow the dough to rest in the fridge, covered well.
- If at anytime during rolling, the dough starts to feel warm (this happens when you live in a warmer climate country, or during the summertime, or when you take too lone rolling), wrap it in plastic film and give it a quick chill in the freezer for 10-15 minutes.
- This recipe is a combination of strategies, recipes and techniques from Epicurious Croissant Recipe, Croissant dough from the book Baking with Julia by Dorie Greenspan and How to Make Croissants by Sallys Baking Addiction


Legitimate, delicious, flaky croissants are basically impossible to find in the US – I’ve never been able to tolerate more than a bite or two without throwing them away in disappointment. I can’t wait to try to this recipe to replicate a real croissant!
I have always wanted to make homemade croissants! This is a great recipe to use for me to finally get to do that!
I’ve always wanted to make croissants from scratch… I feel like it’s time for me to stop thinking about it and do it!
I can’t believe i have never tried making homemade croissants! It actually looks easy!
We love croissant but never tried making it at home. Thanks for sharing detailed recipe. Looks perfect. I will bake this for my family soon.
I have always been put off by the workload behind homemade croissant dough! So glad to know there’s an easier way 🙂
My kids love croissants! This looks like the perfect family baking project for us before they go back to school.
I have never tried to make homemade croissants. I eat them all the time. I will have to give this a try on a rainy day and see what happens. Looks great!!