
How To Knead Bread Dough (Video)
Kneading Bread Dough can be scary and intimidating at first. However, it is actually a simple and enjoyable process once you allow yourself to get comfortable with it. This post teaches How to Knead bread Dough in simple terms if you are new to making bread.

Kneading Bread Dough
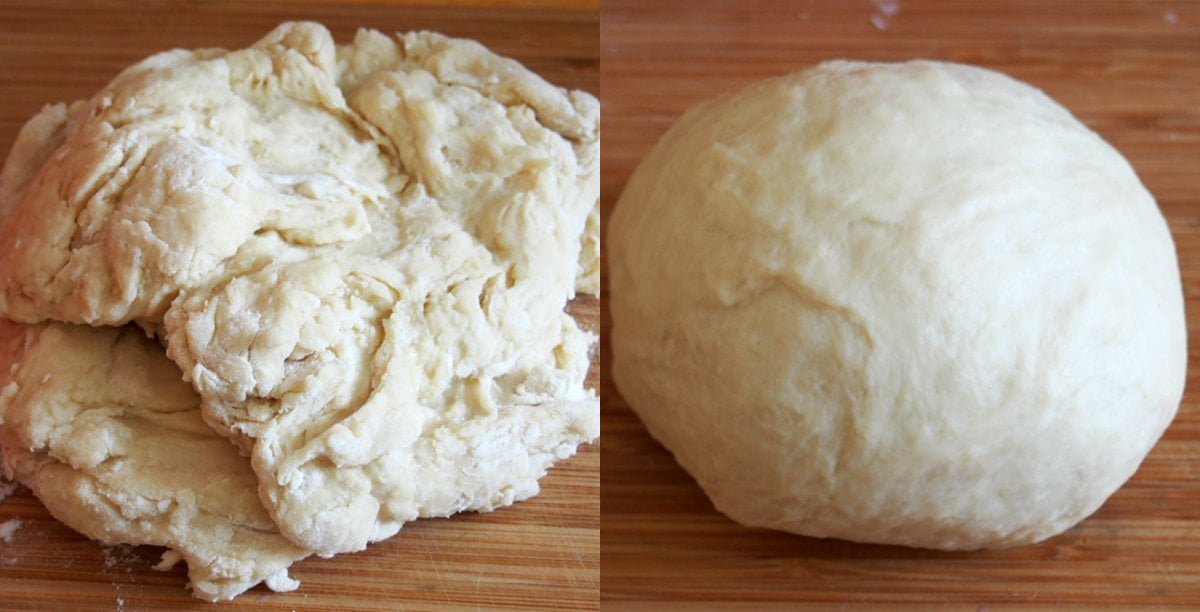
Okay, I am not going to be too technical here for I don’t have much of that stuff either. Simply put and in practicality, we knead dough to transform it from its initial state, which is shaggy, sticky, messy and without form- to something that is more refined, smooth and can hold its shape together.
I believe that once you think of kneading dough that way, it becomes less intimidating to try it. For a little fact mixed in, it is that kneading process that gives the dough the structure it needs to become bread.
When you knead, gluten develops in the dough allowing it to be elastic. And upon baking, it is that elasticity and structure that allows the bread to rise beautifully like a soft, delicious pillow.
How To Knead Bread Dough
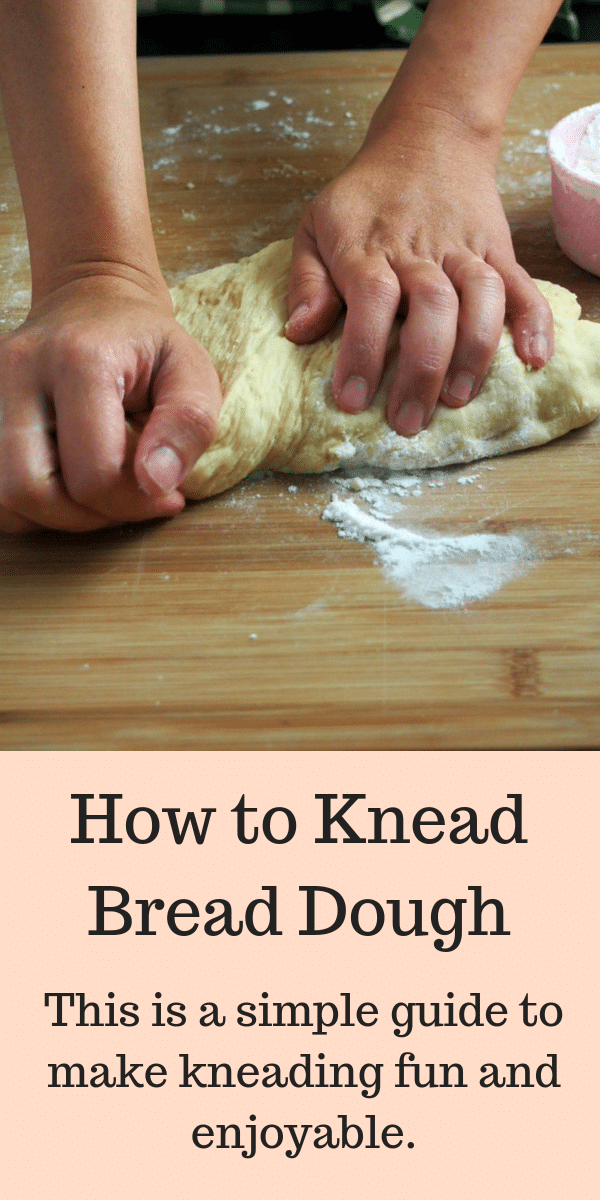
- First off, dust your work surface with flour. Initially, an unkneaded dough is sticky. Some are more wet and stickier than the others. But always, you need a dusting of flour or more, in your work area.
- Turn the dough over on your floured board. Using the heels of your palms, push the dough down and away from you. In this action, you will also use your weight to push the dough down along with the heels of your palms.
- After the pushing motion, fold the dough towards you and push again. Repeat the pushing motion as described above then fold again. At some point, turn the dough after you fold it so you can knead on different portions of the dough. I don’t have any pattern for this but the idea is to turn it often to make sure the kneading is well distributed.
Tip
During the initial stages of kneading, you might need to dust your work surface and your hands if the dough is sticking too much that you can’t work with it.
But be sure to not overdo it because too much flour can make your dough dry, which is a signal that the ingredients proportion are off. So a sprinkle here and there as needed is fine.
- The dough will gradually lose its stickiness and it will become easier to handle. You will notice that it will be smoother and pillowy as you progress into kneading.
Frequently Asked Questions
Once I see my dough is smooth, elastic and becoming nice-looking, I start testing using the windowpane method. It is my security verification. Some bakers do not do this. Maybe for the reason that once you know the feel of a kneaded dough, you will be confident at the end and you know just by “feeling” the dough.
You will know too, visually and by feeling it. But that will happen once you have made bread by hand enough times. I believe, confidence builds up that way. And for me, windowpane test has become a natural thing to do. I always do it without even thinking about it, like a double guarantee.
Tear a small portion of the smooth dough, about 2 tablespoons. Gently stretch it out using your fingers to form a square. A translucent film should form in the center. That is telling you that the dough is elastic enough. (Watch the video for the windowpane test at the end).
If the dough tears instead of forming a translucent film, knead it for a for a moment longer. Repeat the windowpane test until the dough is stretchy enough to form that film.
There is no exact answer to this. The time you knead varies depending on your experience level, the way you knead and the characteristic of your dough. When I was starting to make yeast bread, I knead for 20 minutes to get that smooth, elastic texture. Now, I knead anywhere from 6-12 minutes.
Some dough initially starts out more wet than the others, therefore needs longer kneading. Some comes out more structured from the initial mixing and only needs brief time.
Of course you can. Kneading in the stand mixer is easier and more convenient. However, note that when you use a stand mixer to knead a dough recipe that is written to be kneaded by hand, you may need to make tweaks to the amount of flour in the recipe. As you go along, you will find that you need to sprinkle more flour while the mixer is running. This will aide the dough to come together. You also need to check often if the dough is ready. Dough can be over-kneaded using the stand mixer.
The Feel of a Kneaded Dough
Once you have made bread by hand enough times, you will find that you can disregard all the things I have said here because, by experience, you can be free of any technicality of the process and view it as something that you know how to do by heart.
That is not to say that I am an expert because I am not. I still under knead. I still get dough that don’t rise at all and I have bread fails very often. It is just that I have learned to let go and become less intimidated and just view bread making as a fun process.
So go ahead, make a mess and have fun. With just flour, sugar, milk/water and yeast, you can make bread that will fill your house with an amazing aroma.
Bread is so much fun to make and you can do many things with them- fill them, shape them, top them with anything you like. It is magic! Here are 20 Everyday Bread Recipes for you to practice on.
Happy Bread making!
Ready to Start your Bread Baking Journey? Here are some Recipes For You:
- Sweet Beehive Buns
- Japanese Condensed Milk Bread
- Japanese Milk Buns
- Chelsea Buns
- Sweet Cheese Rolls
- Honey Buns with Honey Cream Filling
- Milk and Sugar Mini Buns
- Sweet and Buttery Sugar Buns


My “passion” is yeast baking and I have taught a lot of keen learners how to be a confident yeast baker.
My lessons always start off with a description of yeast and how important it is to understand the science behind the use of yeast.
Heat kills yeast so at no time in the process of mixing the dough should the yeast encounter hot liquid. Also, yeast can age out so it must be alive to begin with, keeping it in the fridge once the package is opened is necessary.
kneading develops the gluten. The gas produced within the dough will then “blow up” the balloon (dough)
If you wonder why the expansion process ends during baking it is because enough heat has been present to kill the yeast so no more gas is being produced.
I am Cajun and we have a love of bread( it is eaten with every meal) and you have inspired me to make some! I have taken 2 bread making classes, one of which my husband attended with me. The class used bread machines to mix and kneed the dough so I was never able to learn/watch the appropriate way to kneed. You explain so well that I feel confident I can do it!
I am so glad to be able to help 🙂 Thank you!
IF the dough is still sticky after all the kneading what will I do next do I need to add more flour? I tried to put more flour it ends up the dough doesn’t rise and the bread is hard when I bake It. Please help!
Hello! I am sorry you are having trouble. If dough is still sticky, you have to knead for longer, adding only as minimum flour as needed. I know it can be tricky, esp.the dough’s texture depends also how humid it is where you live.but the key is to knead it more, and add flour just enough to allow your hands to be less sticky. ( focus on dusting your hands more with flour, instead of dusting the dough) I hope that helps.
Hi! This is the first time I came across your blog when I searched for Spanish bread recipe. I don’t do a lot of baking, and I’m more of a savory type of person, but after seeing your blog and how well made it is, I think I’m inspired to do more baking :-). When kneading dough, does the surface matter? I saw that you used a wooden board; is this preferred over other types of kneading surface?
Hello Teng! I am so glad that you are inspired to bake. Baking is such a fun hobby. It does not really matter much what surface you use for kneading. I just have this wooden board that is very handy for me. However, other surfaces like countertop surface ( granite, marble etc. ), and even your tabletop is suited for kneading. What is important is that the surface is smooth and that you dust it with flour to prevent sticking. I hope that helps. I hope you continue to bake more!
I always turn the dough 1/4 turn (ish) after each push. You are right about leaning into it and using your body weight. My mother was short and liked a short table (28 inches tall) to kneed bread on. If it was to tall it would wear her out. I have never heard about the window pane method. I learned by feel. (the dough is rubbery and will pop when you lift it off the table. It will begin to lift the dough stuck on your hands.) I will have to try the window pane method. It sounds more fool proof and I am not making bread that often any more.
Hi Eric! Telling by feeling the dough is a fool-proof way to know if you have needed enough so I believe you are on the right path. 🙂
where is the video?
Hello, Dorothy! It is at the bottom part of the post 🙂
I can’t find it either.
Hello Mel! I have re-added the kneading video. It must have caught some snags during some site update. I apologize for the inconvenience.