
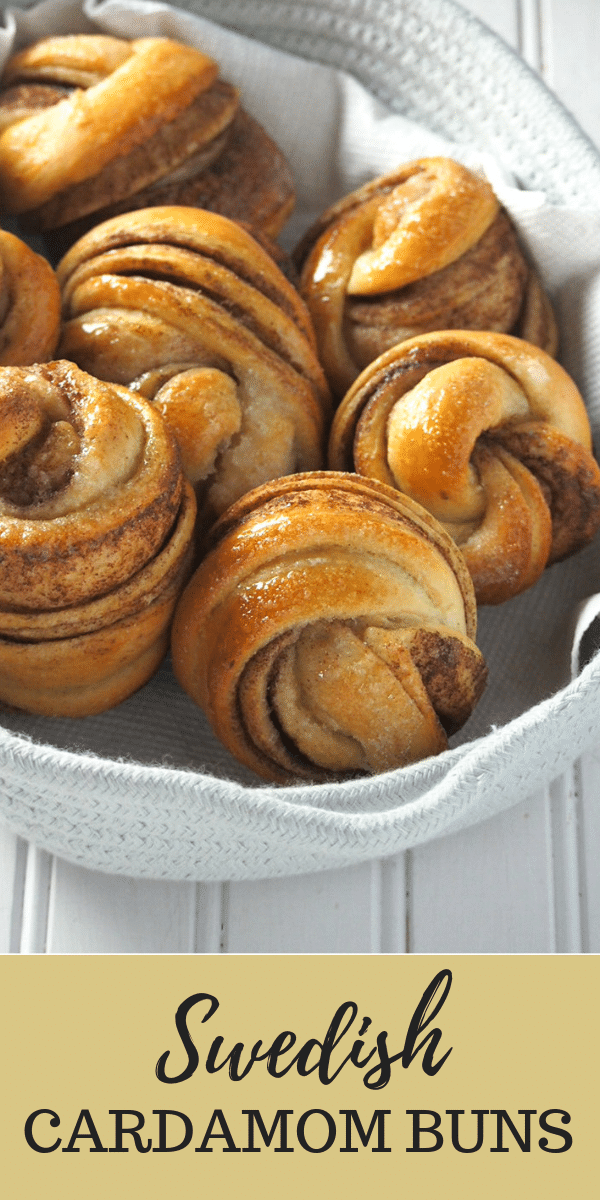
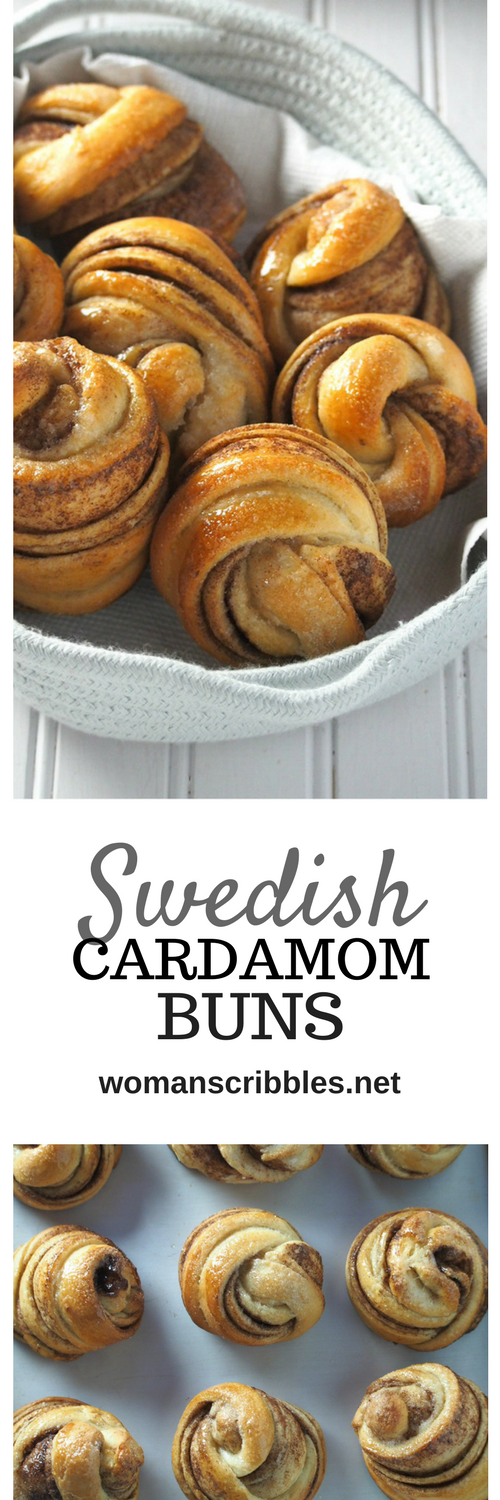
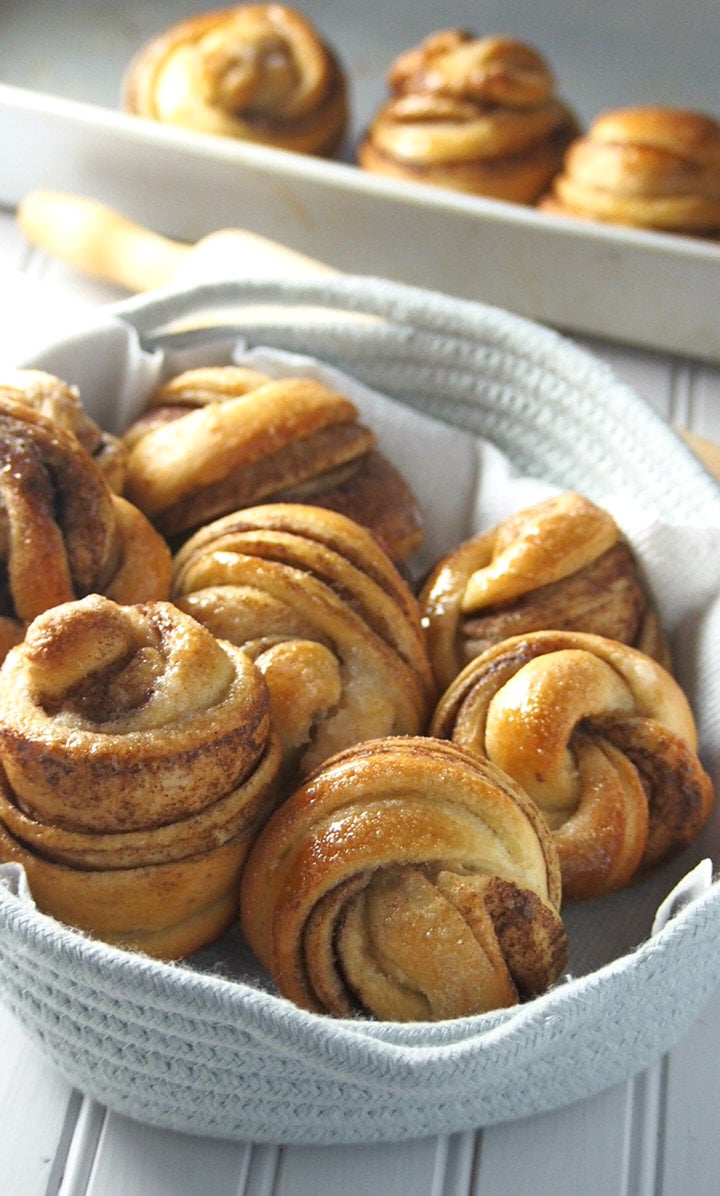
Swedish Cardamom Buns
Swedish Cardamom Buns give you sweet and tasty rolls with warm and bright flavors of cinnamon and cardamom spices combined.
To me, a bread-filled basket is a sight to behold. Has your breath ever stopped at the sight of the bread basket in the hands of the server approaching your table in restaurants?
Nerdy as it sounds, I think mine did, maybe twice or thrice with imaginary background music.
While I am not one to eat the whole basket of bread in one sitting, I just love the sight, smell and feel of warm and fresh bread. To me, it is homey, artistic and very inviting.
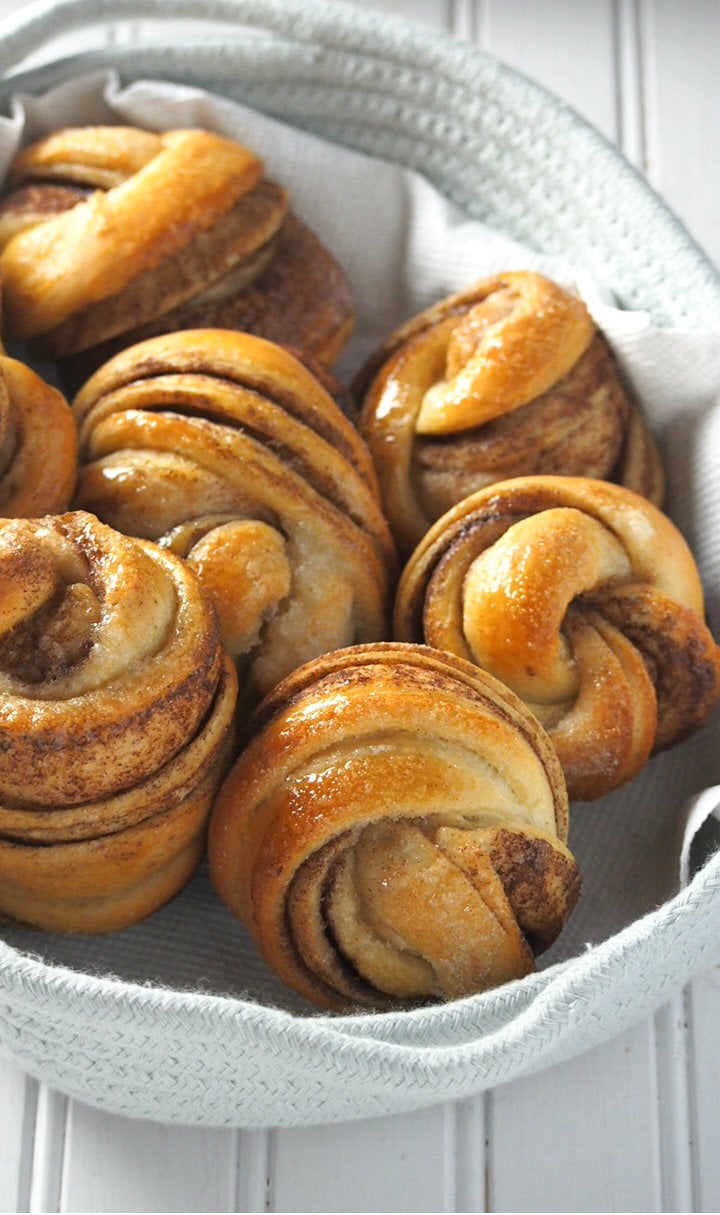
Now when I was baking these Swedish Cardamom Buns, the usual aroma of bread in the house is intensified. With the combination of cinnamon and cardamom spices baking away, the house just felt warm and comforting.
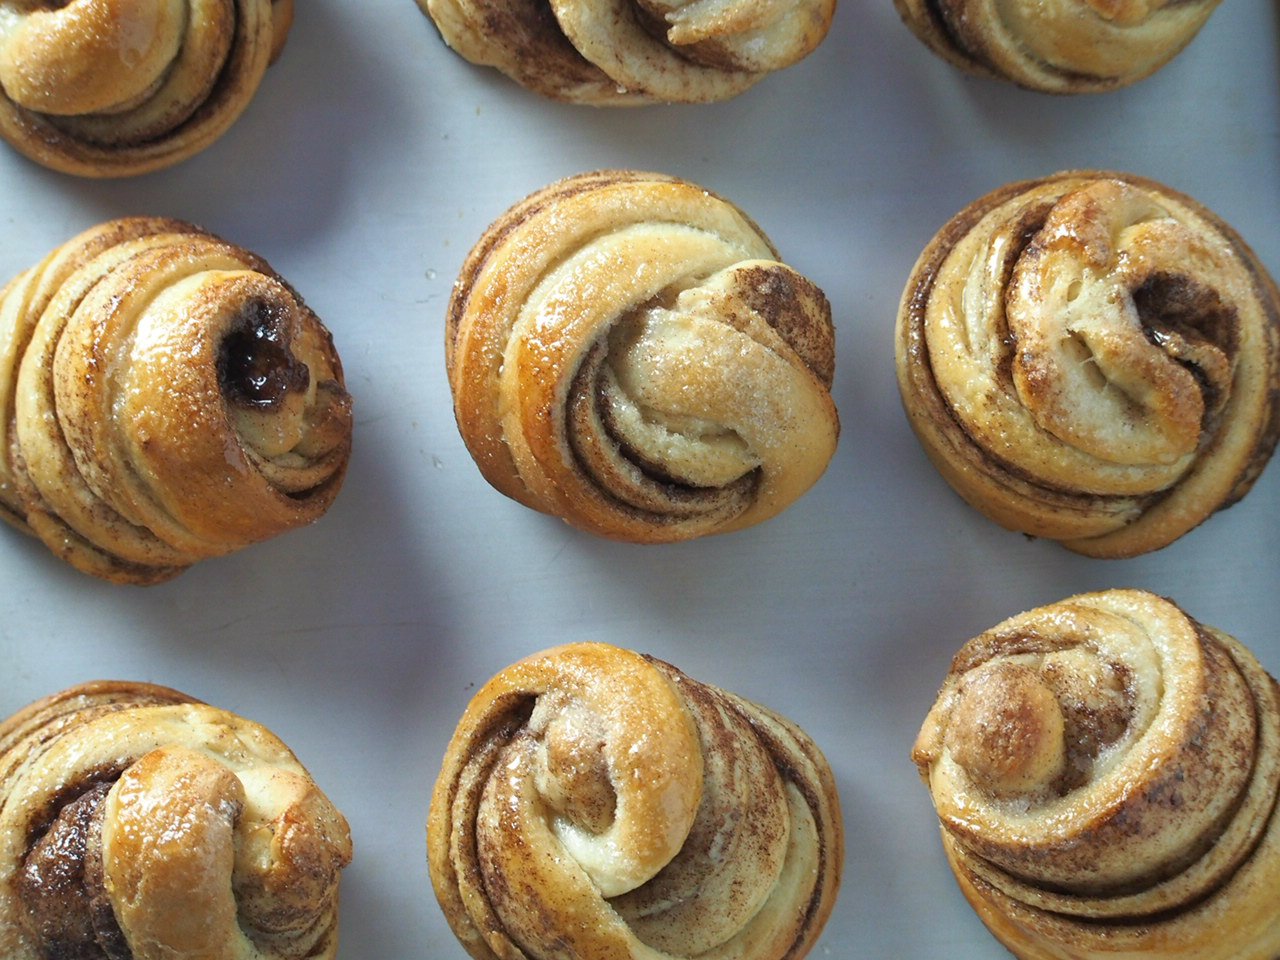
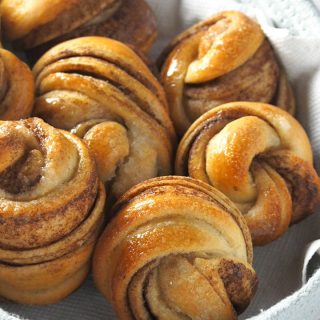
Swedish Cardamom Buns are, at their core, cinnamon buns with the addition of the bright, fresh and fruity spice that is cardamom. With just a bit of sprinkled sugar in place of a fancy frosting, these sweet buns are every bit delicious.
Swedish Cardamom Buns: The Process
Kneading the Dough
- The dough formed after mixing the yeast and other ingredients is soft, shaggy and very sticky.
- As you begin to knead, use a little amount of flour just to help you when the dough starts to stick in your hands or your working surface. The flour is only needed at the early stages of kneading but once the dough starts to take form, you need not add any more.
- As you continue to knead, the stickiness will be diminished and the dough will turn smooth.
Kneading is basically a repeated action of pushing the dough down and away from you using your palms, along with the weight of your body. Then you fold the dough over itself and repeat the pushing motion.
The end result should be a smooth dough and not sticky. It should be able to stretch thinly when you take a portion out and stretch it out with your fingers as if to form a square.
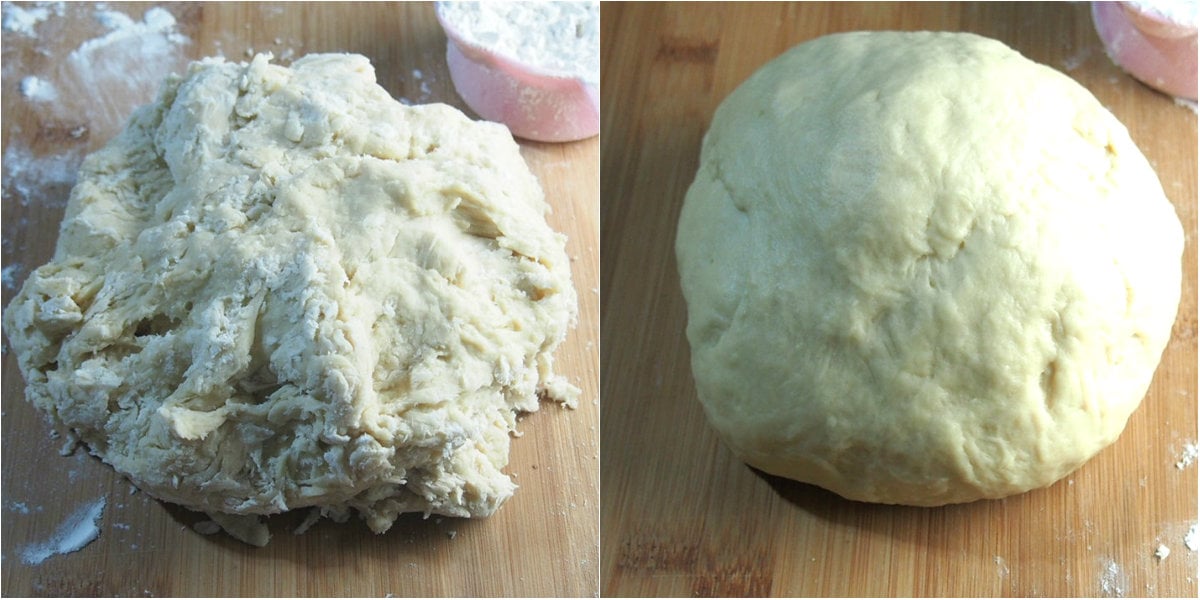
Shape the kneaded dough into a ball, let it rise, covered inside a bowl for an hour or so until doubled in size.
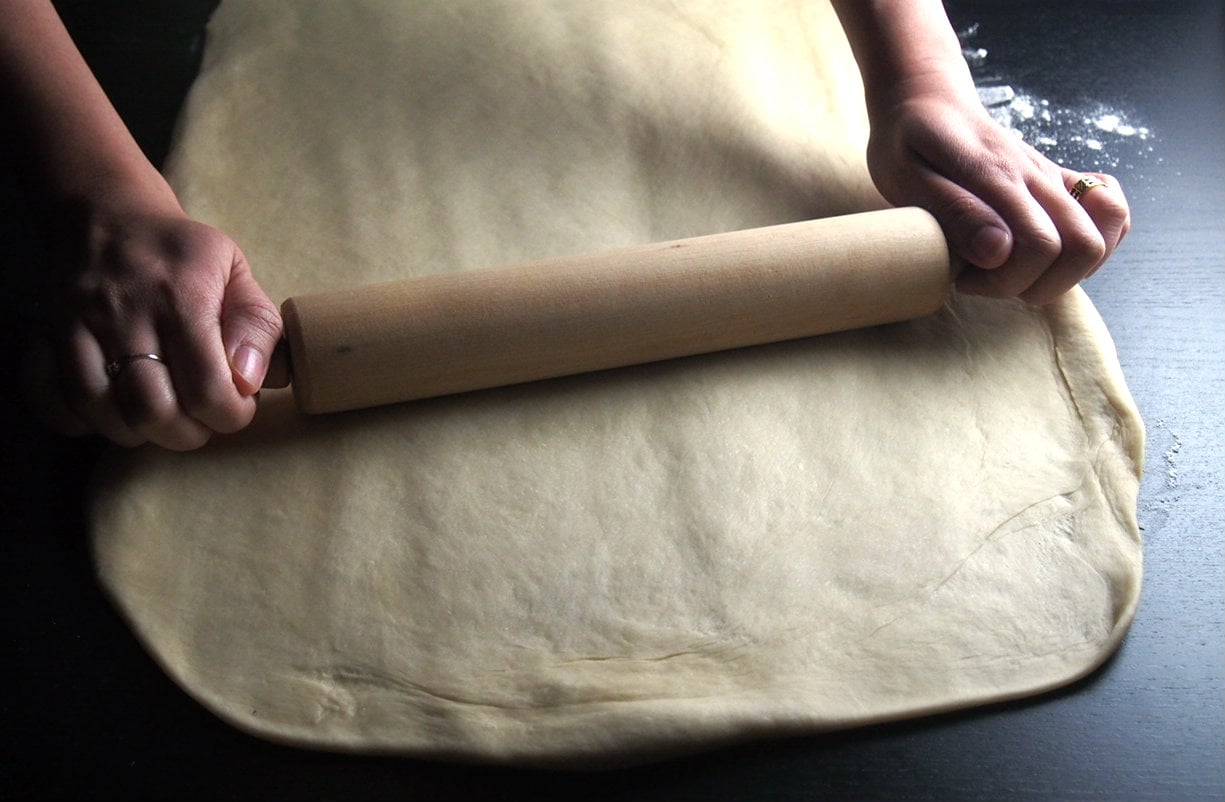
Punch dough down and roll in into a 15×21 inch rectangle.
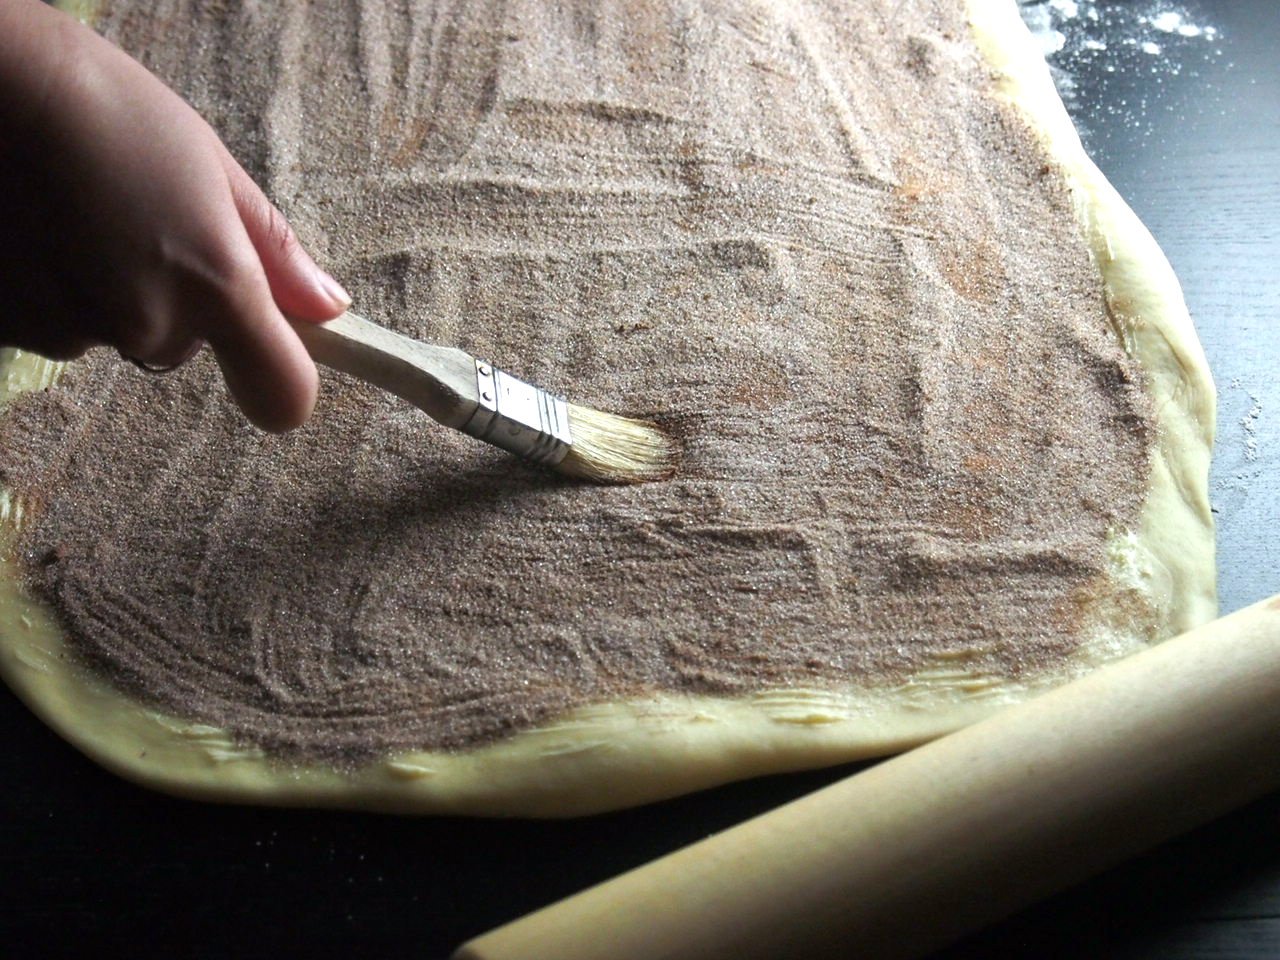
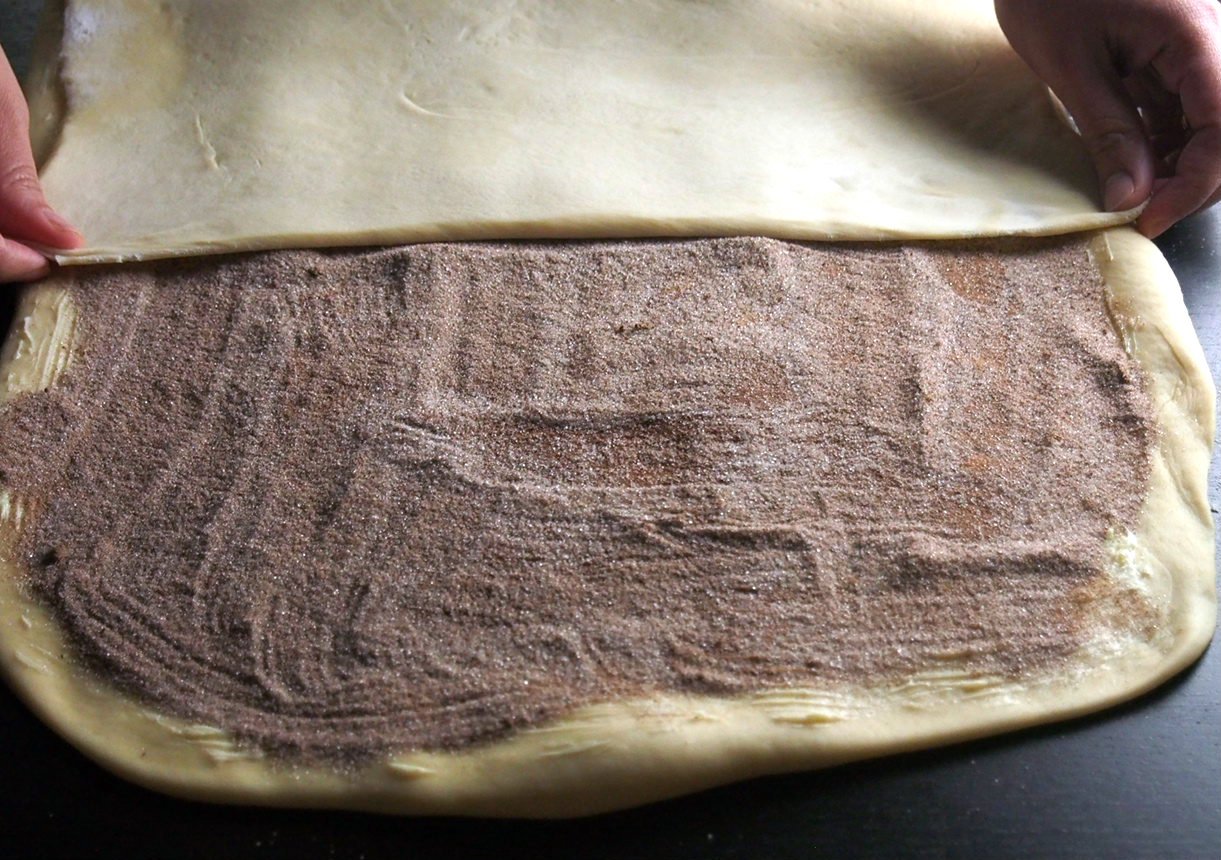
Spread the filling on top of the surface of the dough. Press the filling firmly into the dough using a brush or spatula.
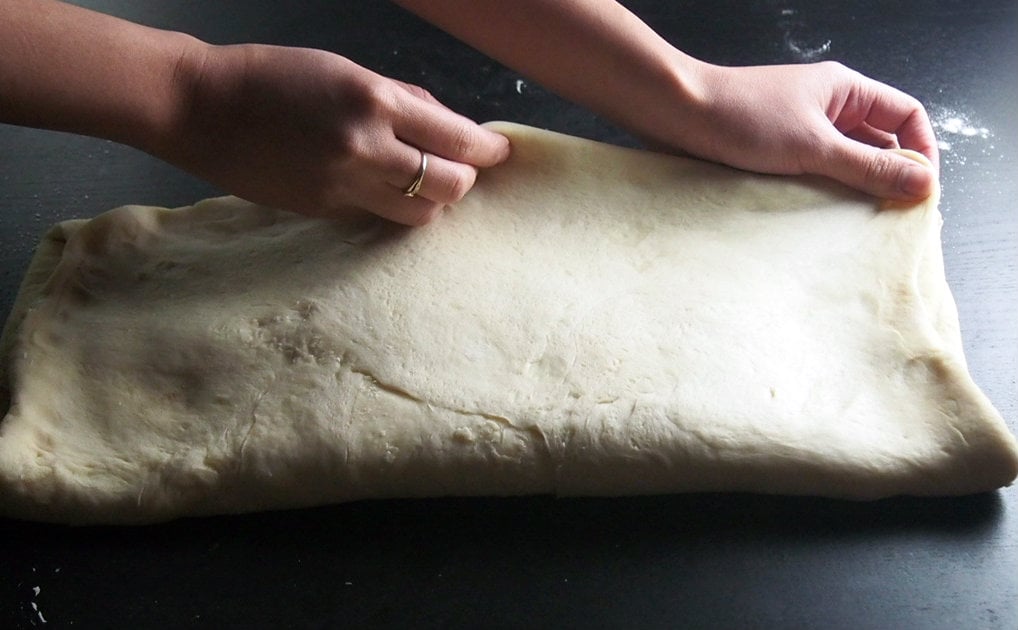
Now, fold the dough business letter style. In the landscape position, fold 1/3 of the dough over to the center. Then fold the other third over that.
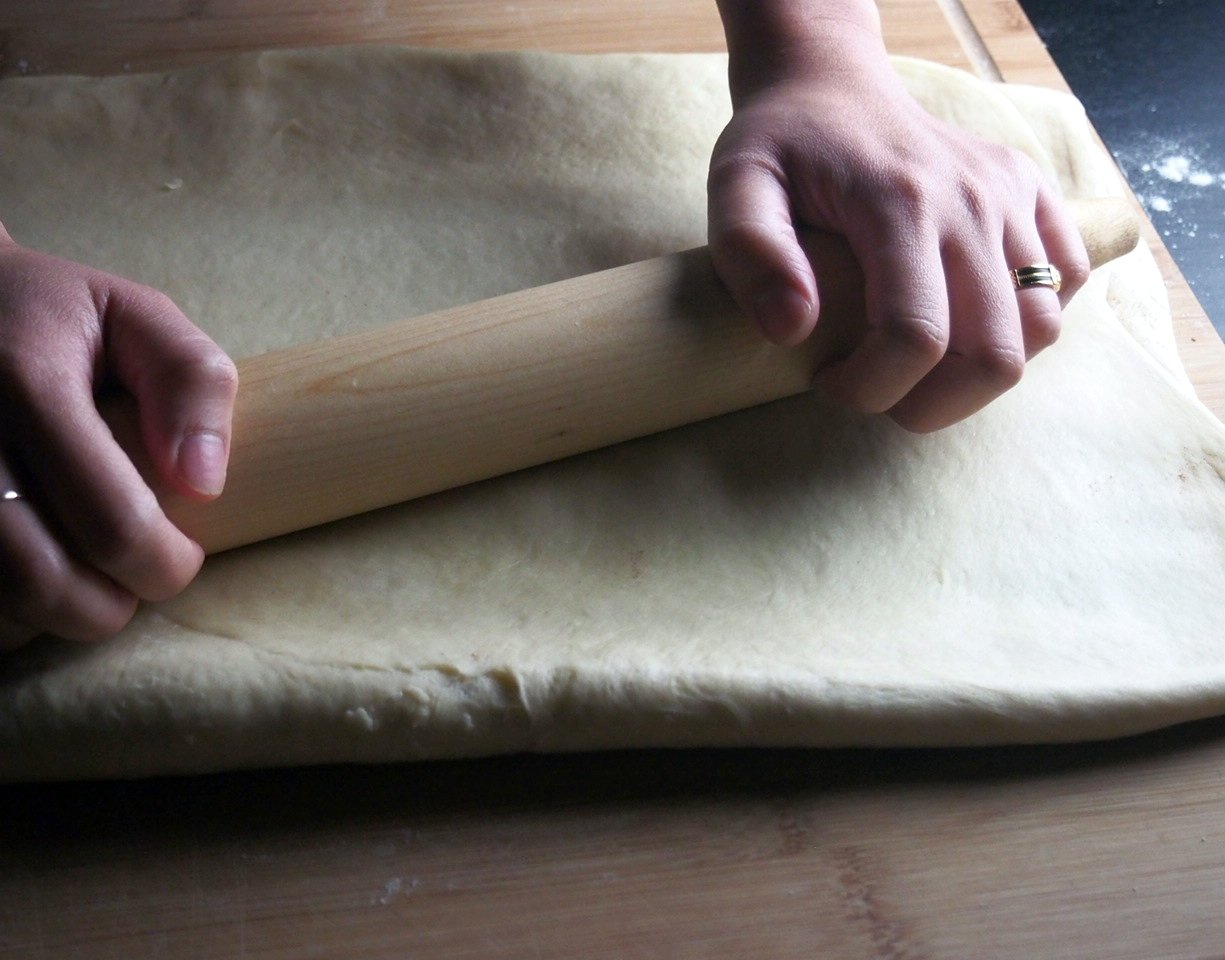
Roll the dough briefly just to stretch the width out to about 10-12 inches.
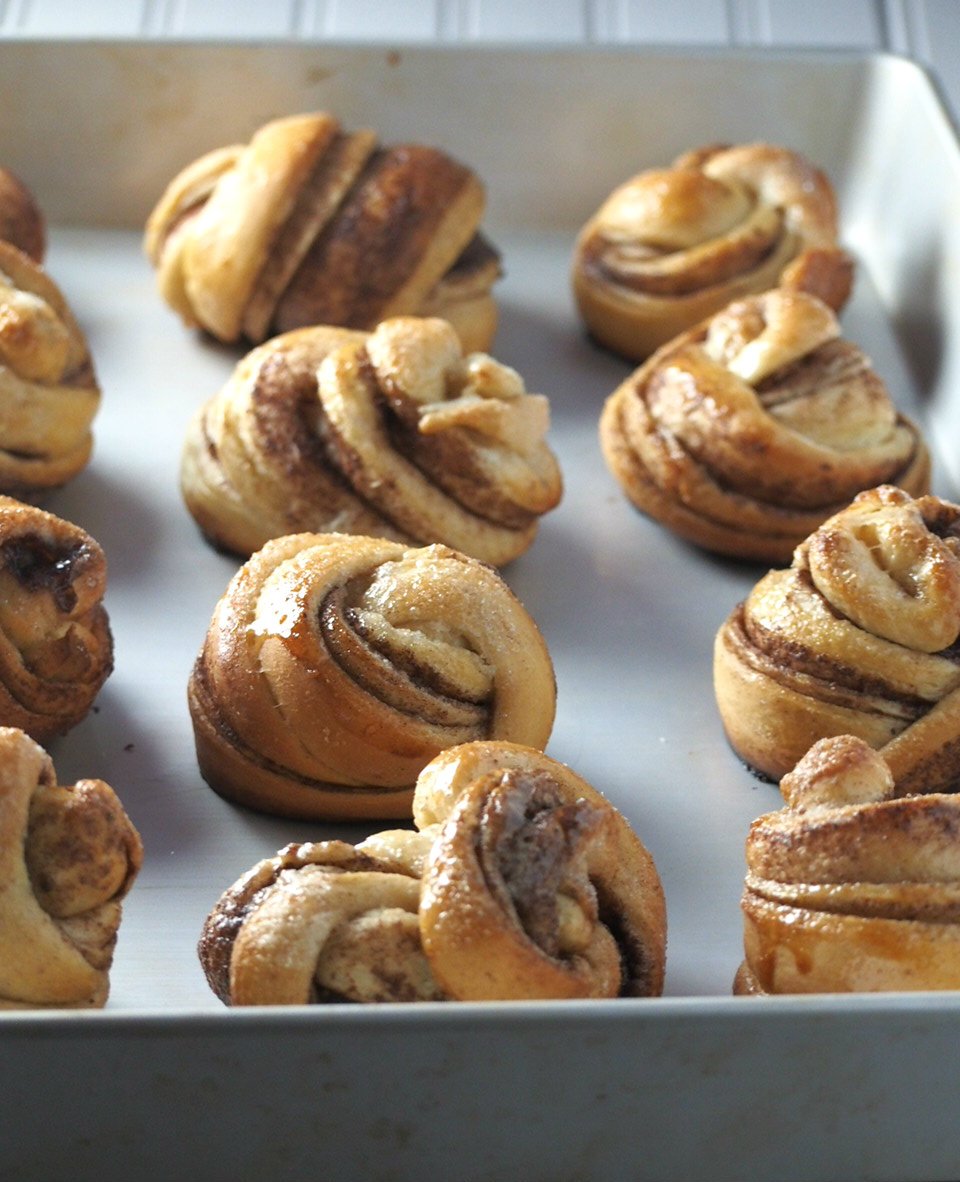
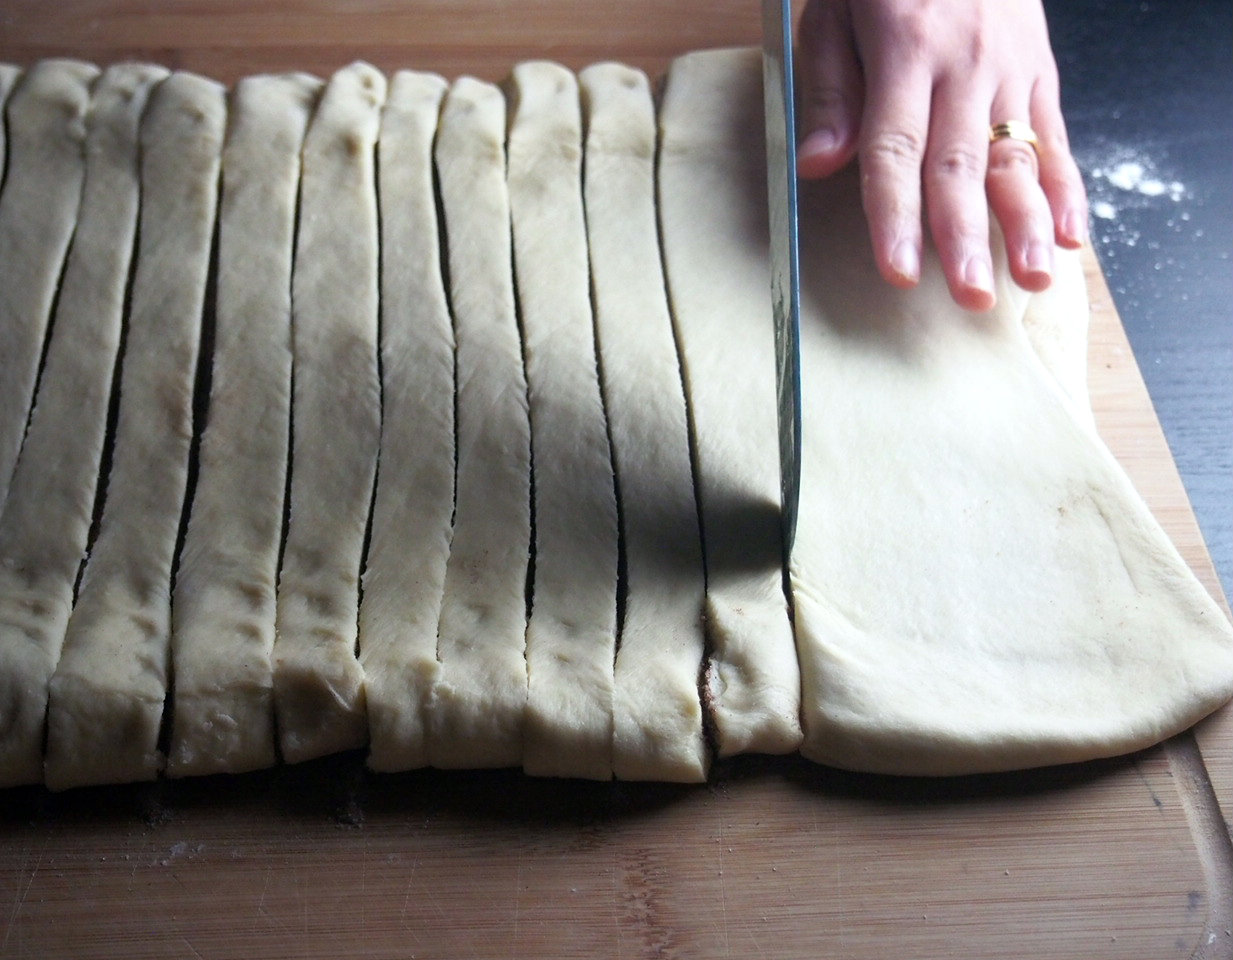
Using a sharp knife or a pizza cutter, cut 2 cm strips of dough starting from one long side to the other. You should have about 15-22 strips.
To assemble each roll, hold one end of a strip with your thumb and next three fingers, wrap dough twice around those fingers (including the thumb), and let the strip pass through the loop where the thumb is, going from under then up to the loop. Pull the strip through the loop ait cross over the bun and tuck the end to the other side.
Actually, just watch this short video. It is way simpler than the tricky instruction.
Place each bun on a baking sheet lined with parchment paper, then cover them loosely with a plastic wrap. Let the buns rise for about an hour, or until the size is doubled.
Preheat oven to 350 F. Make the egg wash by beating one egg with 1 tablespoon of milk. Brush the surface of the buns with the egg wash, and lightly sprinkle with sugar.
Bake at 350 F for 22-25 minutes, or until lightly golden. Serve them warm.
Lastly, savor each and every bite of these sweet, homemade buns.
Life is good.
Do you love baking bread? Check out these other recipes:
- Milk Bread
- Japanese Milk Buns
- Mini Cinnamon Rolls with Coffee Icing
- Chocolate Hazelnut Rolls
- Chocolate Walnut Bread
- Austrian Buchteln
- Brioche Braid
- Brioche Bread Ring with Honey Stung Cream Cheese
- Finnish Pulla
- Cinnamon Roll Bread Loaf
- Whole Wheat Cinnamon Rolls with Easy Caramel Glaze
- Pineapple Buns
- Hawaiian Roll
- Chocolate Chip Bread
If you made a recipe, please tag me on my Instagram or Facebook. I would like to see!
Swedish Cardamom Buns
Ingredients
- 1 and 1/4 cup warm water 105-110 F
- 3/4 stick unsalted butter melted and cooled slightly
- 6 tbsp sugar
- 4 and 1/2 tsp active dry yeast
- 3 large eggs beaten lightly
- 1 and 1/2 tsp salt
- 1/4 cup powdered milk
- 5-6 cups all purpose flour
For the Filling
- 1 stick unsalted butter softened
- 1/4 cup sugar
- 2 tbsp ground cinnamon
- 2 tbsp ground cardamom
Egg Wash
- 1 large egg
- 1 tbsp milk
- sugar for sprinkling
Instructions
- In a large mixing bowl, combine water, melted butter and sugar. Sprinkle the yeast over the mixture and let stand for about 5 minutes or so, until foamy.
- Add the eggs, milk powder and salt and use a wooden spoon to stir everything together. Add 5 cups of flour, one cup at a time, stirring often until a soft dough is formed. Turn it over into a floured surface and knead for about ten minutes, until the dough is smooth and elastic. Use just enough flour from the remaining 1 cup during kneading until the dough is no longer sticky.
- Shape kneaded dough into a ball and place in a bowl. Cover with plastic wrap and let rise for about an hour, until doubled in size.
- Meanwhile, make the filling. Stir together softened butter, sugar, cinnamon, and cardamom until combined. Set aside.
- Punch down risen dough and roll into a 15x21 rectangle. Spread the filling on the surface. Use a spatula, brush or back of the spoon to press the filling into the dough. Starting on the short side of the dough, fold 1/3 of it into the center, then fold the other third over to center too, covering the first flap. This can also be called as the business letter fold. Briefly roll the pin over the folded dough just to stretch the width out to 10-12 inches.
- Using a knife or pizza cutter, cut strips of dough starting from one long side to the other. The strips should be about 2 cm in thickness. You will be able to make 15-22 strips. To assemble the rolls, take one strip, hold one end with your thumb and next three fingers. Wrap the strip around your fingers two times, covering the thumb as well, then pull the dough under and slip it through the opening where your thumb is. Pull it upwards and let it cross over the bun and tuck it in the other side. Watch the short video for assistance.
- Place each roll on a baking sheet that is lined with parchment paper. Cover it loosely with a plastic wrap and let rise for about an hour, until double in size.Preheat oven to 350 F. Beat 1 egg with 1 tablespoon milk and brush this glaze on the surface of the risen rolls. Sprinkle a little sugar over top of the rolls and bake for about 22-25 minutes, until lightly golden.
Video
Notes
Nutrition


Just wondering if you can freeze the dough after the first rise? Like once you fold letter folds?
Hi Christina! Yes, you can freeze the dough after the first rise stage.
I love these cardamom buns
I have tried many different recipes for this but this one is the best
Though I always cook for less time and serve it with creme patissiere which takes these to another level
Hi Jess! Sounds so good!
This might be a weird question, but what if I omit the cardamom? Having trouble finding it and I don’t want to pay $15 for a bottle. Will it just be sweet and cinnamony or will it ruin it?
Hi Marshall! These are still delish even without the cardamom 🙂
CHeck Nuts.com for cardamom at a good price!
3/4 stick of butter? Is that the same as 3/4 cup of butter?
Hi Kim. No, its not the same as 3/4 cup. 1 stick of butter is equal to 1/2 cup. Inhope you enjoy this!
I’m currently in the process of making this recipe, and I just wanted to share that because I did not have milk powder on hand, I subbed it equally for cultured buttermilk powder that I do keep on hand! The dough seemed to come together well, it is currently in its first proof and rising well. I will update this with a comment on how the finished product is!
Hello there! I hope it worked well for you!
Hi there!
Do you know what would happen if I use 3 cups of bread flour and 3 cups of all purpose flour or 2.5 cups of bread and 2.5 cups of all purpose instead of just the entire 6 cup all purpose flour?
Hello Erin! You can use bread flour for a part of the all-purpose and it should be fine.
These are so good! Not too sweet just perfect. I cut the Strips too thick as I read 2 in instead of 2cm so they turned out huge.
I am glad you loved them, Barbara!
Hello! I tried making these and they tasted delicious but they didn’t rise at all, I think I may have killed my yeast. How should I avoid this?
Hello Erica! It is best to use a thermometer to know that the liquid don’t get too hot. Good luck!
I made the filling and it seems very liquid and darker than the video and picture. Did I do this correct?
Hello there! That is fine, just spread it on the dough. And it should be ok.
This is the exact same recipe as the one from Gourmet in 1996 (as posted on Epicurious). I was trying to decide on a recipe and compared both side by side. I would have hoped people wouldn’t post other people’s recipes as their own…
Hello Ash! You are correct. This awesome recipe is from Epicurious, as stated in the notes section of the recipe 🙂
Hey Sanna! This recipe has been on my dough/breads pinterest board for awhile and thought I might make them this weekend for my church group. They’re my guinea pigs when I try new recipes. Just curious what the powdered milk’s role is. I’ve never used it before and not sure if excluding it completely and sub with flour would make them come out differently. If it’s a fat that is needed, wouldn’t using regular milk instead of warm water to get the east going work just as well? I guess I could try myself and report back with results but was curious if you knew the science/reason behind powdered milk specifically. Thanks. Can’t wait to try them
Hello there Beth! You can omit the powdered milk if you don’t have it. It just adds a bit of moisture to the bread, and a bit of flavor too. But you can omit it too, if you prefer 🙂
Hi Sanna,
Do these freeze well after baking or would you recommend freezing them before baking? Thanks!
Hello there, Morgan! You can freeze them once they are shaped. Just wrap them well in plastic and then in foil. After that, you can thaw them, let them rise, sprinkle the sugar topping, then bake. I hope you enjoy these!
Hi,
Is it possible to freeze these once they have been shaped? I don’t trust myself to make 20 buns and not eat them in one sitting
Hello there Bronwyn! You can freeze them once they are shaped. Just wrap them well in plastic and then in foil. After that, you can thaw them, let them rise, sprinkle the sugar topping, then bake. I hope you enjoy these!
Hi Sanna,
I have not tried to make these yet but am excited to! I would like to make a lot more but smaller. How do you suggest I go about doing so?
Hello there, you can just cut the strips of dough as thin as you can so you can make smaller buns. A pizza cutter will be best to use. Or you can also cut the strips halfway horizontally instead of long ones. I hope that helps!
Would love to make these gluten free but not sure if I need to add anything to the dough so it can be worked the same as regular dough. Any suggestions?
Hi Theresa! I have not tried baking gluten-free so I cannot really give my input. However, if you do try it, I appreciate you leaving feedback so that others can see. Thanks!
Hey, great recipe. No problem with rise but is the cook temp right? 20-25min at 350F?
I have a temp in my oven and 30min at 300F and they are not brown. Even 30min at 400F they are not at all brown on top
Hi Sanna,
I baked these today as a birthday present for my best friend; it was my first serious bake – I experimented with cookies and muffins so far – and they turned out pretty OK. The dough rose and it was elastic, but the buns were not holding up like yours, I think I did not knit it enough, maybe? 🙂 Anyways, for a first try, they turned up better than I expected or trusted myself to begin with 🙂
I will definitely try it again and I was thinking if adding a sugar syrup on top would ruin the recipe? I am trying to recreate
a cardamon bun I had in a Danish coffee place in Lisbon – they were stickier and more moist.
Many thanks, again, for this easy to follow recipe.
Hello Adina! Thank you for your feedback 🙂 You can definitely brush these buns with sugar syrup right after baking. That will be awesome too! As with the knitting, it gets better and better for me as I bake it often 🙂 I had to practice too 🙂