How To Make Hokkaido Baked Cheese Tarts: A Step By Step Guide
Learn how to recreate the delicious and popular Hokkaido baked cheese tarts at home with this easy step-by-step guide. Impress your friends and family with your baking skills! If you want a single, 9 inch tart version, check out my Cheese Tart Recipe.
This Hokkaido Baked Cheese Tarts recipe is a version you can totally make at home. Follow the guide closely, and you are sure to make these with success.
You can enjoy cheesy treats that are flaky, rich but not too sweet. And you will have added one new dessert recipe to your list.
My family loves this. And I am sure yours will too! Let’s begin.
Hokkaido Baked Cheese Tarts
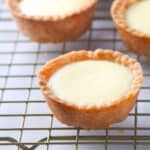
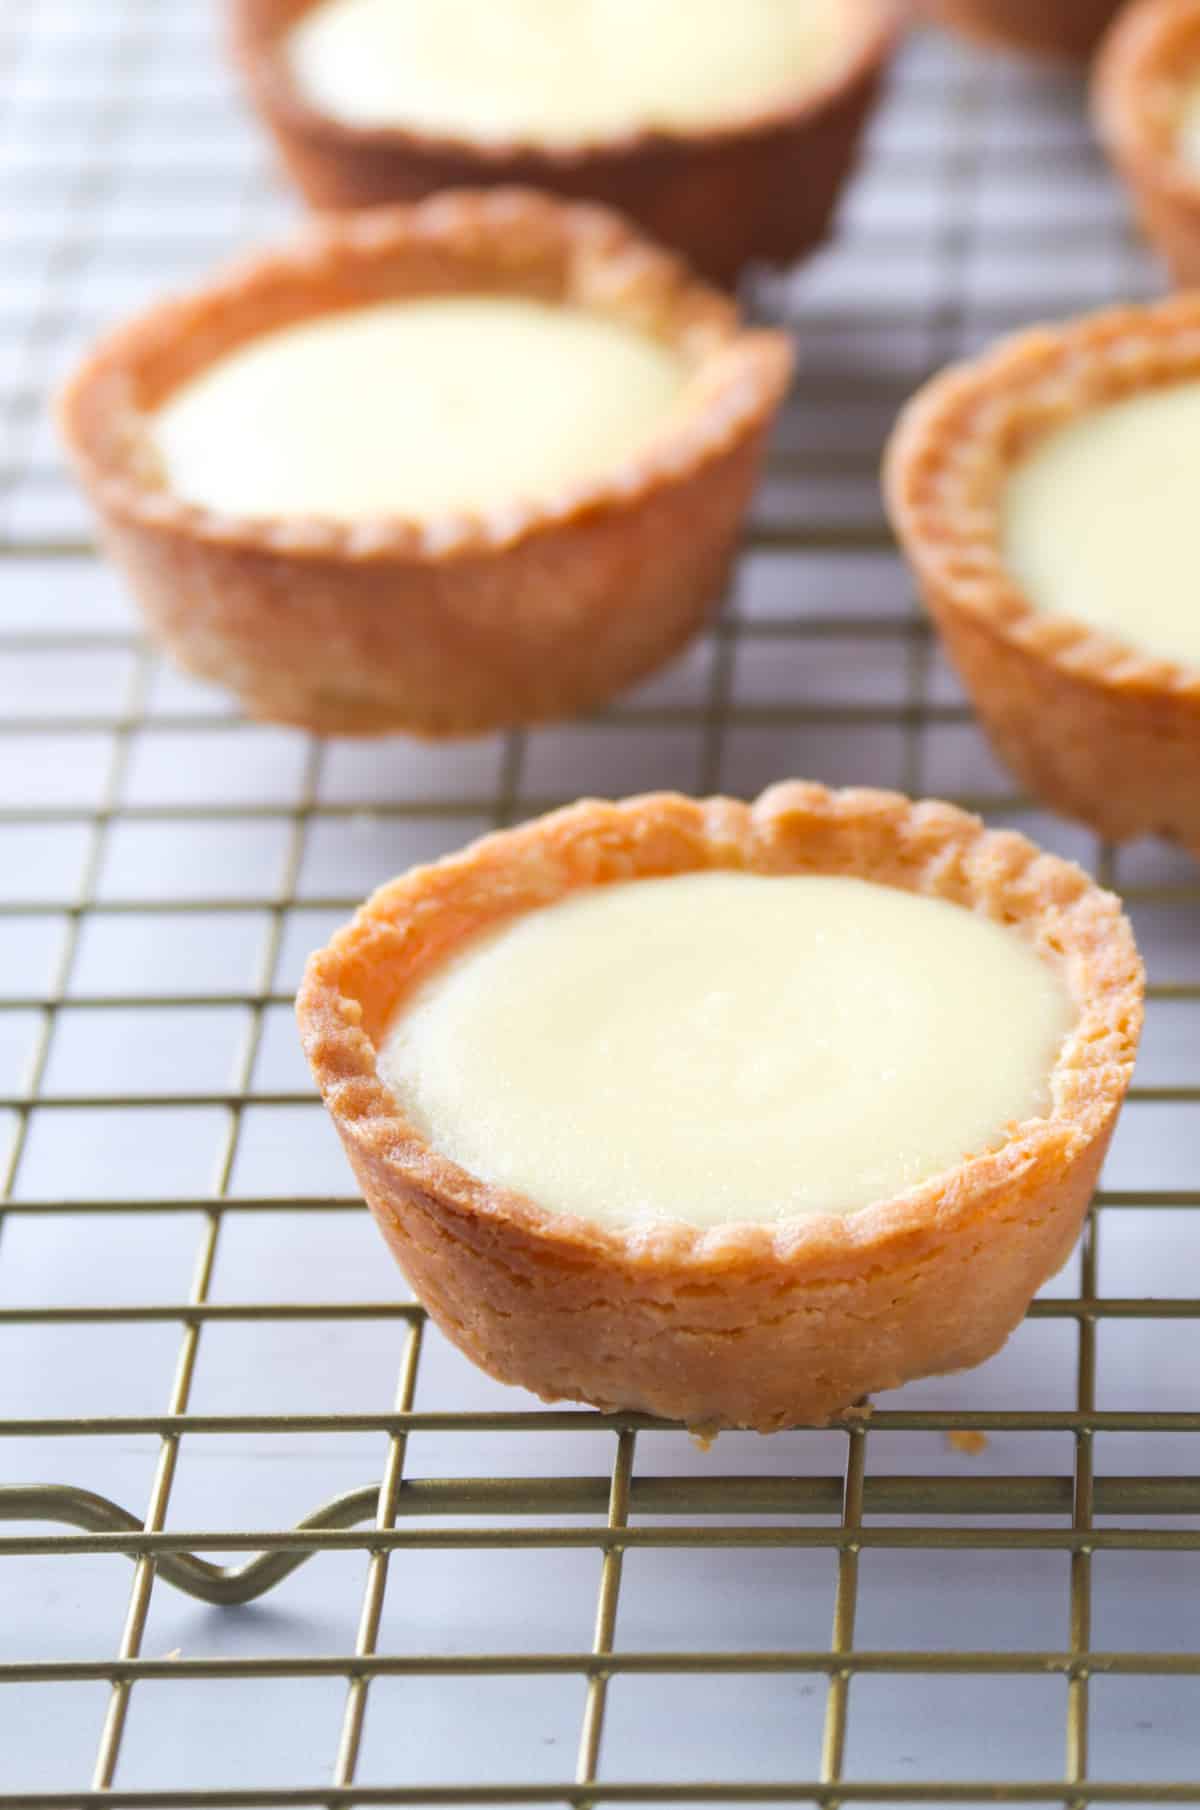
Hokkaido Cheese tarts are a widely popular dessert in Japan. It is well known for the combination of cheesy, crunchy and sweet elements in one little pastry.
This homemade version is totally doable for the home baker. And while it takes a good amount of time to make it, the pastry is totally forgiving, and the cheese filling is done by melting ingredients in a simple double boiler.
The results are delicious, crowd pleasing and is guaranteed to be a new favorite! Another delicious Asian cheesecake on the site is Ube Basque Cheesecake. You should also try it!
The Cheese Filling
- This simple combination of cream cheese, and parmesan cheese makes up the cheesy element of the cheese tarts.
- The milk, whipping cream, unsalted butter, sugar and egg all adds richness and a touch of sweetness to this cheese custard filling.
- While most recipes for Hokkaido Cheese Tart recipes call for mascarpone, I chose to omit it in this homemade version as it is very pricey.
Pointers and Tips for Success
- The recipe can make 14-16 cheese tarts. However, since a standard muffin pan has 12 spots, I usually just make 12 at a time, then I refrigerate the remaining pastry dough and cheese filling to make the extra tarts the next day.
- Do not skip the overnight chilling of the pastry. This will allow the dough to rest for ease of rolling and to avoid shrinkage.
- The pastry will be prebaked without the filling. For this, we will need some cut up parchment paper to lay over each tart crust, and some uncooked beans to serve as pie weights. We will bake the crusts until they dry, but not fully done.
- Then, we will briefly bake again with the cheese filling, just to set it a bit. The result- warm, velvety and flowy cheese nestled on crisp tart shells!
Step 1: Make The Crust
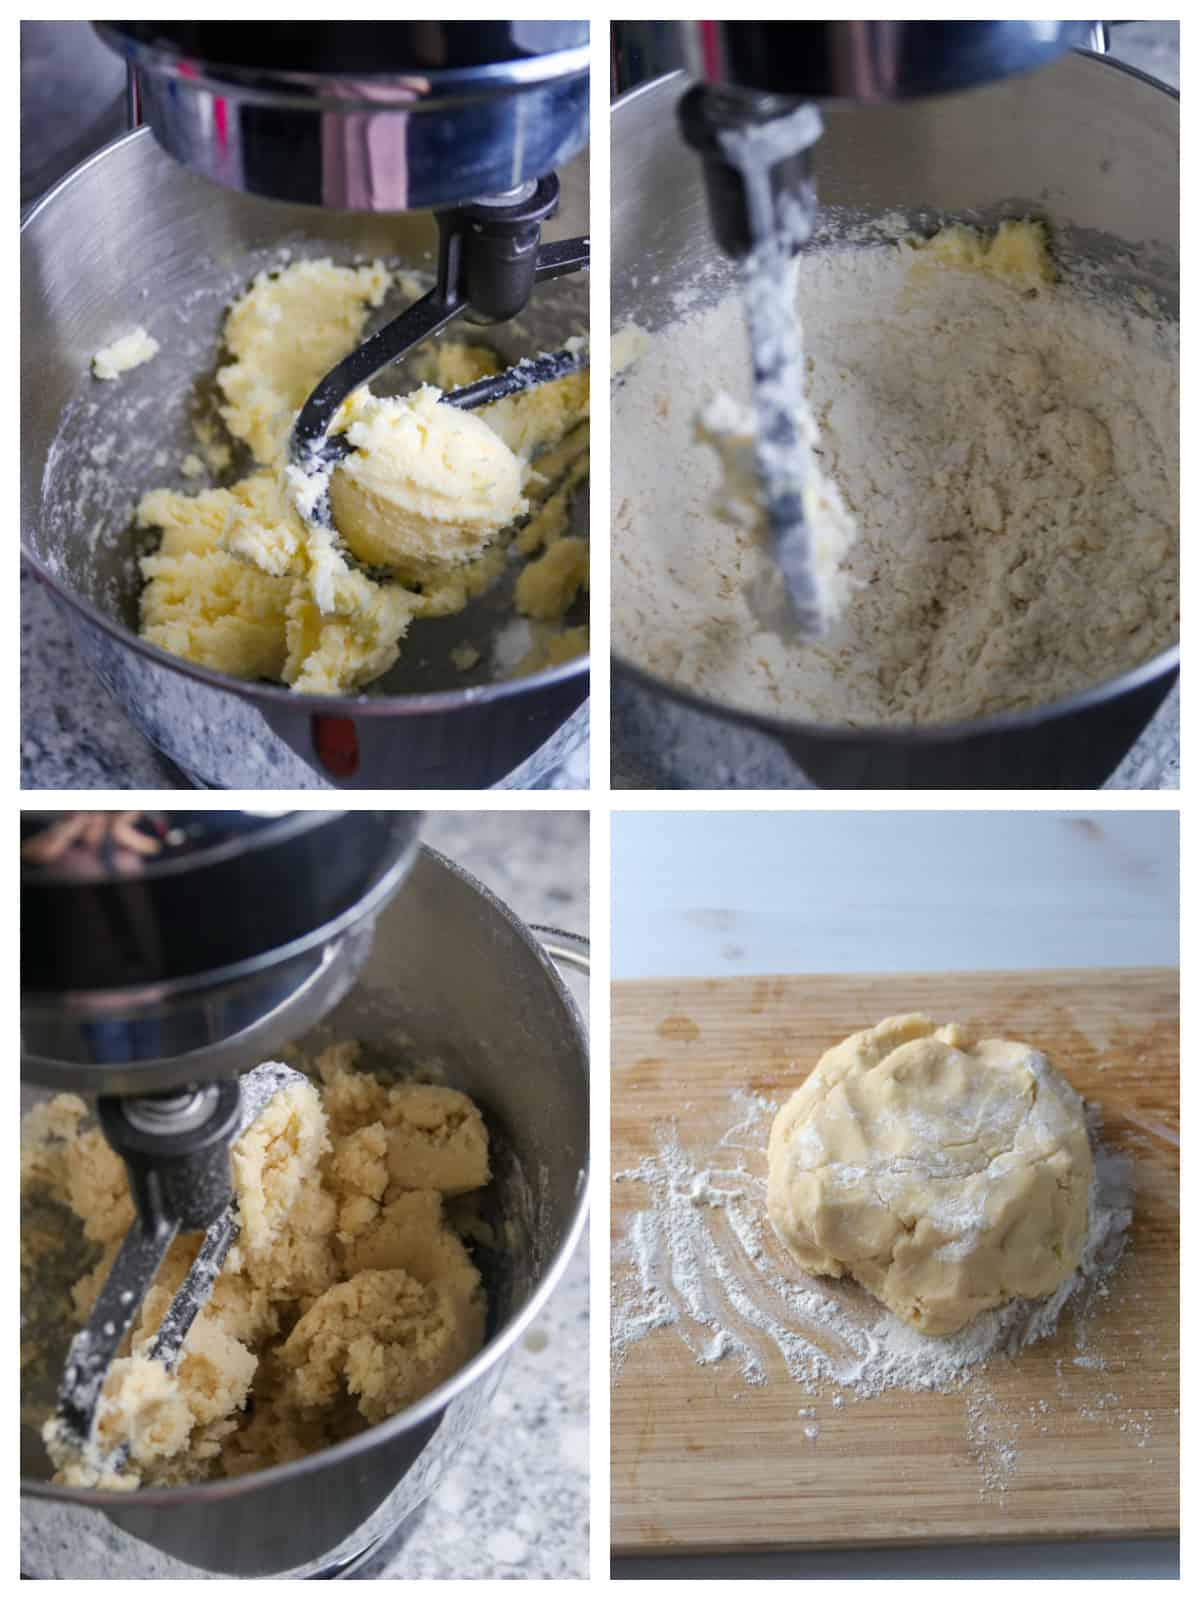
In the bowl of a stand mixer, cream together butter and sugar until fluffy. Start at a low speed then, speeding up once the sugar is moistened. Beat in the egg yolk until incorporated. Add the flour and salt and beat until moistened. Add water and briefly mix just until a dough is formed.
Turn the dough into a slightly floured surface. Knead briefly then shape into a 2 inch thick disk. Wrap this in plastic and let it rest in the fridge overnight.
Step 2: Roll Out the Dough and Shape The Tart Shells
Let the chilled dough sit at room temperature for 8-10 minutes. On a lightly floured surface, Roll the dough out to ¼ inch thickness. Using a 3 inch scalloped cookie cutter (a plain, round one will work, too), cut circles from the dough.
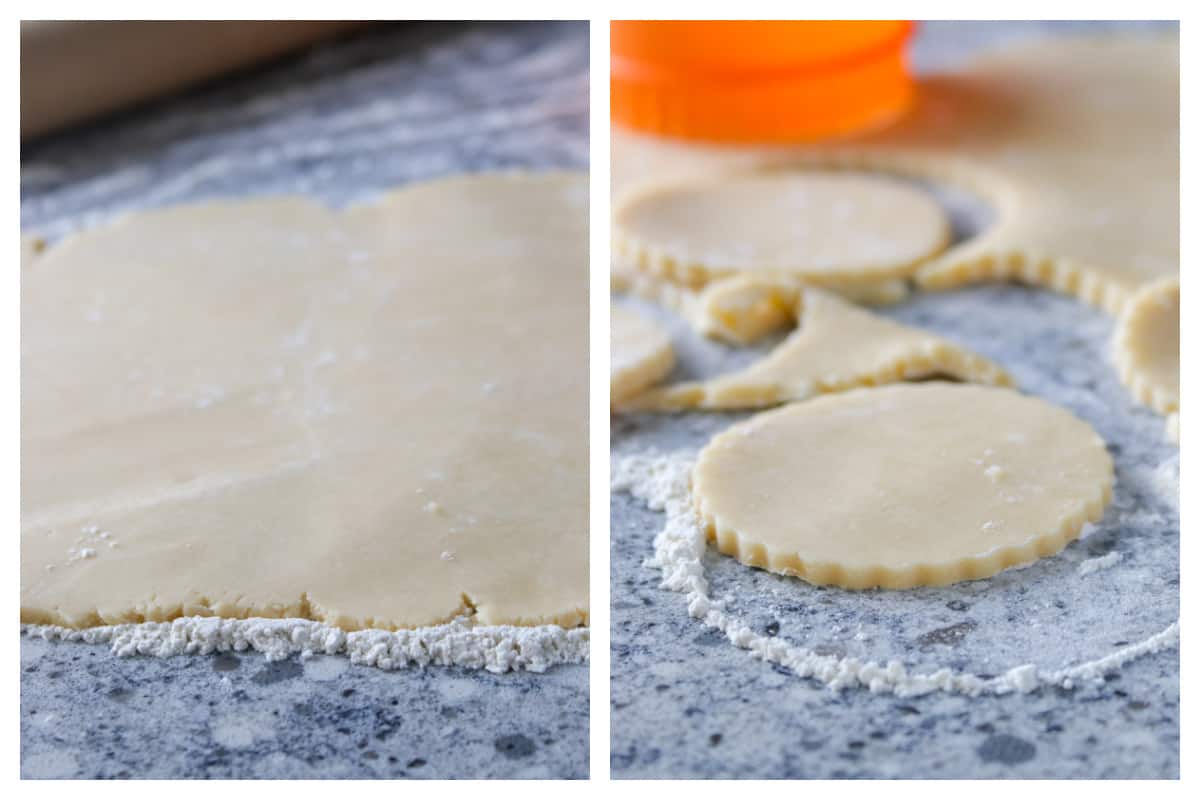
Use a pastry scraper or angled spatula to lift the edges of the dough circles. Place each cut dough into the slots in the muffin pan. Make sure that the dough is nice and flushed against the sides of the muffin cavity. Gather and roll out the remaining pastry, and cut more circles.
Chill the muffin pan in the fridge for an hour. Meanwhile, cut 12 little pieces of parchment paper that can cover the bottom and sides of each tart shell. Crumple each one.
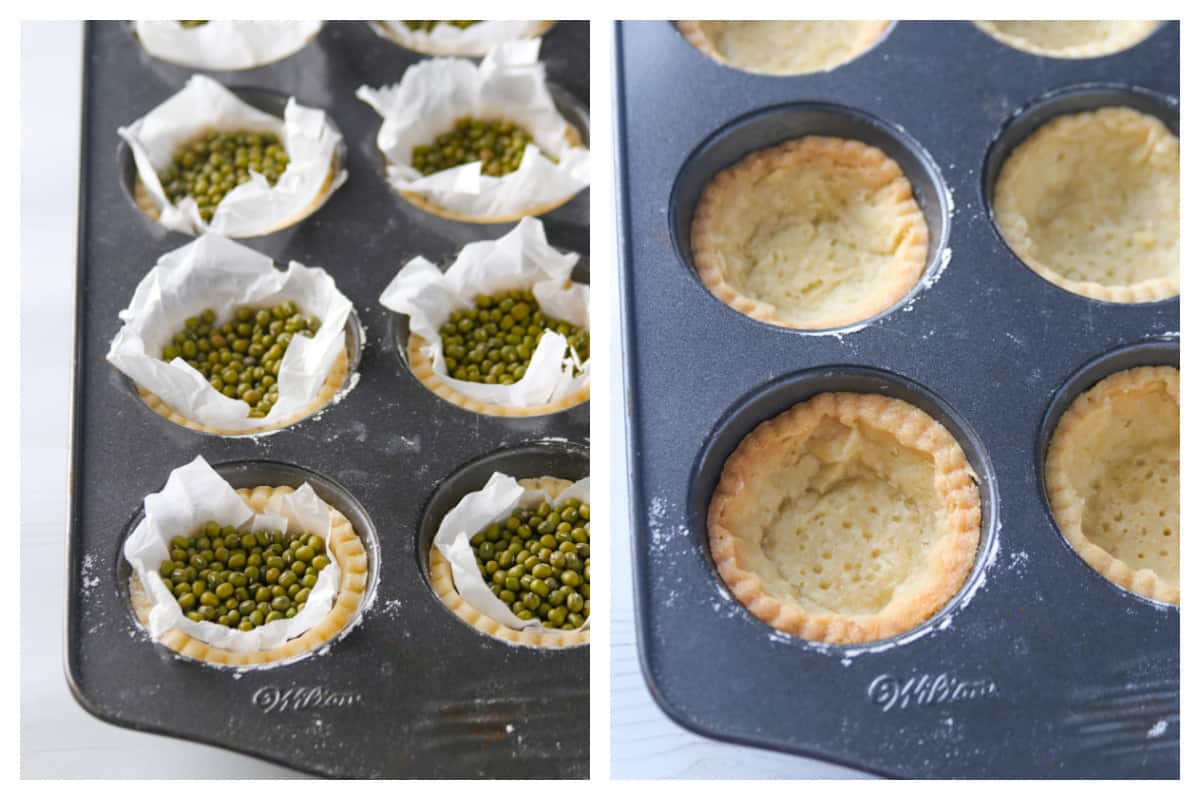
Step 3: Pre-Bake the Tart Shells
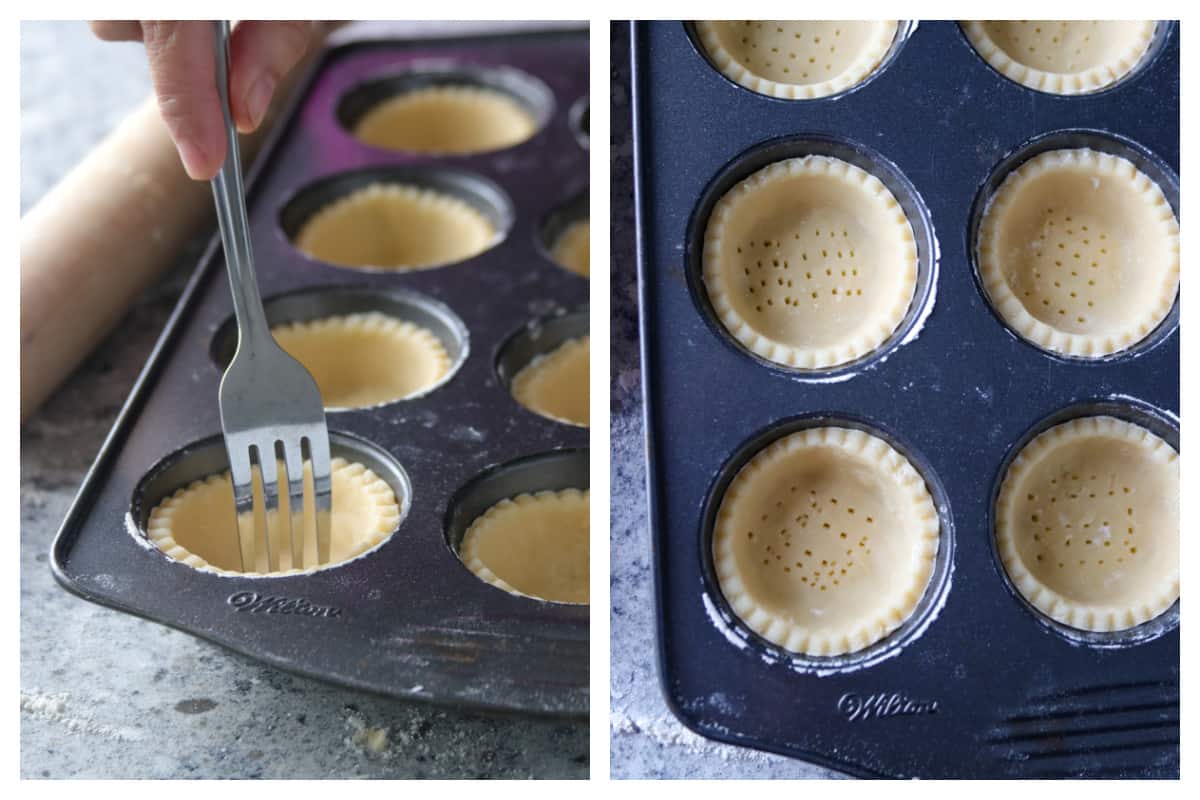
Take the pan with the tart shell out from the fridge. Using the tines of a fork, poke several holes on the bottom of each shell.
Preheat oven to 325 ℉. Lay the cut up parchment paper over each tart shell, easing it gently in every slot. Carefully spoon uncooked beans to each hole, filling up the sides.
Pre bake the shells at 325℉ for 20 minutes. Take out the pan from the oven and carefully remove the parchment with the beans.
If the dough tears or the dough sticks while removing the parchment paper, bake for an additional 5-7 minutes with the pie weights on, until the pastry is dry. Then remove the parchment and weights and bake the shells for 5-10 minutes more, or until the edges are lightly golden. Let the shells cool.
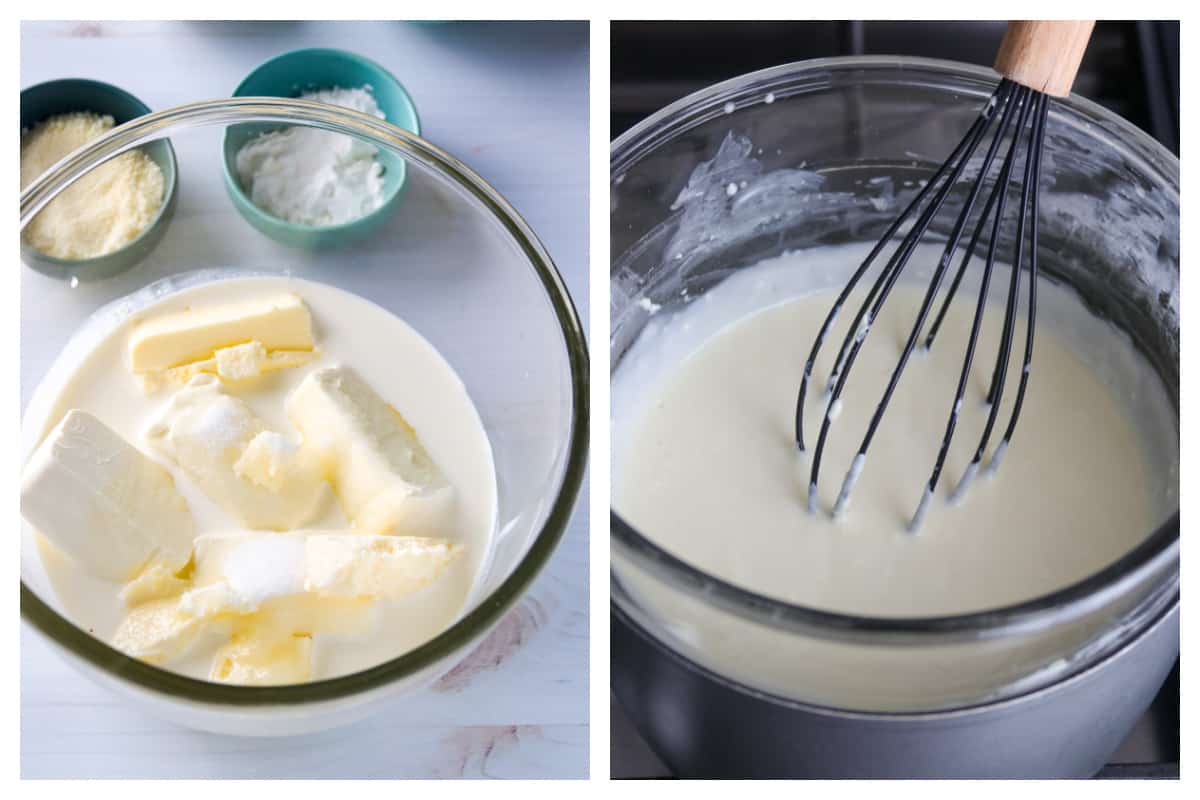
Step 4: Make the Cheese Filling
Prepare a double boiler set up. Fill a pot or saucepan with about 2 inch of water. Bring it to gentle simmer. Fit a heat-resistant bowl snugly over the pot (the water should not touch the bottom of the bowl. If it does, reduce the water).
Add the cream cheese, butter, milk, whipping cream and sugar to the bowl. Whisk occasionally until everything melts together. Once the cream cheese has melted, stir in the parmesan cheese until the mixture is smooth.
In a small bowl, beat together egg, lemon juice and cornstarch until smooth. Add about 1 tablespoon of the cheese mixture to the egg-lemon mix and stir. Add this small mixture to the bowl. Stir for a few minutes more, until the mixture is thick like a curd. Turn off heat. Allow the cheese filling to cool slightly.
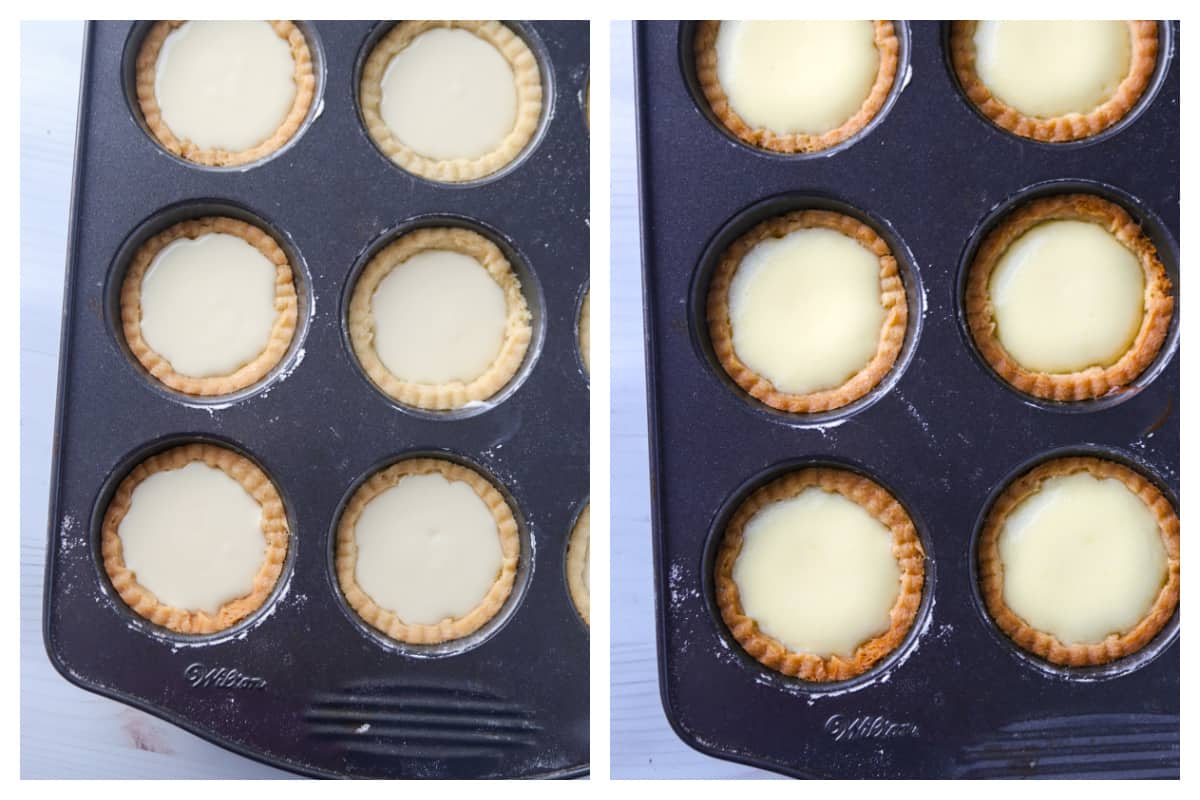
Step 5: Baking The Hokkaido Cheese Tarts
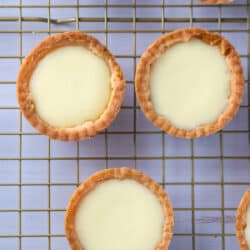
Preheat oven to 425 F. Using a soup ladle, spoon cheese mixture into each tart shell until almost full. Bake at 425 ℉ for 12-15 minutes, or until the edges of the cheese has set, and there is only a slight jiggle in the middle. Do not overbake. If the cheese is starting to balloon or puff, you are overbaking it.
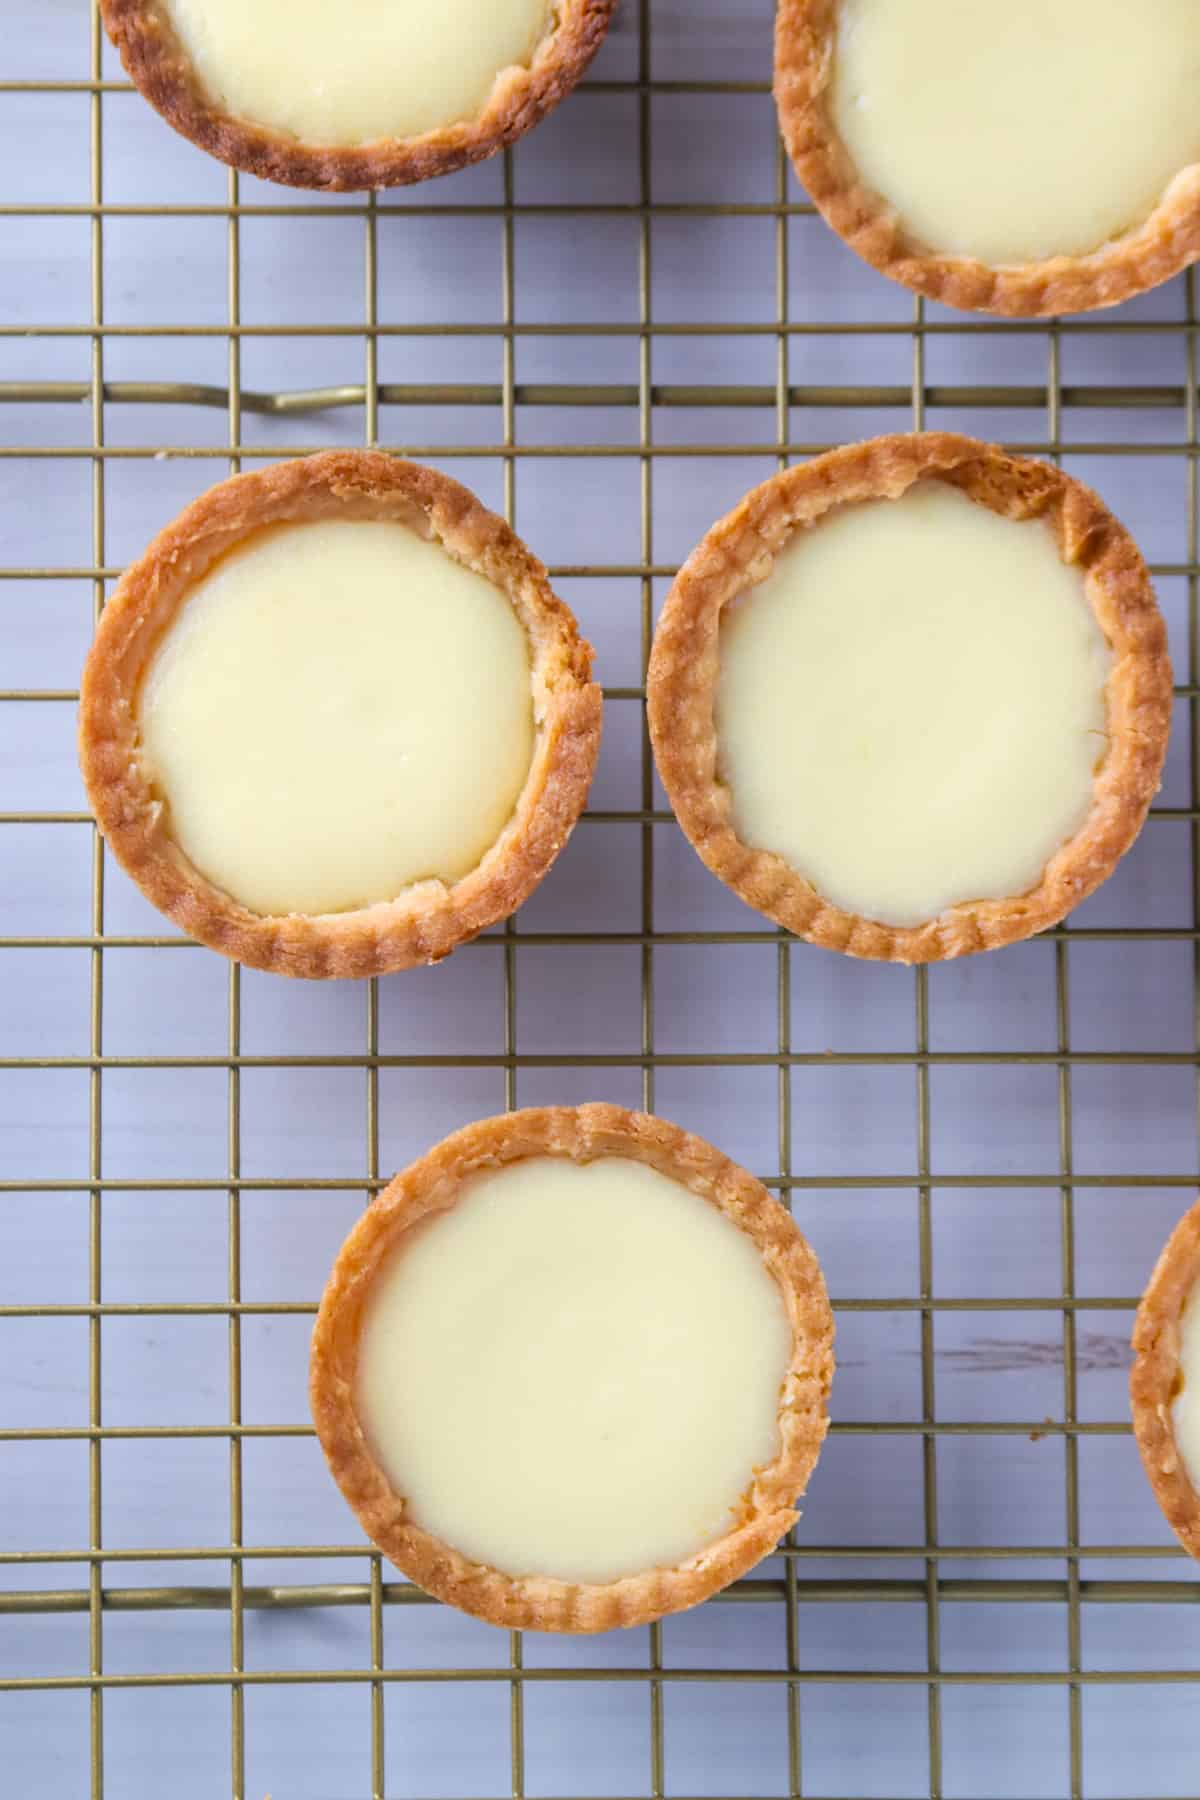
Serving and Storage Tips for Hokkaido Baked Cheese Tarts
- Allow the tarts to cool in the pan slightly. The filling will be very hot, so do not eat right away. Enjoy this warm as soon as you can tolerate the heat. For a no bake cheesecake, try No-Bake Coffee Swirl Cheesecake.
- To remove the tarts from the pan, use a small angled spatula or thin bread knife to gently pry on one side. The tart will start to lift.
- To store, keep them in a tightly covered container in the refrigerator for up to 5 days. To serve, reheat them in the microwave for 5-8 seconds.
More Cheesy Desserts
Hokkaido Baked Cheese Tarts
Equipment
- regular muffin pan
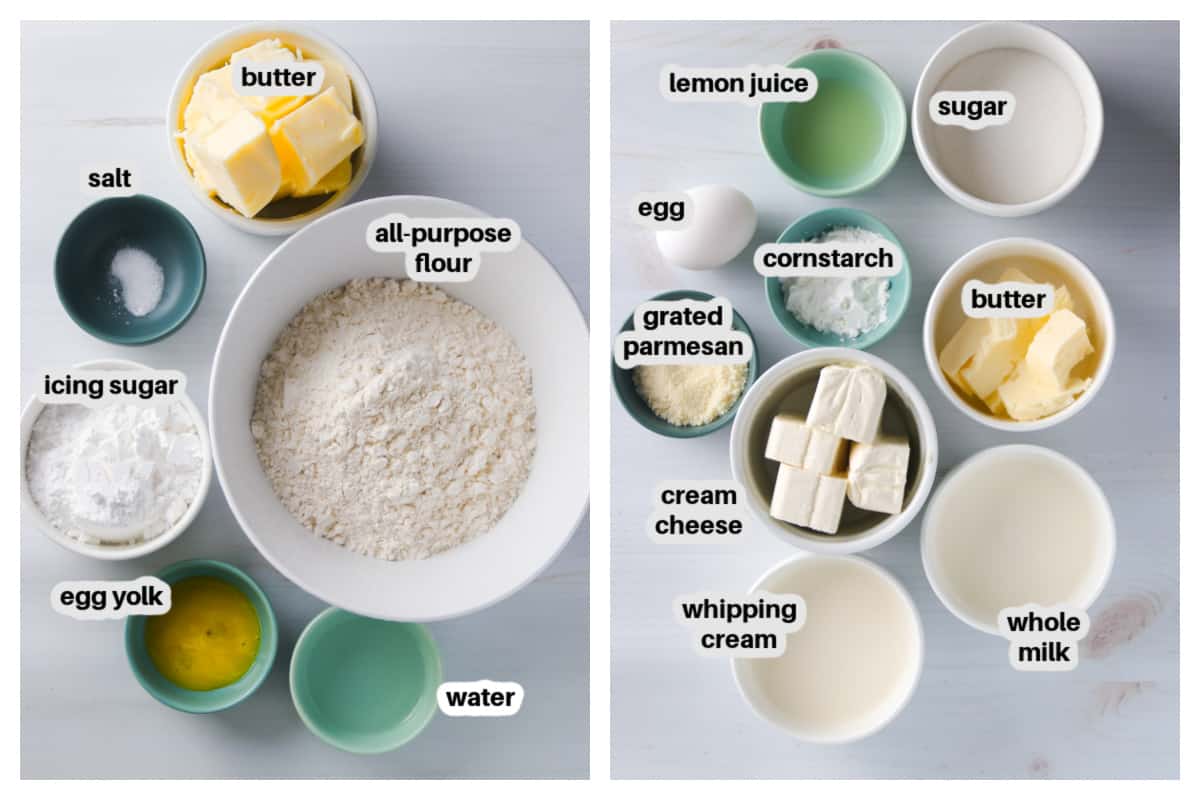
Ingredients
For the Pastry
- 1 cup butter softened
- ¾ cup powdered sugar
- 1 egg yolk from a large egg
- 1 ¾ cups all-purpose flour
- 1 tsp cold water
For the Cheese Filling
- 250 grams cream cheese
- 57 grams butter
- ½ cup whipping cream
- ½ cup whole milk
- ¼ cup sugar
- 2 tbsp grated parmesan cheese
- 1 large egg
- 1 tbsp cornstarch
- 2 tsp lemon juice
Instructions
Make the Crust
- In the bowl of a stand mixer, cream together butter and sugar until fluffy. Start at a low speed then, speeding up once the sugar is moistened. Beat in the yolk until incorporated. Add the flour and salt and beat until moistened. Add water and briefly mix just until a dough is formed.
- Turn the dough into a slightly floured surface. Knead briefly then shape into a 2 inch thick disk. Wrap this in plastic and let it rest in the fridge overnight.
Roll and Shape the Pastry Cups
- Let the chilled dough sit at room temperature for 8-10 minutes. On a lightly floured surface, Roll the dough out to ¼ inch thickness. Using a 3 inch scalloped cookie cutter (a plain, round one will work, too), cut circles from the dough.
- Use a pastry scraper or angled spatula to lift the edges of the dough circles. Place each cut dough into the slots in the muffin pan. Make sure that the dough is nice and flushed against the sides of the muffin cavity. Gather and roll out the remaining pastry, and cut more circles. The pastry can make about 14-16 circles. I usually just stop at 12, then chill the remaining pastry. You can make more the next day. There will be enough cheese filling to make 2-4 more tarts.
- Chill the muffin pan in the fridge for an hour. Meanwhile, cut 12 little pieces of parchment paper that can cover the bottom and sides of each tart shell. Crumple each one.
Pre Bake the Tart Shells
- Take the pan with the tart shell out from the fridge. Using the tines of a fork, poke several holes on the bottom of each shell.
- Preheat oven to 325 ℉. Lay the cut up parchment paper over each tart shell, easing it gently in every slot. Carefully spoon uncooked beans to each hole, filling up the sides.
- Pre bake the shells at 325℉ for 20 minutes. Take out the pan from the oven and carefully remove the parchment with the beans. If the dough tears or the dough sticks while removing the parchment paper, bake for an additional 5-7 minutes with the pie weights on, until the pastry is dry. Then remove the parchment and weights and bake the shells for 5-10 minutes more, or until the edges are lightly golden. Let the shells cool.
Make the Cheese Filling
- Prepare a double boiler set up ( see photo in the post): Fill a pot with about 2 inch of water. Bring it to gentle simmer. Fit a heat-resistant bowl snugly over the pot (the water should not touch the bottom of the bowl. If it does, reduce the water).
- Add the cream cheese, butter, milk, whipping cream and sugar to the bowl. Stir occasionally until everything melt together. Once the cream cheese has melted, stir in the parmesan cheese until the mixture is smooth.
- In a small bowl, beat together egg, lemon juice and cornstarch until smooth. Add about 1 tablespoon of the cheese mixture to the egg-lemon mix and stir. Add this small mixture to the bowl. Stir for a few minutes more, until the mixture is thick like a curd. Turn off heat. Allow the cheese filling to cool slightly.
Bake the Cheese Tarts
- Preheat oven to 425 F. Using a soup ladle, spoon cheese mixture into each tart shell until almost full. Bake at 425 ℉ for 12-15 minutes, or until the edges of the cheese has set, and there is only a slight jiggle in the middle. Do not overbake. If the cheese is starting to balloon or puff, you are overbaking it.
- Allow the tarts to cool in the pan for about ten minutes. The filling will be very hot, so do not eat right away. Enjoy warm. To remove the tarts from the pan, use a small angled spatula or thin bread knife to gently pry on one side. The tart will start to lift. Then, dig in! The filling will be nice and flowy and pastry is tender-crisp!
- To store, keep them in a tightly covered container in the fridge for up to 5 days. To serve, reheat them in the microwave for 5-8 seconds.