
Pandesal (Filipino Bread Rolls): Step By Step Guide To Perfectly Fluffy Rolls
Learn how to make the perfect Pandesal, a popular Filipino bread roll, with this step by step guide. Fluffy and delicious, these rolls are a staple in Filipino cuisine. Love Filipino breads? Check out my Spanish Bread recipe. More Filipino classics? Check out Ube Hopia, Cassava Cake and Suman Malagkit.
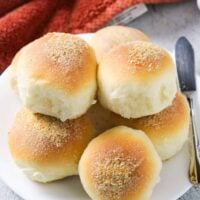
Oh, pandesal in the sweet hours of the morning! Nothing beats a warm tray of these freshly baked Filipino-style dinner rolls with the morning cup of tea or coffee.
Pan de Sal in Spanish mean salt bread. And despite the name, many pandesal recipes have evolved from salty to being slightly sweet with just a touch of salt.
Pandesal is one of the most raved-about recipes here on the blog. If you would like a bread machine version, check out Bread Machine Pandesal!
How to Enjoy Pandesal?
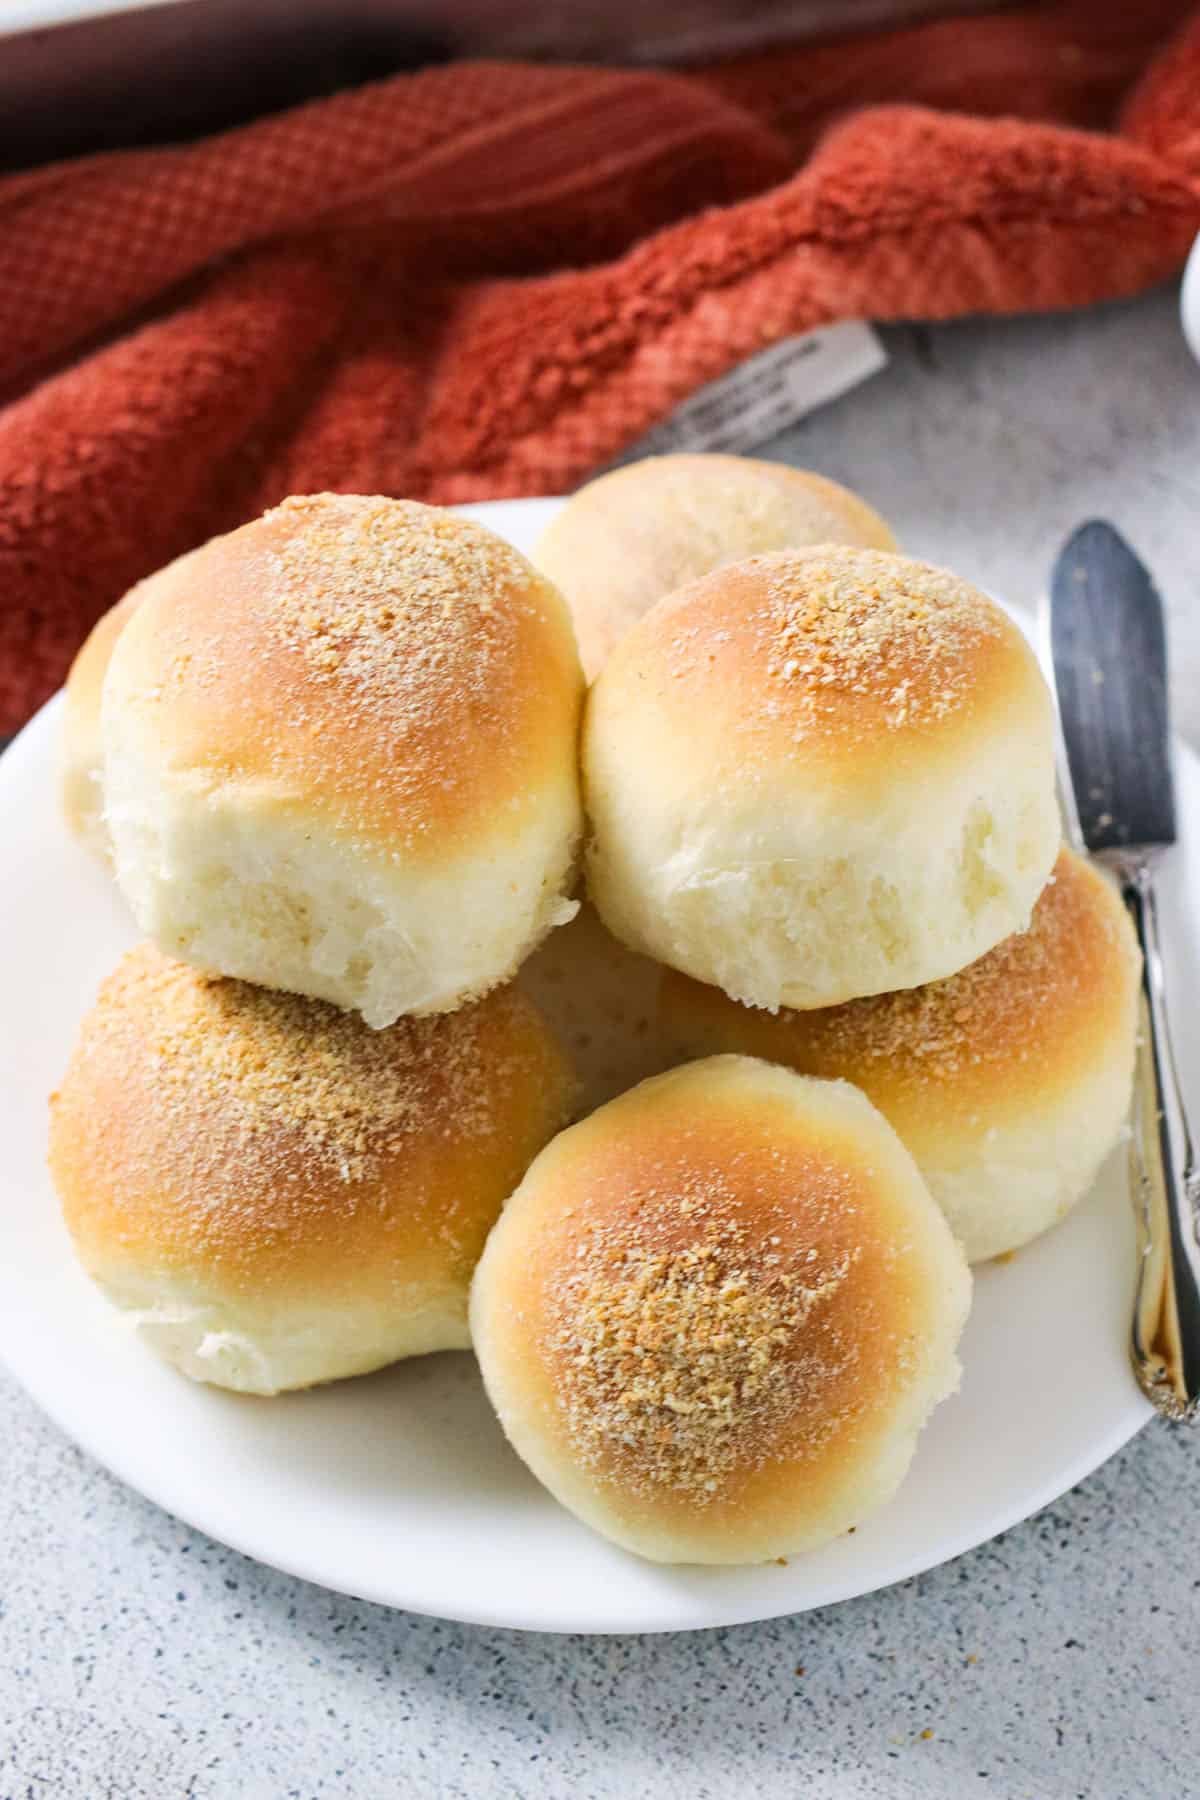
- Pandesal is probably the Philippines’ favorite bread. There is something about these golden dinner rolls that are dusted with breadcrumbs that make them so out of the ordinary. A bread that is delicious on its own, or dipped in coffee.
- For a filling version, we slice the bun in half and fill it with sliced hotdogs, fried egg, and even sauteed corned beef. Sweet tooth? Try peanut butter or coconut jam. Oh, the little things that bring us so much joy!
- If you love pandesal, you need to check out my other pandesal creations like Ube Cheese Pandesal , Red Velvet Pandesal and Chocolate Pandesal with Nutella Filling!
The Perfect Pandesal Recipe
- These pandesal are lightly toasted on the outside. The nice golden exterior has a nice tender-crisp texture, and it renders a nice toasty flavor. Just the way I like it.
- The inside is soft and light. It is not dense and tight-knit, but not too airy either. Just pure crumb perfection.
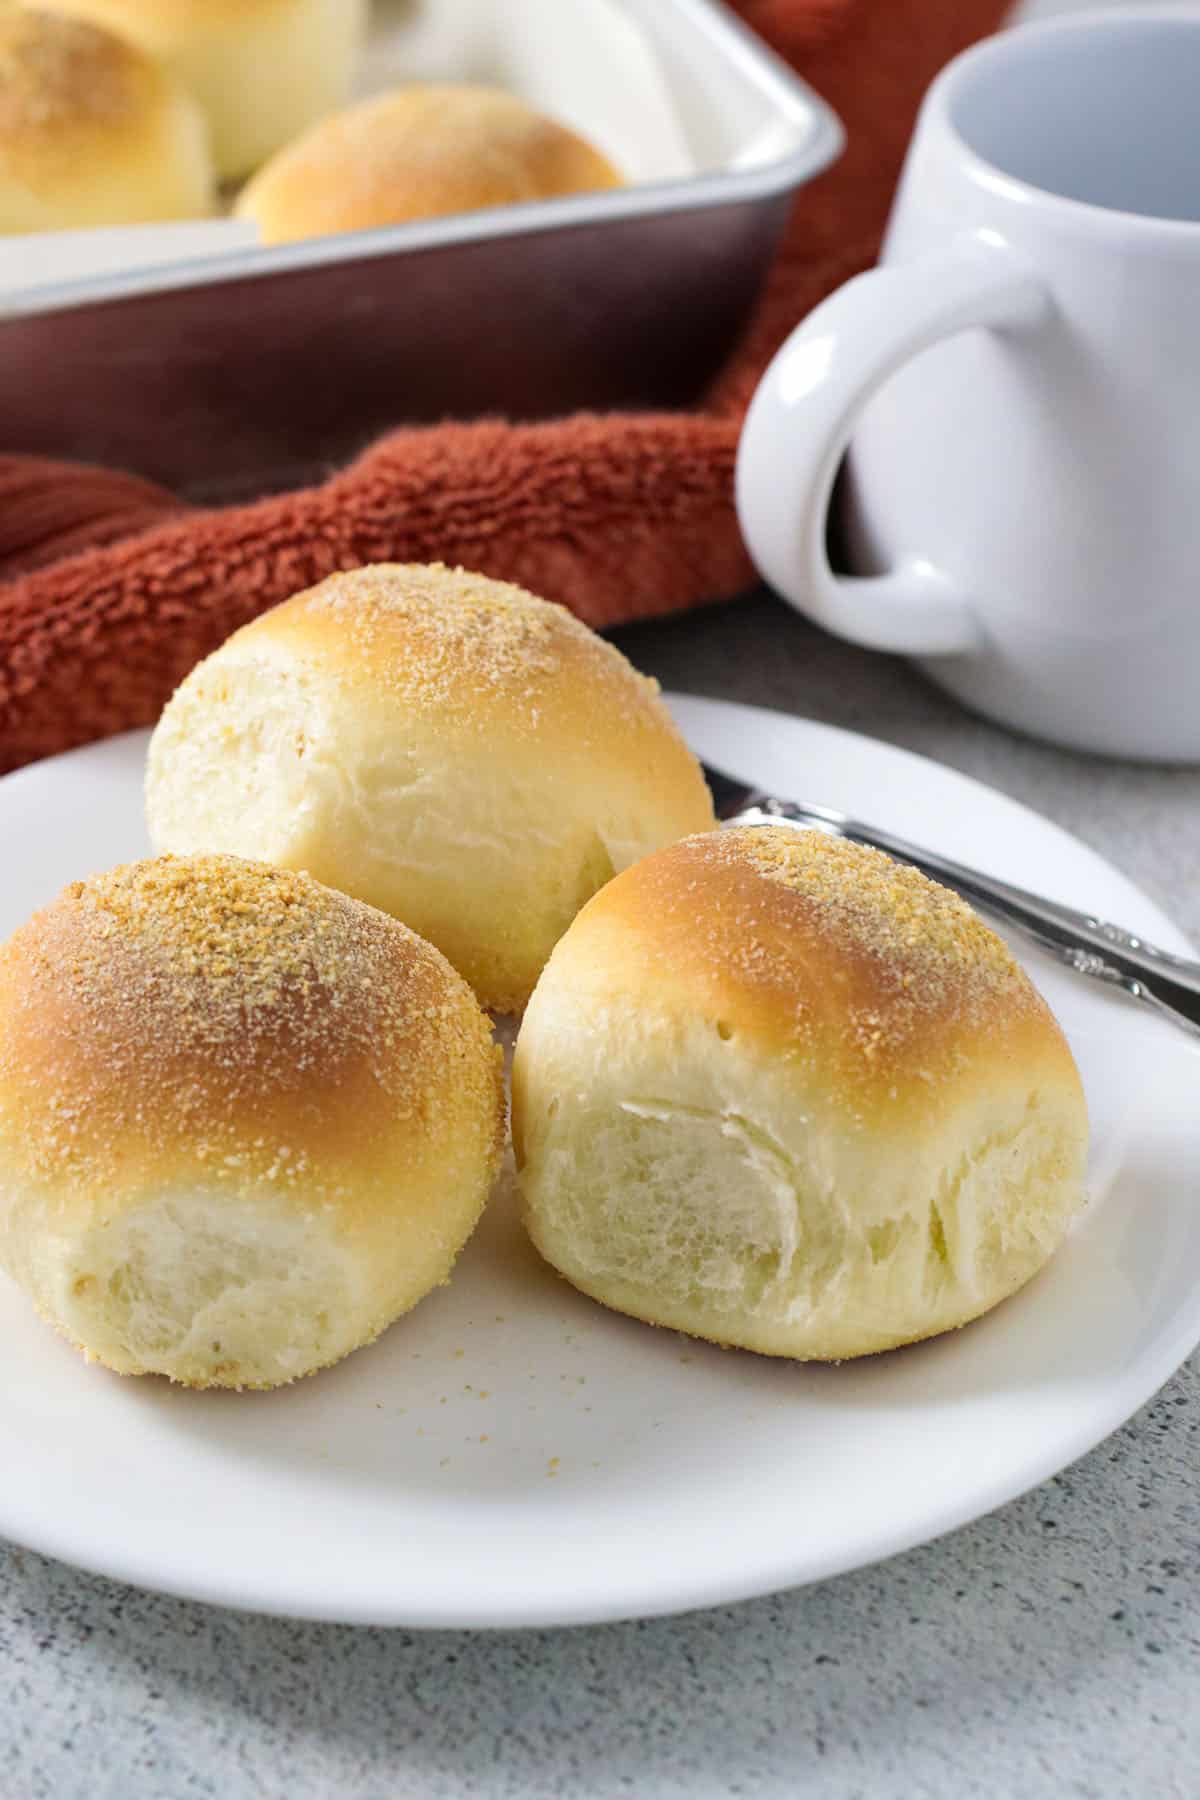
- They are pillowy soft out of the over AND remain soft the days after.
- Eat them plain, dip them in coffee, slather Nutella, slather butter. You decide how to enjoy it. Lately, we slather it with non-hydrogenated margarine. I think it’s the only way to enjoy it now, and nothing else 🙂
The Process
Proof the Yeast and Mix in the Dough Ingredients
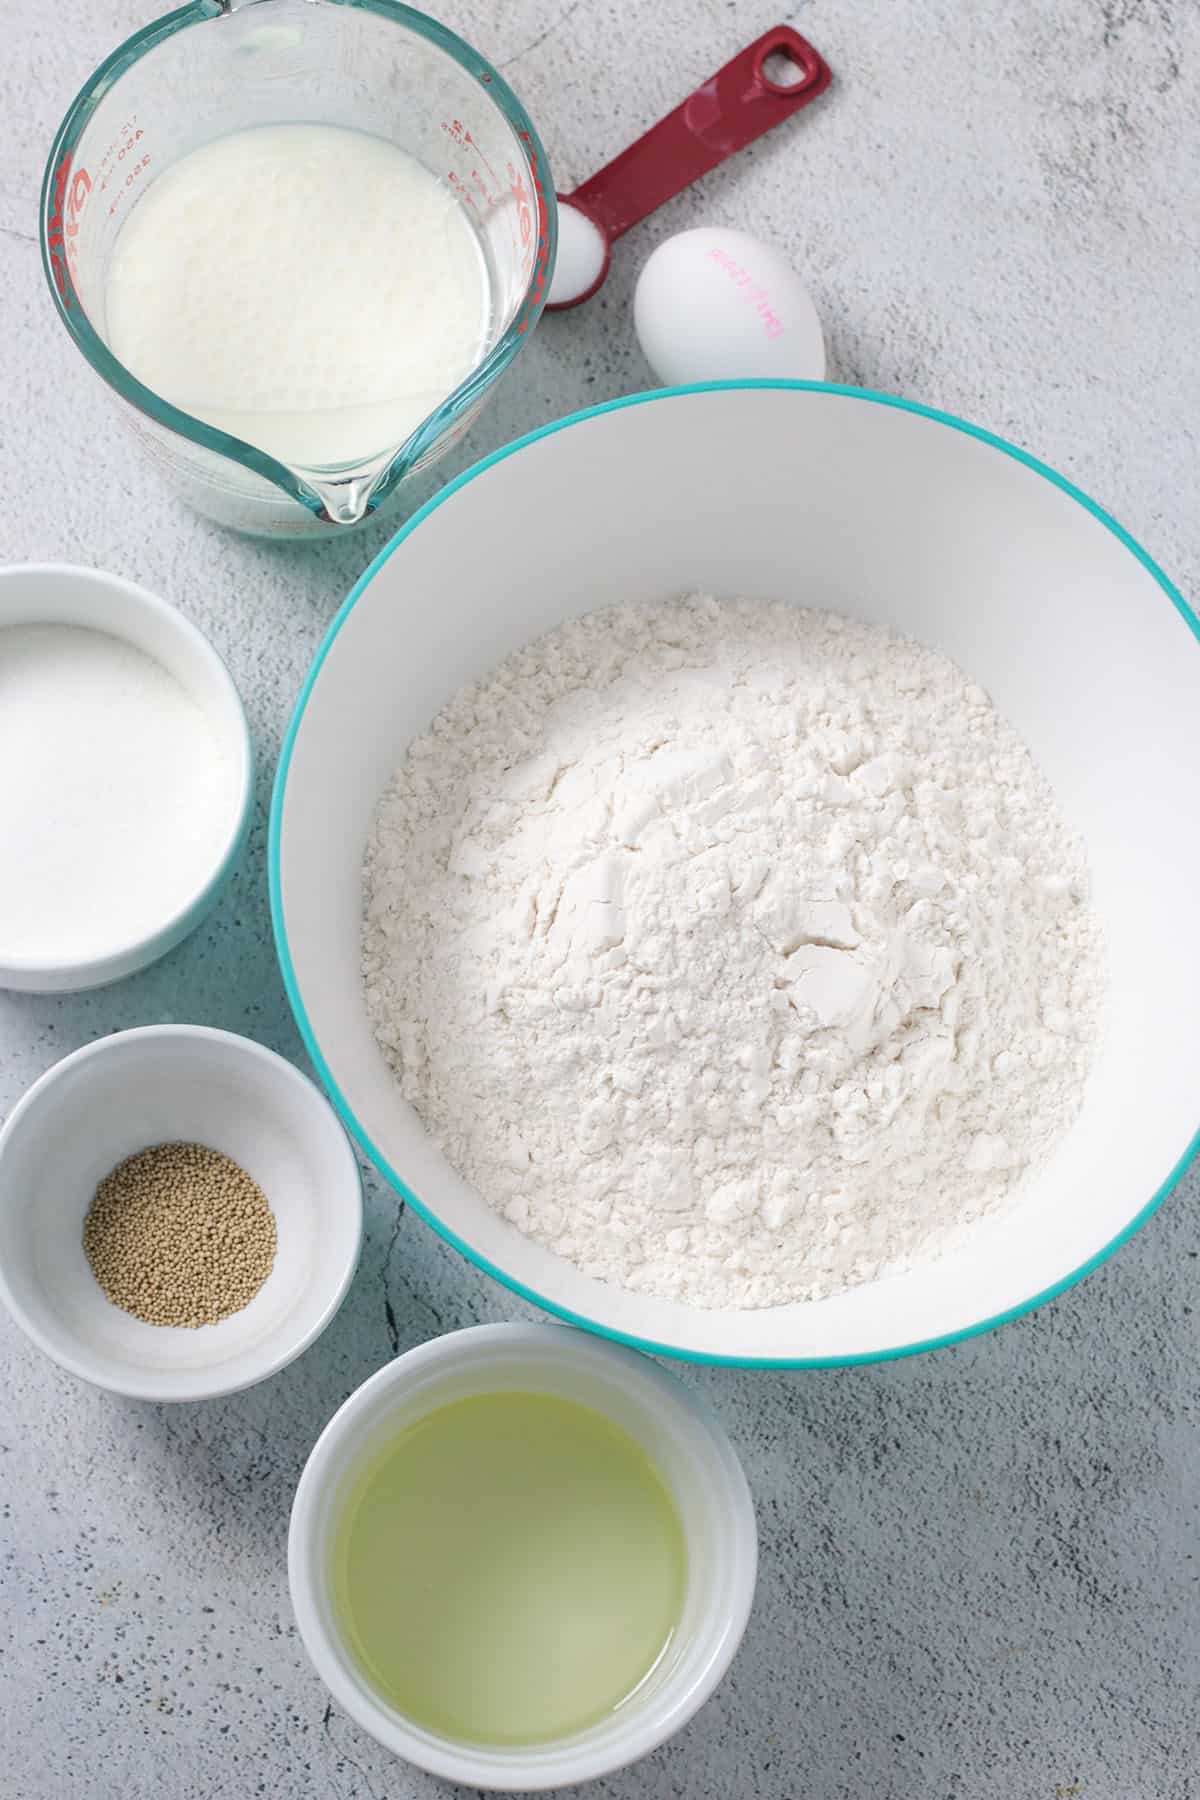
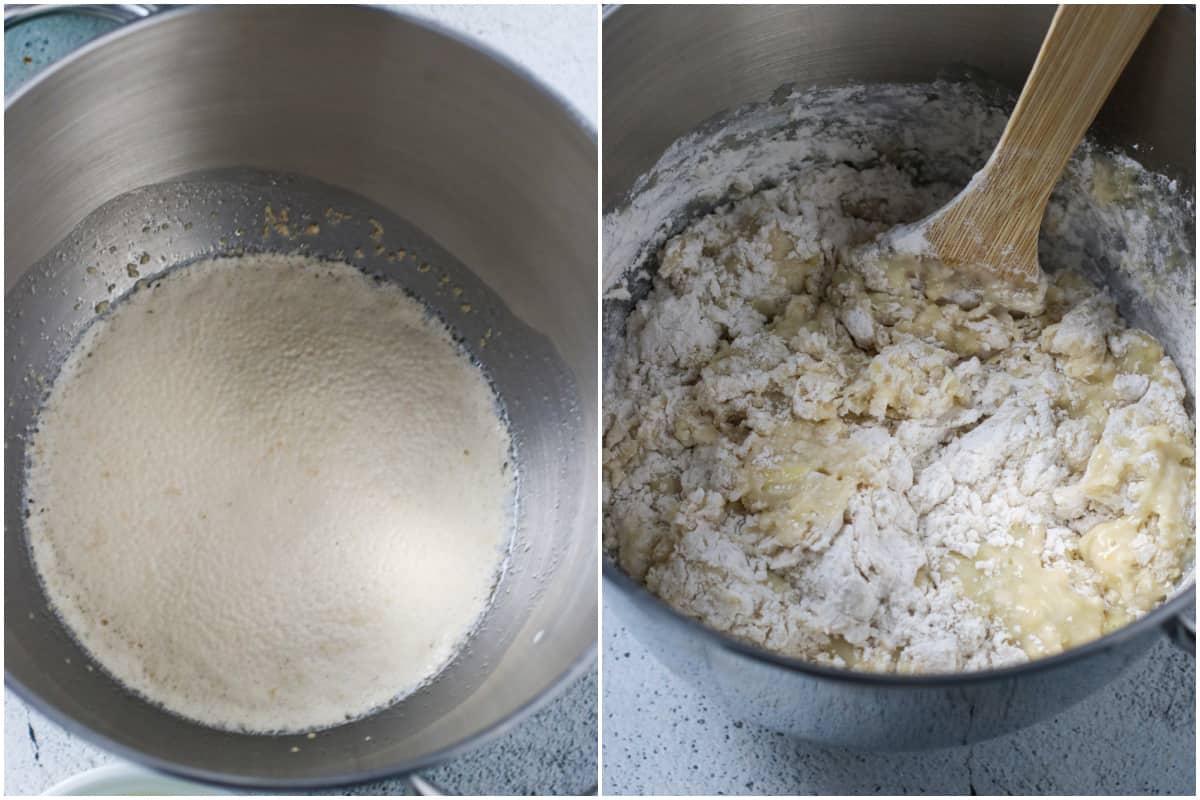
In a bowl of a stand mixer, pour the milk and then sprinkle the yeast. Sprinkle approximately 1-2 teaspoons of the sugar in there as well. Let this mixture sit for 7-12 minutes until it looks thick and creamy.
Add the eggs, the remaining sugar, and the oil. Stir to combine. In a bowl, combine 4 cups of flour and 1 tsp of salt. Gradually add this mixture to the mixing bowl, about 1 cup at a time, stirring well after adding.
Knead the Dough in the Stand Mixer
Now attach the dough hook to the mixer, and on medium speed, mix the dough for 10 minutes. During this period the dough will start to take form, gathering slowly in the center.
After ten minutes of mixing, slowly add more flour with the mixer still running, about 1-2 tbsp at a time. As you add, the dough will gather more and more and it will start to clean the sides of the bowl.
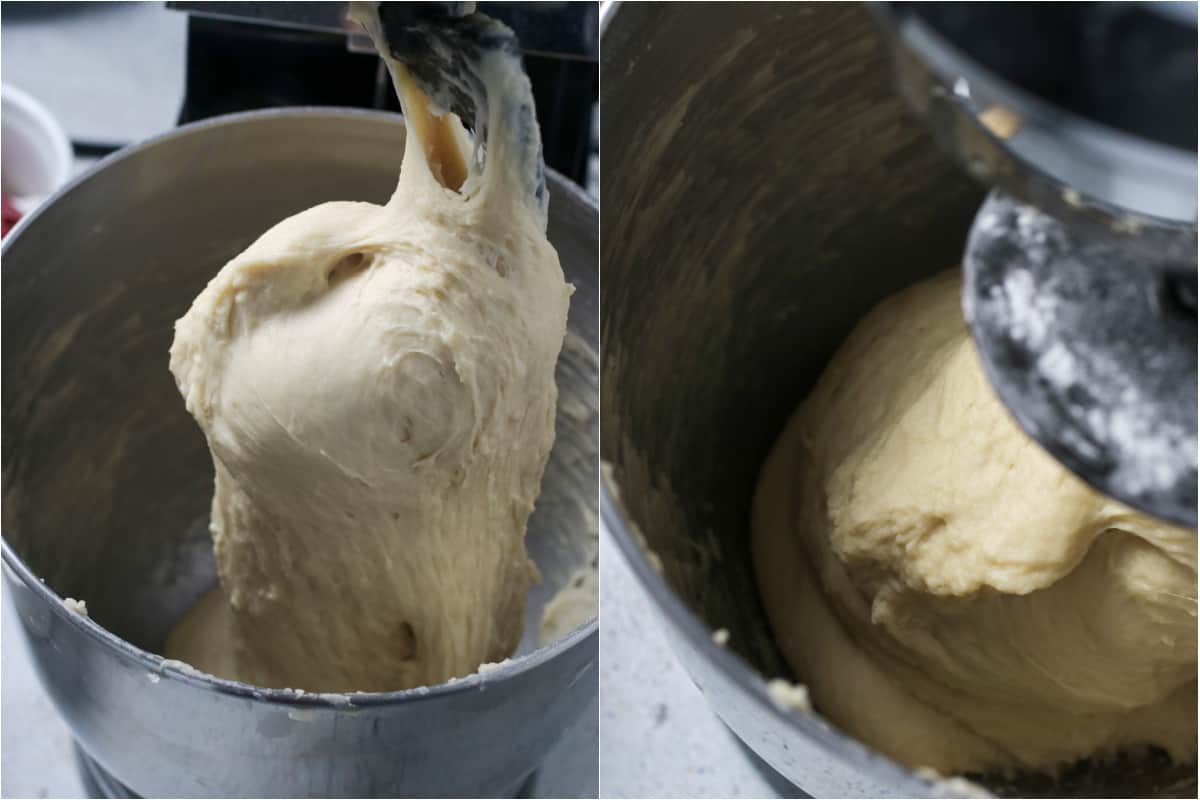
The Dough Gathers in the Center of the Bowl
Continue the mixing and adding, until the dough gathers in the center of the bowl and cleans the sides and bottom of the bowl entirely.
You will also hear the slapping sounds that the dough makes against the bowl. This should take around 10 minutes more, for a total of 20 minutes or so in the mixer.
To test if the dough is adequately kneaded, you can do the windowpane test found in my How to Knead Bread Dough post.
Finish Kneading and Allow the Dough to Rise
You may also need to increase the mixer speed for the dough to release at the bottom of the bowl. You may need less of the 1/2 cup reserved flour, but not more.
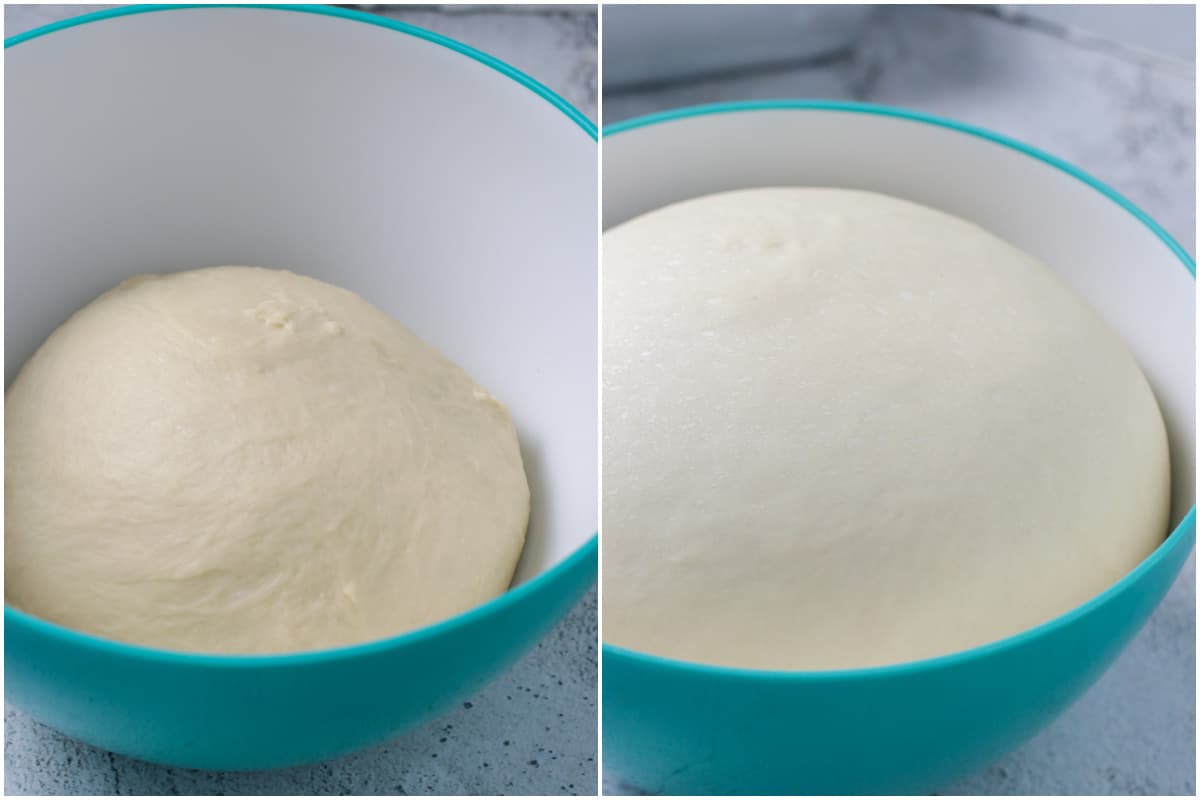
Shape the dough into a ball, and let the dough rise in a bowl, Allow it to rise for 1 hour and a half, covered with a clean towel.
Shape the Dough and Dust with Bread Crumbs
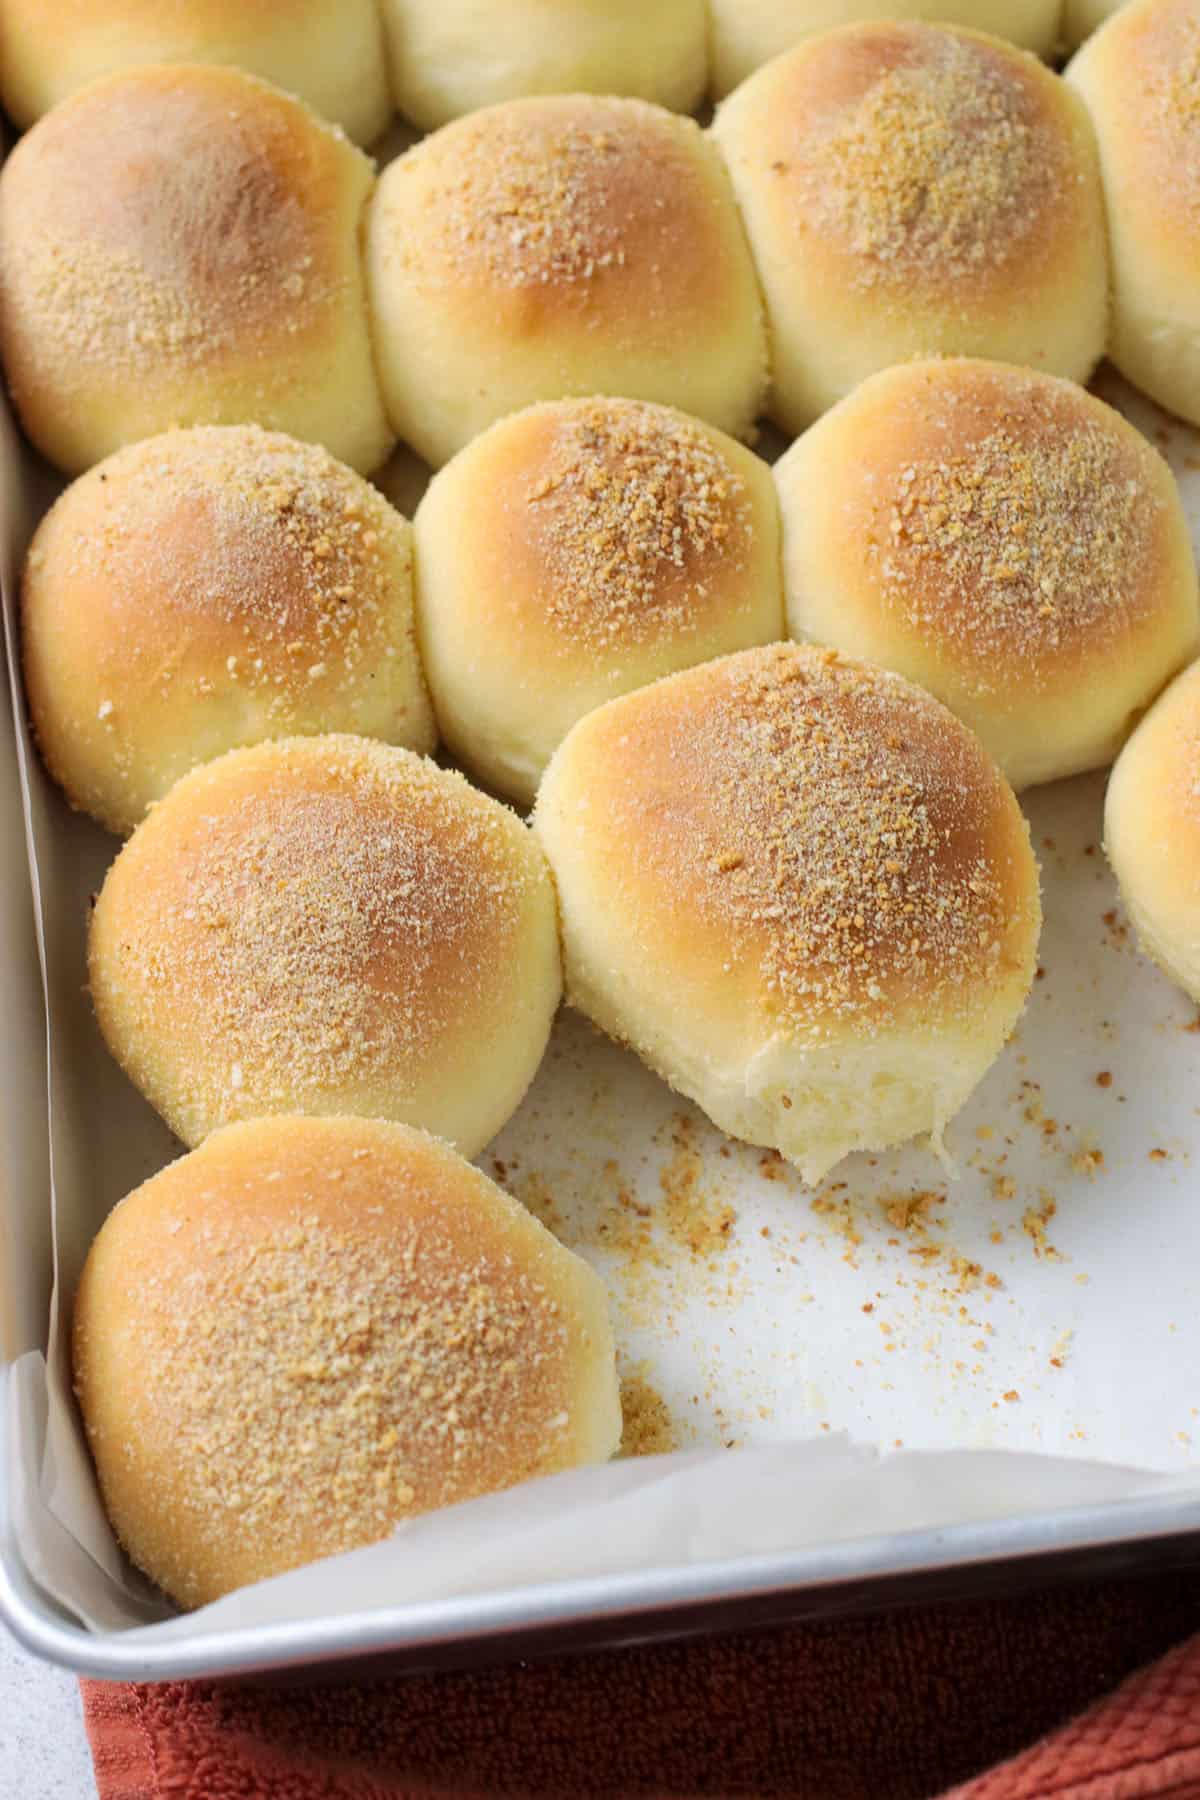
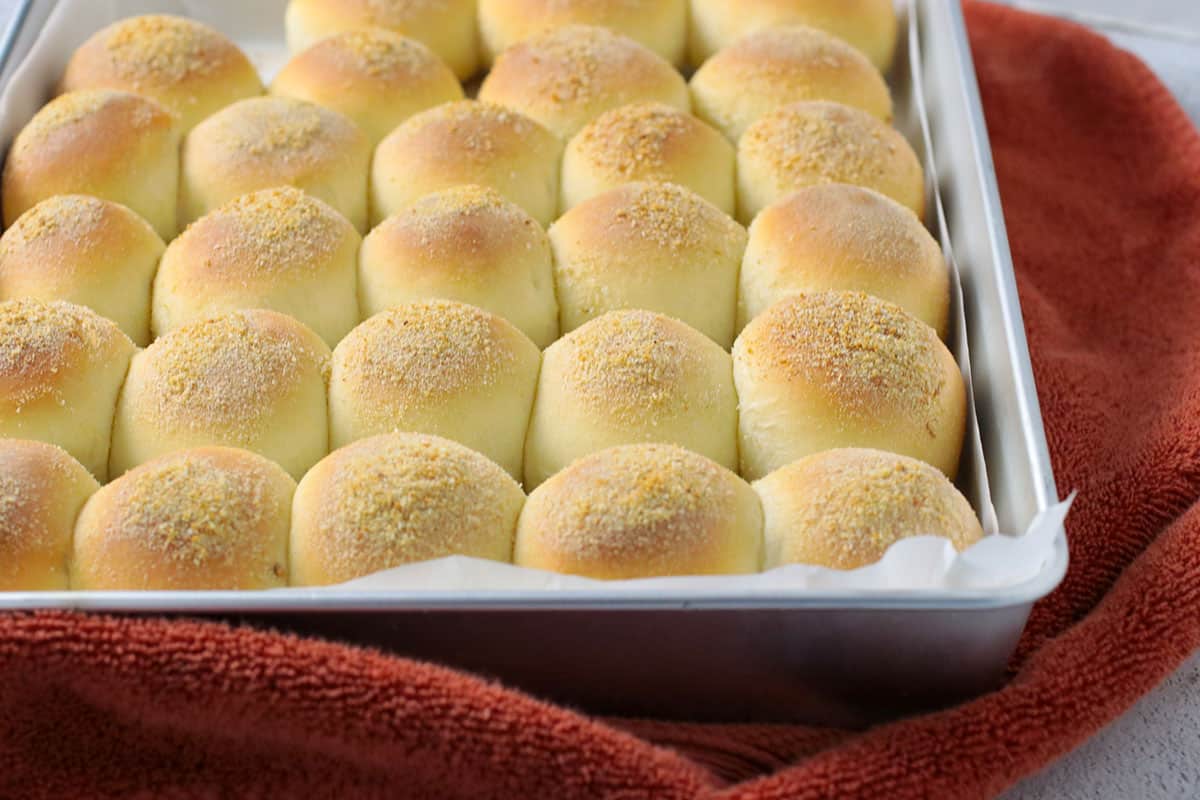
After rising, gently deflate the dough. Shape it into a log and divide it into 25-28 pieces.
Roll each piece into a plate of bread crumbs, then arrange the balls in a parchment-lined, light-colored baking pan.

Allow the Shaped Dough to Rise Again, then Bake!
Allow these to rise once more, for 30-40 minutes, covered loosely with a clean kitchen towel. Bake the pandesal for 23-25 minutes, or until golden on top.
Let them cool slightly before serving.
Pointers for Making Pandesal
- The milk should not exceed the temperature of 110F. Hotter than that and you risk killing the yeast.
- If the yeast did not turn foamy after 10 minutes. Discard the mixture and start again.
- The recipe calls for 4 and 1/2 cups of flour. 4 cups are added initially to the dough. The remaining 1/2 cup will be added one tablespoon at a time just until the dough gathers into the center of the bowl. You may not have to use all of the 1/2 cup of flour.
- Use a light-colored baking pan to avoid too much browning of the bottom of the pandesal.
p.s. These will be so good with this Sweet and Spicy Squid or this Filipino Style Pancit Canton.
More Bread Recipes:
- Mamon Recipe
- The Best Ensaymada
- Cassava Cake
- Ube Cheesecake
- Chocolate Mamon
- Yema Rolls
- Coconut Buns with Milky Sweet Filling
- Japanese Milk Buns
- Spanish Bread
- Hawaiian Rolls
- Sweet Cheese Rolls
- Sweet Beehive Buns
- Milk and Sugar Mini Buns
- Pineapple Buns
- Whole Wheat Potato Dinner Rolls
- Crescent Butter Rolls
Pandesal
Ingredients
- 2 and 1/4 tsp active dry yeast
- 1 and 1/4 cup warm milk heated to 105-115 F
- 4 and 1/2 cups all-purpose flour divided
- 1 tsp salt
- 1/2 cup of sugar
- 1/3 cup canola oil
- 2 large eggs lightly beaten
- bread crumbs for dusting the pandesal dough
Instructions
- In the bowl of a stand mixer, stir together the warm milk, yeast and about a tablespoon of the sugar. Let this mixture stand until it is foamy. In another bowl, combine 4 cups of flour and salt.
- Once the yeast mixture is foamy, add in the eggs, sugar and oil to the bowl of stand mixer. Gradually add the flour mixture, about a cup at a time while stirring with a wooden spatula or spoon. Briefly mix everything together until a shaggy dough forms.
- Attach the dough hook to the stand mixer and run the mixer on medium speed to start kneading the dough. After ten minutes of mixing, gradually sprinkle little amounts of flour to the dough ( about a tablespoon at a time) to help in the kneading process. Continue to knead until the dough gathers in the center and is cleaning the sides and bottom of the bowl. This should take about 20 minutes or so and you should only have used up to 1/2 cup of flour. Gather the dough into a ball. Place it inside a bowl, cover with a kitchen towel and let stand in room temperature to rise for an hour, or until the size is doubled. Meanwhile, line a large baking sheet with parchment paper.
- Gently deflate the dough. Divide it into 25-28 equal sized portions. Smooth and shape each portion into an imperfect ball, about 2 and 1/2 to 3 inches in size. Roll each portion of dough in the bread crumbs and place in the baking sheet. Allow little spaces in between portions. Cover the rolls with a kitchen towel and let rise for 40 minutes. Preheat oven to 350 F. Bake the pandesal for 23-25 minutes or until the top is lightly golden. Serve warm. Store leftovers in a tightly closed container at room temperature.


Hi Sanna, from one of your new Canadian subscribers… love your website. Tried your pandesal recipe with a couple of tweaks, a third egg yoke only added, butter instead of oil, and your guidelines are awesome. Tried it a couple of times and the third time it was perfect. Thank you very much. Will be trying more of your recipes and will be bringing you more subs.. : )
Hello Manuel! Thank you so much for trying the pandesal recipe and for your feedback as well. I appreciate your tips on substitutions so that others who want to try it will know 🙂 Thank you very much!
I used more than 4 and 1/2 cups of flour.. coz it’s too sticky
Hello Faye! The moisture in the dough and how much flour you are going to need depends on the humidity where you are so it may vary from time to time. Thank you!
Can I replace 1/3 canola oil with 1/3 butter?
Hello, Ris! That is fine. It will alter the texture slightly but yes , you can 🙂
I just stumbled upon this recipe and am super excited to try! But I do have a quick question…if I were to replace the white flour with whole wheat is it possible to do equal substitution? Or should I split it half white/half whole what?
Hello KC! Direct substitution of the all-purpose flour with whole wheat will alter the texture greatly and will yield a very sticky dough. You can start with half / half ratio like you said and work your way from there in the next tries. Thank you and keep me posted.
I tried your recipe and all i can say is the Best pandesal recipe ever!
Wow! Thanks, Karen! I am so happy you liked it! Happy baking always!
I am sooo excited! Will try to bake them tomorrow. I tried several recipes and all came out very hard. Huhu, hopefully I will be able to do justice to your recipe.
Hi Aira! I am so excited for you! You will love these pandesal. It is one of my favorites:) Good luck amd keep me posted!
Hi po! I have a question. Is your Pandesal recipe stays soft until the next couple of days? Because I have tried some Pandesal recipes and they were hard the next daythank you!
Hello Ann, the pandesal will stay soft for the next 2-3 days. Just store them in a covered container at room temperature. 🙂
Got it. Thank you so much
Wowwww!!!a big WOW and thanks… make it today, for breakfast tomorrow…but then, its gone in 15mins… even its little dark brown and the first batch is kinda burned…
I just adjust the temp for the sexond batch, make it to 305F for 20mins… i think my oven is different from yours.
Again, thanks alot… my kids and hubby love it!!!
Looking forward to bake next week…
This is the best ever pandesal i made… i tried so many recipes, but this is the one that im looking for…
Thanks a lot, Amina! I am really happy that you liked it! Thanks for your feedback!
Hi..i used your recipe in making my pandesal and its perfect
My only issue is it gets burnt at the bottom of it,my 2nd time to baked pandesal using your recipe and same issue,any suggestions or remedy for this..it really taste good,my son and nephew loves it so much..thank you for sharing your recipe
Hi Chona! Thank you so much for trying the recipe! 🙂 If the bottoms get burnt quickly, you can layer the bottom of your baking pan with two parchment paper.
Also, dark pans tend to cook faster. Sometimes the bottom darkens faster than when using lighter colored pans. I hope these tips help. Please keep me posted. Thank you!
I’m excited to make this!
Can I use this recipe in breadmachine?
Can I use butter instead of canola oil?
Hello Maria! While I have not tried the bread machine yet, you can definitely adapt this recipe to be made in the bread machine.
You can use butter in place of the canola oil, though the texture of the pandesal may be altered. I hope you like this recipe.
Happy baking!
Omg I’ve been wanting to make my own pan de sal and these came out perfect! I’m glad I chose this recipe 😀 It was a perfect accompaniment for our pancit.
Thank you Kim! I am so happy that you liked this!
Hi can i use vegetable oil?
Hello Raquel! Yes, you can use vegetable oil as long as it is mild tasting. Happy baking 🙂
Hi..do i need a mixer or can I hand do everthing?
Hello! You can definitely do this by hand. Just be sure to knead the dough until it is smooth and can stretch thinly. You can look at How to Knead Bread Dough post as a guide. Happy Baking!
Can you use a breadmaker for this recipe? Thanks
Hi Myrna! I am so sorry I have not tried breadmaker yet 🙂
I got put in charge of bringing the pandesal for our most recent family gathering. We usually get it from a bakery but that bakery closed over the past couple years and we haven’t been able to find good pandesal since. I found your recipe and made a practice batch; my aunt happened to come by that afternoon and said it tasted perfect! I ended up making three additional batches for the family, and it was a HUGE hit! I have a feeling I’ll be making it for many more family gatherings. I did not expect that such perfect pandesal could come out of my kitchen! Thank you for this wonderful recipe and for keeping our family tradition alive! (Question from my aunt: have you ever tried freezing the dough? Does that work? I’ve had great luck over the past week freezing the pandesal after it’s baked but we’re curious about how the dough would hold up after a freezing.)
Hello, Alicia! Wow, thank you too! It makes me so happy when baked goods are enjoyed and cherished as a part of a family gathering/tradition. So thank you very much!
About freezing the dough, I have not tried freezing this pandesal dough exactly but usually, when I freeze other bread dough ( like brioche dough), I freeze them after the first rise. So after the first rise, gently deflate it and wrap it really good in a floured plastic wrap, then in foil. Once you are ready to bake, thaw it in room temperature, shape it into balls and let them rise for about 2 hours or more until they are doubled in size.
Alternately, instead of freezing, you can refrigerate the dough once they are shaped into rolls. So once they are shaped and ready in the pan, you can refrigerate them overnight. In the morning, take them out, let them rise for about 2 hours and bake. Voila! Hot pandesal for breakfasts!
For how long you need to wait for the yeast and milk to get foamy?
Hello, Aloi! About 5-10 minutes is the normal time for the mixture to become creamy and foam up. 🙂
Thank you for sharing your recipe. Just made it and it is now
My fav pandesal recipe. My only regret is that
I didn’t make it thick enough like you said.
Thank you, Hannah! I am just so glad that you liked it. 🙂