
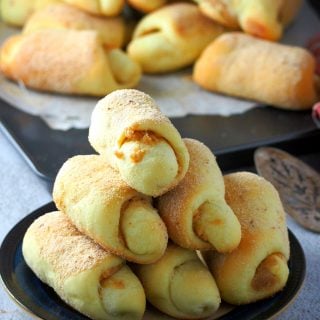
Spanish Bread- A Filipino Bakery Favorite
Spanish Bread brings back memories of hot afternoon snacks back home with these soft bread coming out of brown paper bags, warm and fresh from the bakery. The sweet, buttery paste filling is my favorite. Love Filipino breads? Also try Pandesal and Ensaymada.
Around the time when the Holidays were approaching, a reader asked if I have a Spanish Bread recipe on the blog.
And that was a very nice inquiry because I stopped and asked myself “Why I have not made this delicious bread, the Filipino Spanish bread which is also another bakery classic back home?”
You guys are my hero. You remind me of delicious things that I would not have not thought of by myself. So here we are, let’s make this Filipino bakery favorite and enjoy a typical pinoy merienda.
What I love about Spanish Bread?
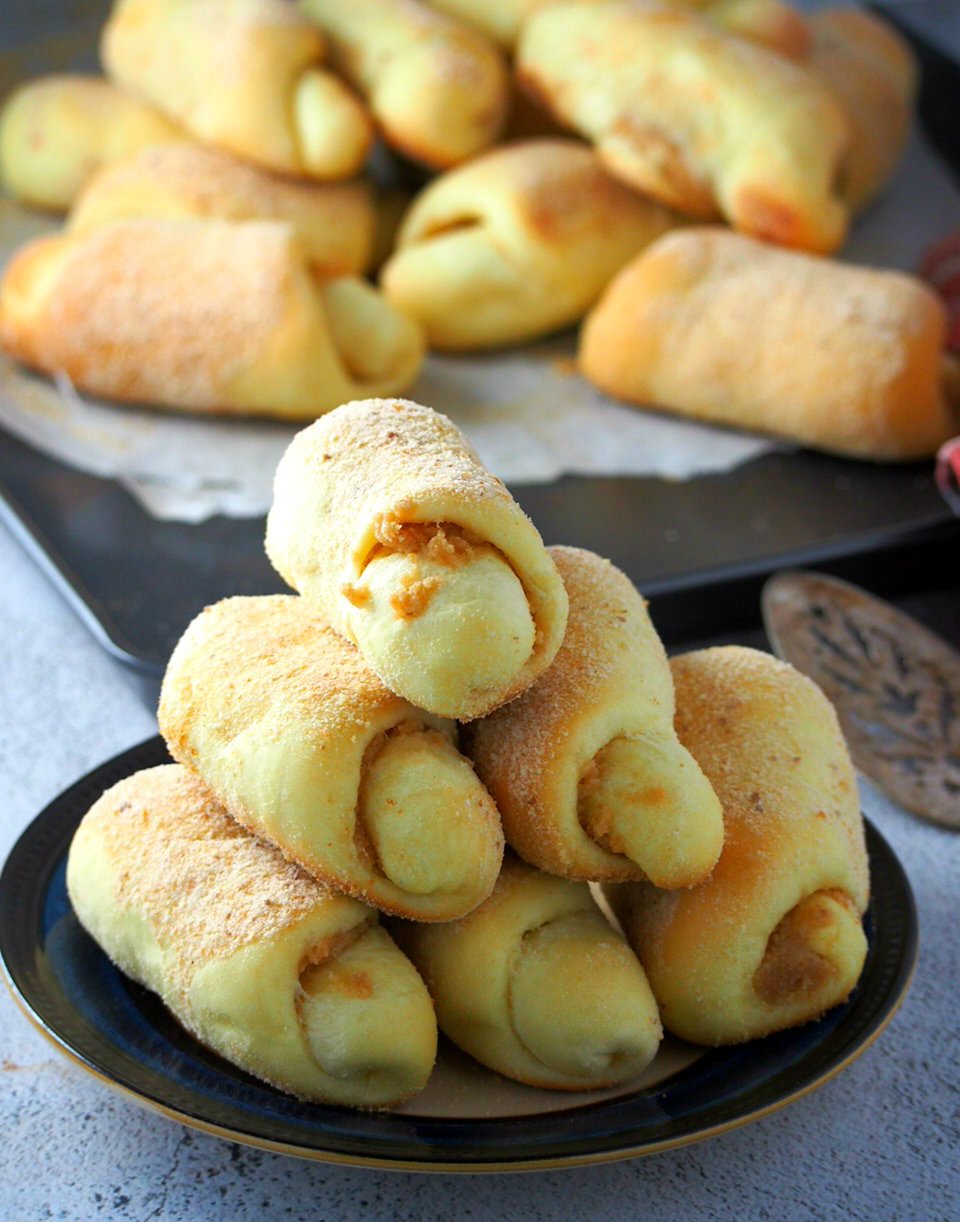
- They are meaty in the bread department. They are fat rolls of bread dusted with breadcrumbs all over.
- The texture from the breadcrumbs makes them a delight to eat.
- The chunky filling that is sweet and buttery is a nice contrast to the soft bread surrounding it.
Let’s Make Them!
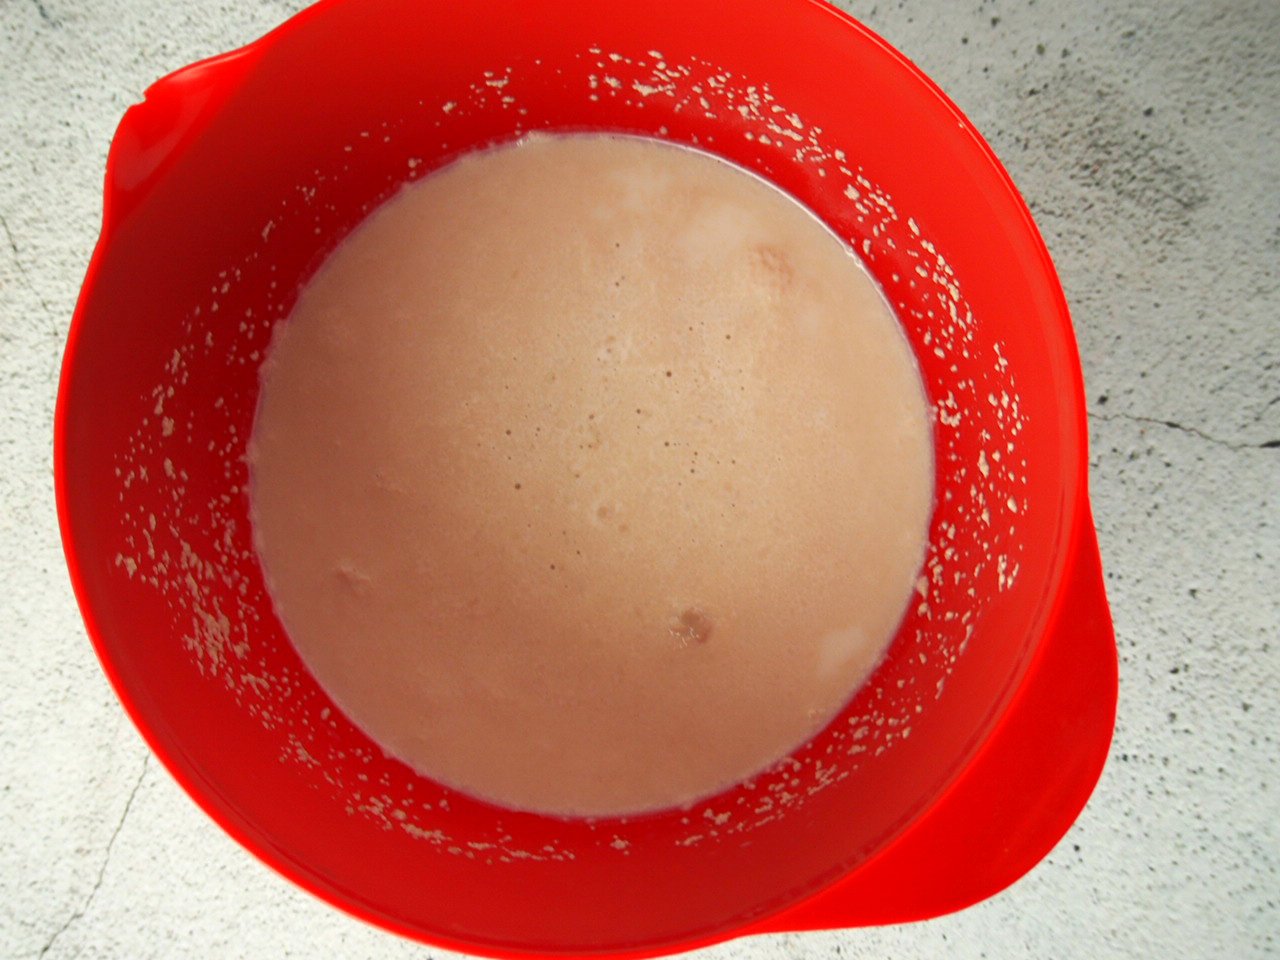
Start by proofing the yeast. So in a large mixing bowl, combine the warm milk and yeast and let sit stand for about 5 minutes.
Note: The milk should be between 105-115 F. As you can see in the photo above, the mixture will turn foamy or creamy.
Add the sugar, eggs, salt and oil to the bowl and stir everything with a wooden spoon.
Then, add 4 cups of flour but only one cup at a time. Stir after each addition. The mixture will turn into a shaggy dough. Sprinkle just enough of the remaining 1/2 cup of flour and keep stirring until the dough gathers in the center.
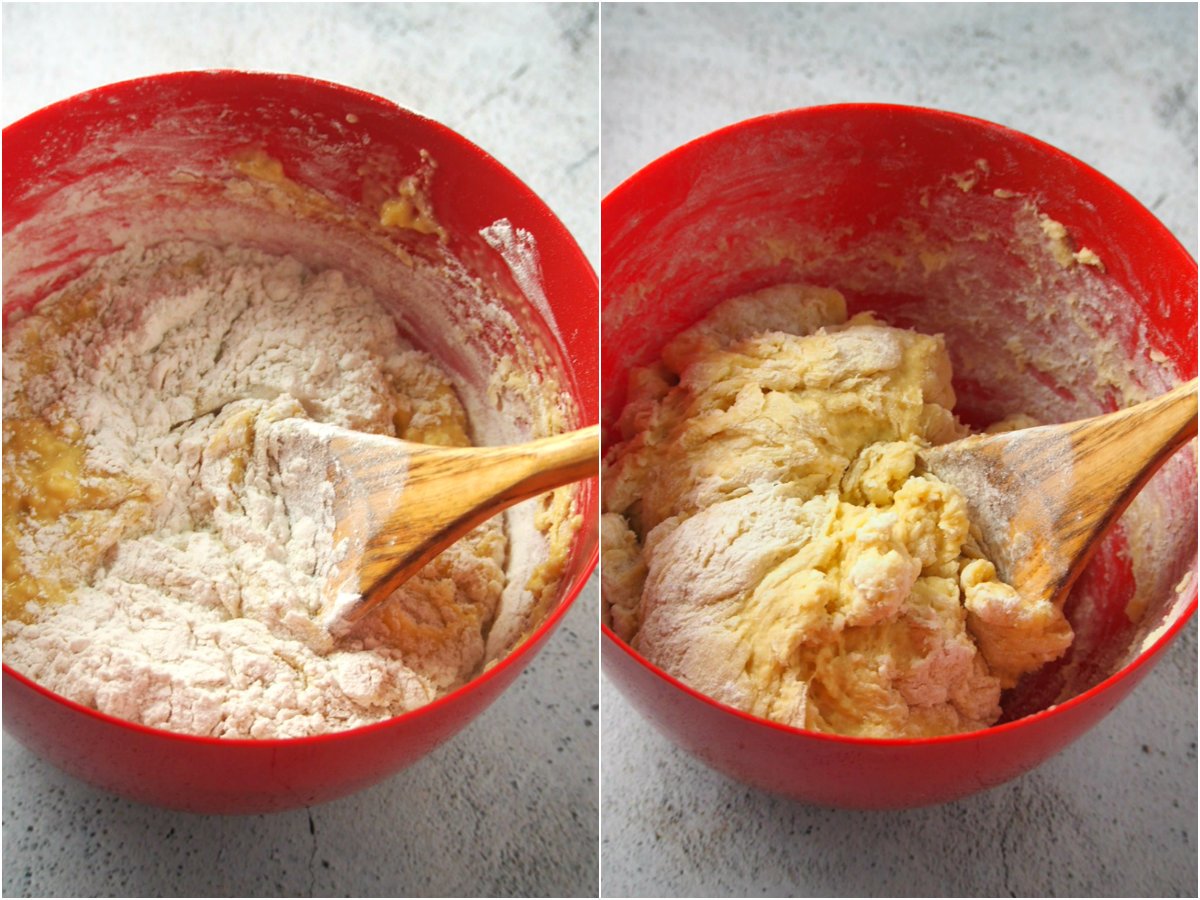
Knead the Dough. Flour a board and dust your hands with flour as well. Turn the dough over onto the board and start kneading. Use the remaining flour to dust your board and your hands to help with the stickiness as you knead.
You may need up to 1/8 cup more of flour as you continue to knead until the dough is smooth and elastic. New to kneading? Check out my simple guide How to Knead Bread Dough ( with video).
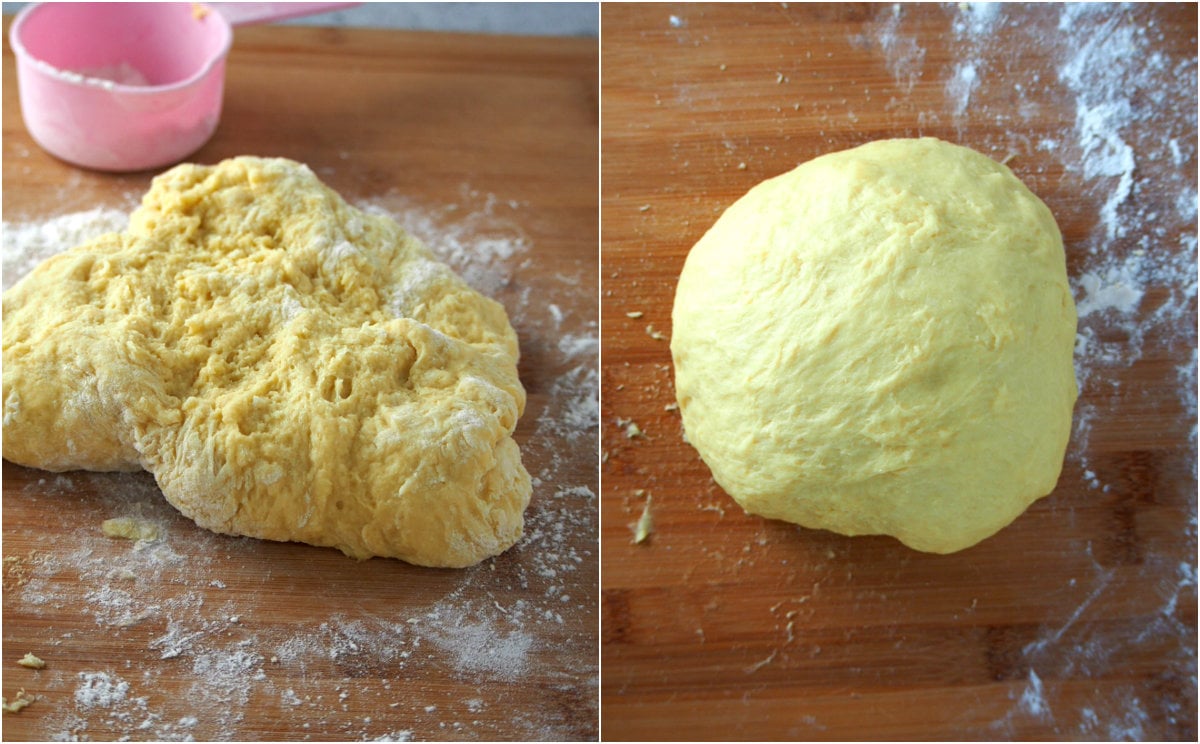
First Rise. Shape the kneaded dough into a ball and place it in a bowl. Cover and let it rise for 1 and 1/2 hour, until the size is doubled.
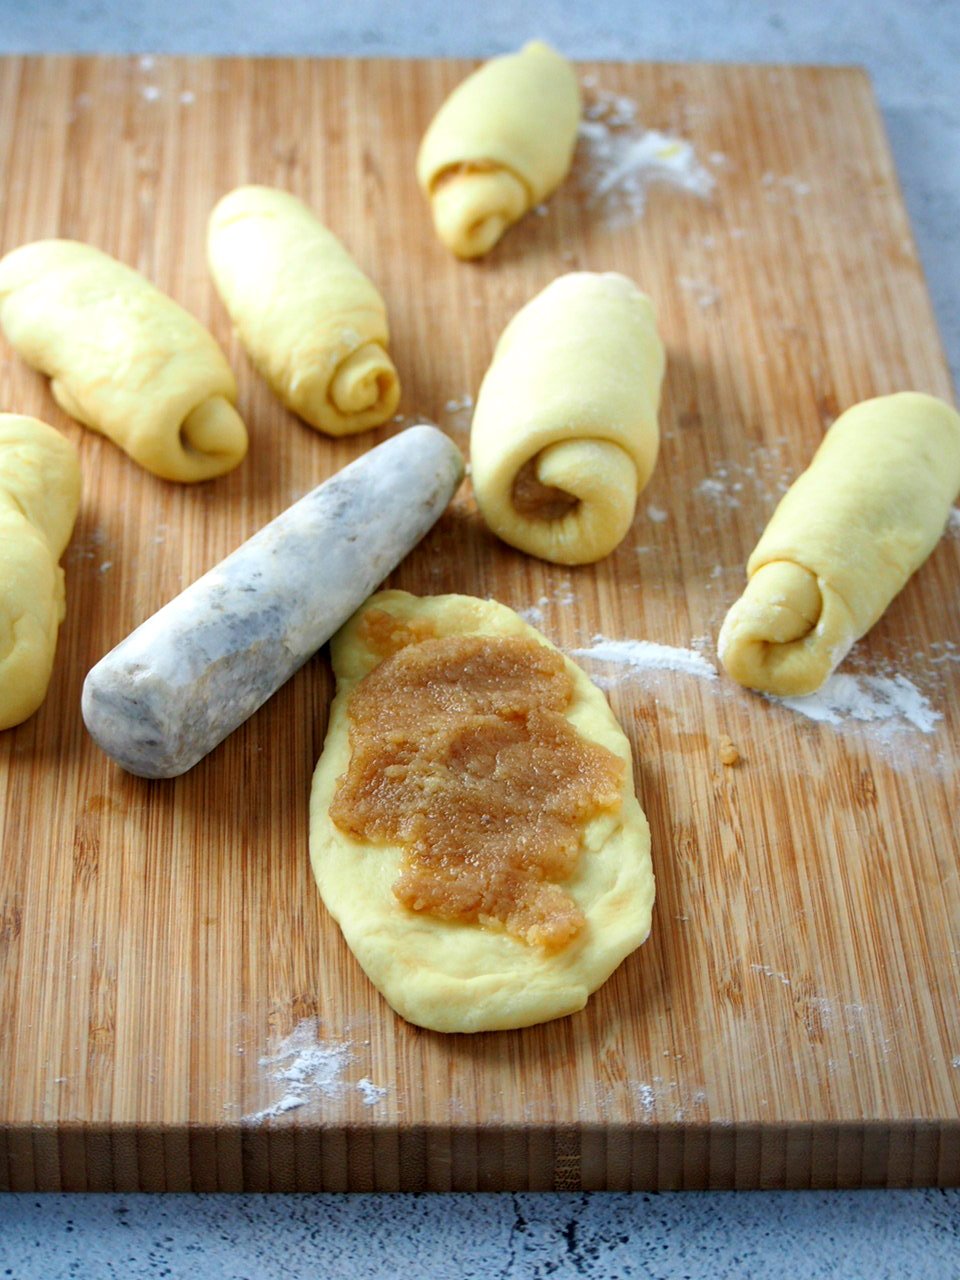
Shape the Dough. Once the dough has risen, gently punch it down and divide it into 18-20 almost equal sized portions.
Flatten each portion with your palms or use a rolling pin. You need an oval-shaped dough that is about the size of your hands.
Spoon about a tablespoon of the filling and spread it across the dough. Roll the dough into a log. Repeat with the rest of the portions.
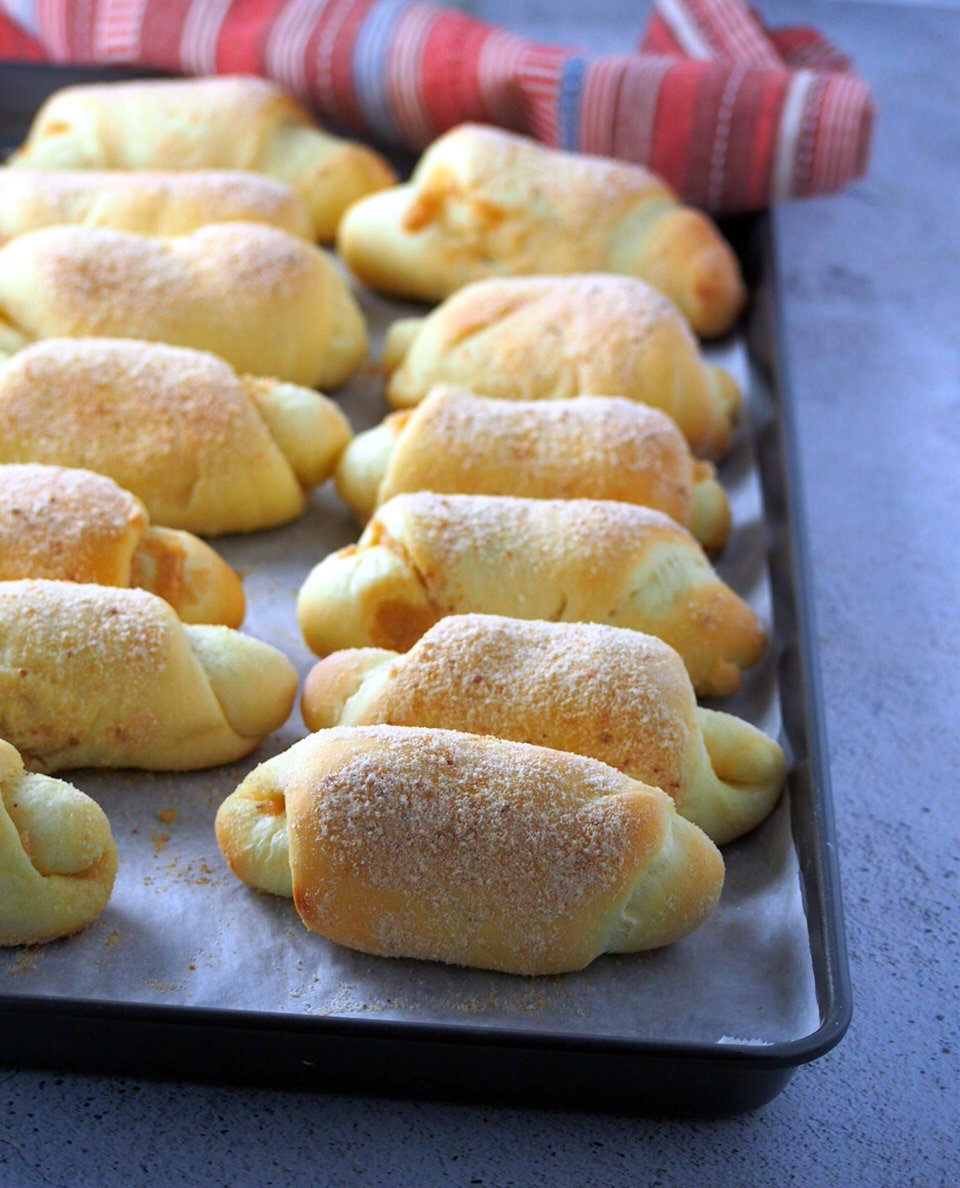
Place them in a greased baking tray or line the tray with parchment paper. Using a pastry brush, brush evaporated milk all over the logs, then dip them in breadcrumbs, making sure the log is all coated.
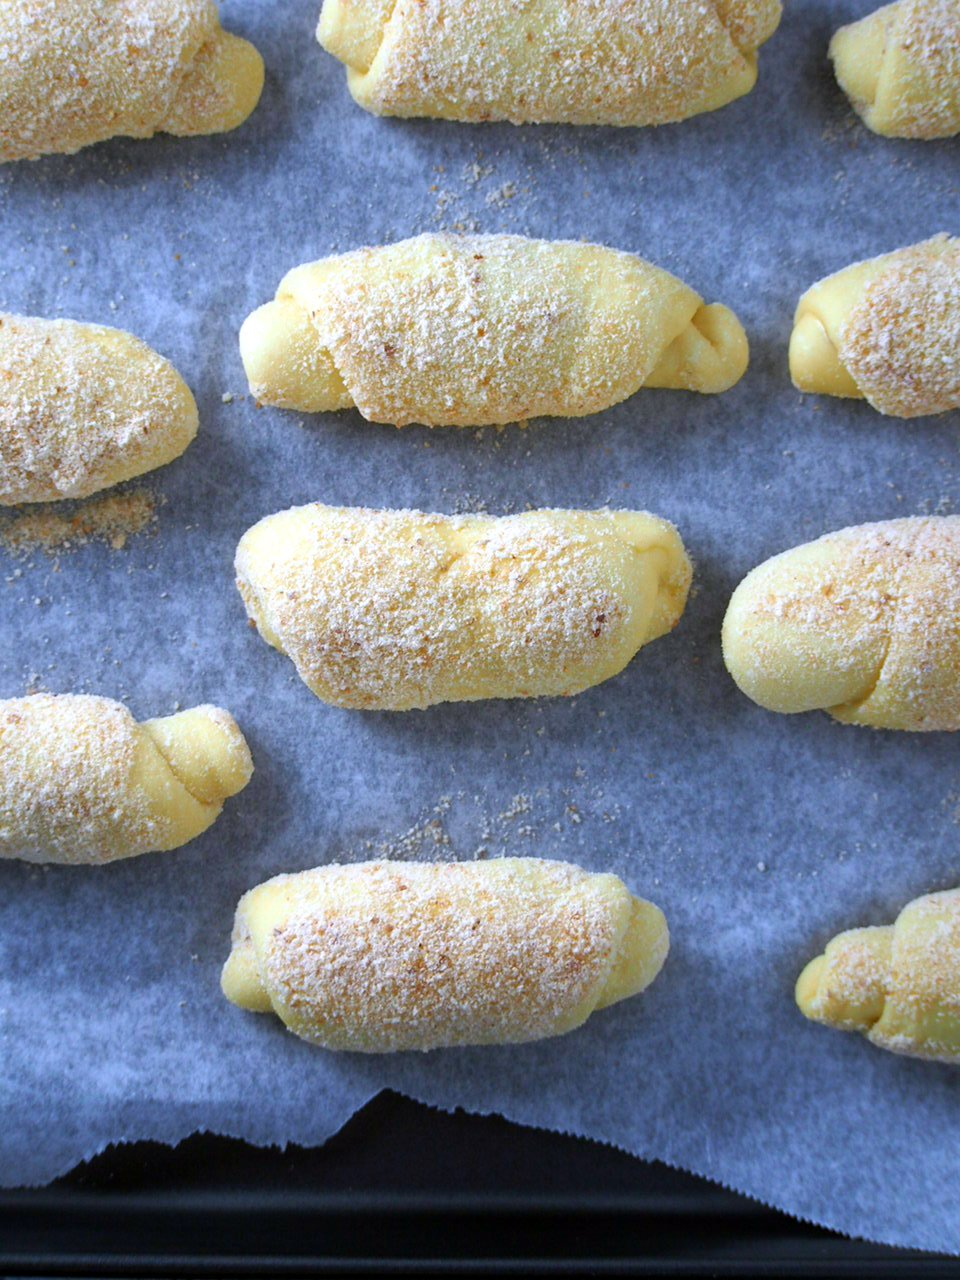
Second Rise. Line them up again in the baking tray. Cover the logs loosely with plastic wrap and let them rise for about an hour, or until they are puffy and doubled in size.
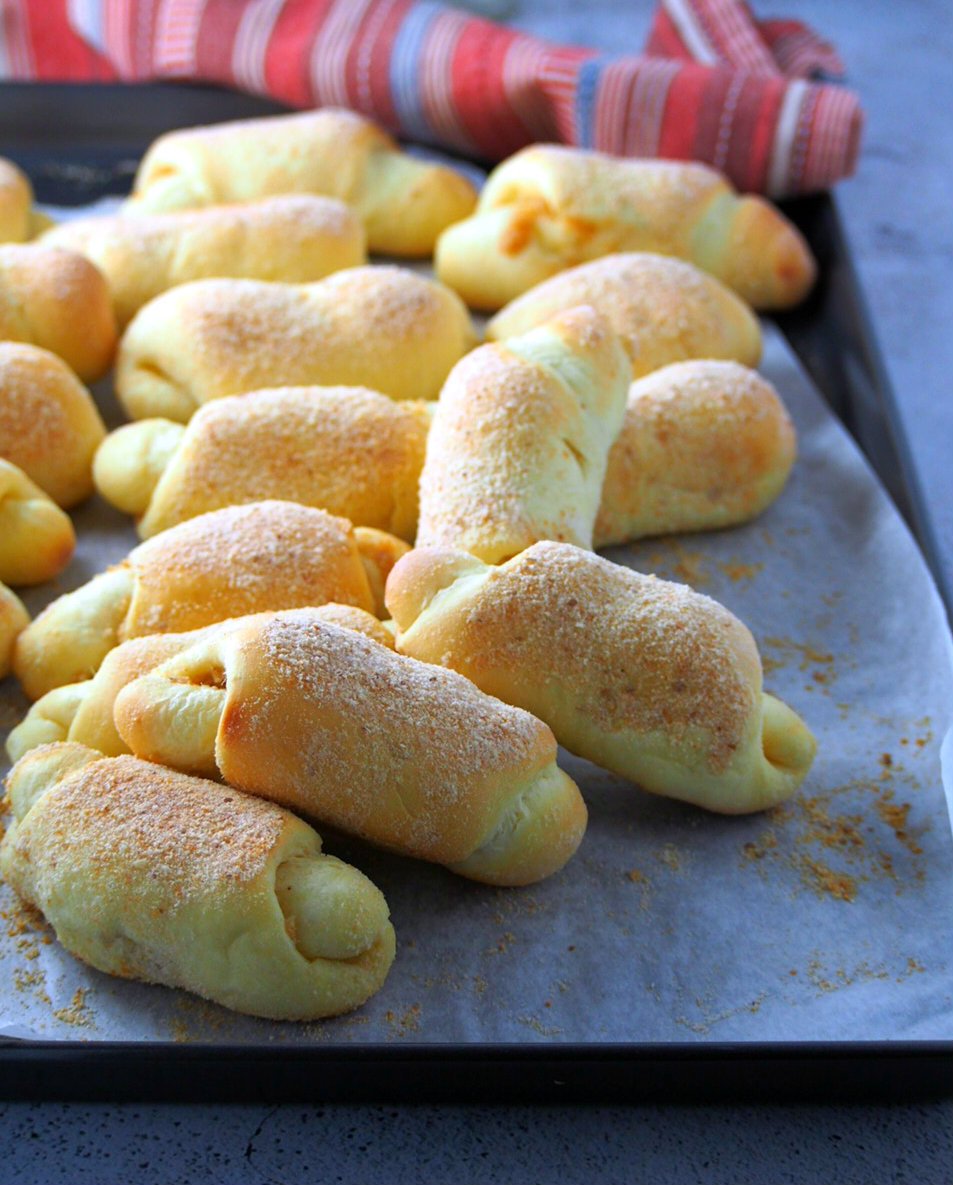
Bake. Preheat oven to 350 F. Once the temperature is reached, bake the Spanish bread for 15-20 minutes, or until they are lightly golden.
Once they are done, be patient. The filling is hot. I know it smells nice and heavenly but that delicious filling needs more time before you take that bite.
Then grab what you need. A cup of coffee or tea maybe? Hot chocolate is super, too. Wind down and have a snack of warm bread, fresh from the oven. A typical Filipino afternoon snack. Oh, some of the good things in life!
More Delicious Bread
- Japanese Condensed Milk Bread
- Yema Rolls
- Milk Bread
- Japanese Milk Buns
- Coconut Bread with Milky Sweet Filling
- Sweet Beehive Buns
- Honey Buns with Honey Cream Filling
- Chelsea Buns
- Milk and Sugar Mini Buns
- Soft and Buttery Sugar Buns
- Choco-Yema Cupcakes
- Pan de Siosa
- Ube Morning Buns
- Easy and Tasty Bibingka
- Puto Pao
- Tasty ( Asian Style White Loaf Bread)
- Whole Wheat Buttermilk Loaf Bread
Spanish Bread
Ingredients
For the Bread Dough
- 1 and 1/4 cups warm milk 105-115 F
- 2 and 1/4 tsp active dry yeast
- 4 and 1/2 cup all-purpose flour, divided + up to 1/8 cup extra for kneading
- 1 tsp salt
- 1/2 cup sugar
- 1/3 cup canola oil
- 2 large eggs lightly beaten
- 3/4 cup bread crumbs for coating the bread
- 1/4 cup evaporated milk
For the Spanish Bread Filling
- 1/4 cup all-purpose flour
- 1/2 cup` bread crumbs
- 1/3 cup butter
- 2/3 cup brown sugar
- 1/3 cup evaporated milk
Instructions
Make the Bread Dough
- In a mixing bowl, combine milk and yeast. Let stand for 5 minutes or until foamy. Add the eggs, sugar, oil and salt. Stir everything with a wooden spoon. Add 4 cups of flour, one cup at a time while stirring. The mixture will turn into a shaggy dough.
- Sprinkle just enough of the remaining 1/2 cup of flour and keep stirring until the dough gathers in the center. Turn the dough over on a floured board and knead it until it is smooth and elastic, about 6-10 minutes. As you knead, dust your hands and your board as needed to help with the stickiness. You may need to use up to 1/8 cup of additional flour.
- Shape the dough into a ball and place it a bowl. Cover and let rise for 1 and 1/2 hours, or until the size is doubled. You can make the filling at this point.
- Gently punch the dough down and divide it into 18-20 portions. Using a small rolling pin or your hands, flatten each portion into an oval that is about the size of your hands. Spread about a tablespoon of the filling across the surface of the dough and roll it into a log. Repeat with all the other portions. Arrange the rolls in a large baking tray that is greased or lined with parchment paper. Brush evaporated milk on each of the rolls and dip them in breadcrumbs. Cover them loosely with plastic wrap and let them rise for an hour.
- Preheat the oven to 350 F. Bake the Spanish bread for 15-20 minutes, or until the rolls are lightly golden.
Spanish Bread Filling
- Heat the butter in a small saucepan until it is bubbly. Add the flour and the breadcrumbs and stir the mixture vigorously with a wire whisk for a few seconds. This is a grainy mixture at this point. Immediately add the milk and keep stirring until the mixture loosens up a bit. Stir for 30 seconds more and turn off heat. Stir in the sugar well until it is incorporated. Set aside to cool. This mixture is a chunky paste.


Hi Sanna, thanks so much for the recipe.. the best po yung spanish bread.. i made it twice already my hubby and my friends are loving it.. and also your pandesal recipe it is the best.. thank you.. God bless you more!
Hello, Gerlyn! I am so happy that you liked it! Thank you so much, too!
Hello.I am baking Spanish bread also but I will try to follow your recipe.May I ask if it is good and ok if I will leave my dough inside the ref for overnight after it has risen up?sometimes i ran out of time in the night to bake them.Thank you.
Hi Violeta!
Yes, you can leave the dough in the fridge overnight after it has risen (first rise), or even before. It will still rise inside the fridge but at a slower pace. The following morning, bring the dough to room temp. and either let it rise if it hasnt doubled in size yet, or deflate and continue on with the recipe.
You can also leave them in the fridge after you have shaped them. Then take them out and let them rise the following morning.
I hope that helps! 🙂
Love these!Can I use fresh milk instead of evaporated milk?
Yes, you can use fresh milk. Might change the texture of the filling a bit but it is fine 🙂
Thank you for sharing the recipe 🙂 just wondering do you use the plain flour for the all purpose flour or the bread flour(bakers flour)? Thank you
Hello Paula! I used plain all-purpose flour. I hope you like these!
Thank you for the recipe! They turned out so delicious. Fresh out of the oven they were a little crunchy yet pillowy soft inside! I did have to use more than 4 1/2 cups of flour though – and used bread flour instead of AP. Can’t wait to try more of your recipes! 🙂
Hi Angela! Thank you for making this! I am so glad you loved it!
Love finding this page. I will be coming here often. My question is: Is there any reason I can’t use my big stand mixer with a dough hook to make this. I have Arthritis and the kneading can just wear me out.
Hello Cherilynne! Thanks for visiting the blog. Yes, you can use the stand mixer to make the dough. Just follow the procedure, but in the bowl of a stand mixer. You only need to check the texture of the dough to make sure it wont be over kneaded 🙂
Thank you so much and happy baking!
I wish you had a video on this bread.
Hey Sylvia! The video is coming up next week so be sure to come back 🙂
Hi. I have a question. I saw in your soft cheese bread that you made a overnight dough. If I make this Spanish bread, can I make an overnight dough as well? And what is the measurement? I want my Spanish break to keep it soft even for days. Thank you
Hello Ann! You can use the dough for the sweet cheese rolls for this Spanish bread. Just follow the dough instructions for the cheese rolls and make the filling for Spanish bread. 🙂
I was thinking that too. Thank you so much. Will let you know how it goes when I made them. Btw how about putting some cinnamon powder on the filling?
Yes, absolutely! You can do that too. I suggest 1-4 to 1/2 teaspoons. Whisk the cinnamon powder with the brown sugar, then follow the filling procedure. 🙂
Hi,
If I am going to use bread machine for the dough, do you know the measurements?
Thanks
Hello, Marie! Sorry I have not tried this on the bread machine/maker yet :(.
I used bread machine to make the dough, and it came out just fine. Started with the warm milk, then mixed in the yeast and a tablespoon of sugar. I waited a minute before adding the rest of the ingredients in no specific order. Hope this helps 🙂
Thank you so much for that, Irene!
Thanks so much for sharing this recipe. My family loves it and will be making it again. 🙂 I’m new into baking and this guide helped me a lot.
Hello Weng! I am so happy that you loved it! Enjoy always and happy baking!
Sanna it looks like you respond to questions pretty quickly so I am going to ask you a very silly question. I am going to make these and when you roll the little dough balls out – – which way do you roll them up. By the short end or the long side? Maybe it will be obvious when I actually make them but I wanted to understand as much as possible,. Your comments and photos in your description of this recipe are very much appreciated. Thank you in advance for answering my question. Nancy
Hi Nancy! That is not a silly question at all, so no worries. You will roll them starting on the short edge, the oval is facing you vertically. I hope that helps. Please let me know if you have more questions.
Thank you so much for sharing I’m going to try it I hope it stays nice and soft not like my old recipe… do you have recipe for Portos cream puffs ? Thank you
Thank you, Marlo! They will be soft and nice for days 🙂 I don’t have Porto’s cream puff recipe. To be honest, I think I am missing out because I have not tasted it yet. I DO LOVE their cheese rolls though! I will check out the cream puffs next time we go to the US.
Baked these this morning as a test run for an upcoming brunch. They are sooooooo good! They will definitely be on the menu for this upcoming brunch and many more to come. I really appreciate the numerous descriptors that you sprinkle throughout the recipe: shaggy, size of your hand, chunky paste… I find that helpful in knowing that I’m on track. Thank you for all the time, energy and resources that you put into creating and sharing this recipe!
Hi Anna! Thank you so much! I feel happy knowing that you like the recipe and the instructions written. I appreciate it a lot so thank you!
These look wonderful and like nothing I have ever seen before. If one wanted to freeze part of the recipe would you do it before or after you bake them?
Hi Juli Kay,
I have not really tried freezing these yet so I cannot guarantee the result. However, if you want part of them reserved you can shape the rolls and put them in the fridge for a day. Once you are ready to bake them, just take them out, let them rise for 2 hours then bake. 🙂
Hi, may i know if i can use raw sugar instead of brown sugar for this recipe?
Hello Wennie! Yes you can use white sugar 🙂 You won’t get the deep caramelized brown color for the filling, though. But It will work 🙂 Good luck!
What kind of bread crumbs did you use? Soft or crunchy?
Hello Susan! I used the soft ones (regular). 🙂 Happy Baking and I hope you love these!
This looks like what a local bakery calls “Señorita Bread” and I’m really excited about this.
Did you make the breadcrumbs from some other bread? How do I get ‘breadcrumbs’?
Hello there, Bethy! I do not make my own bread crumbs. I buy the ready- made bread crumbs form supermarkets. They are just the regular ones.
That is right, I believe these are called Senorita bread too.
Why don’t you make your own bread crumbs it’s easy, and for all of you guys, just get a regular bread and put it in your food processor then there you go, you have a fresh bread crumbs instead of buying one. 😉
Do you use seasoned, plain, or Panko?
Hi Lynn! I used plain 🙂
hi ma’am salmt sa daming recipe na ibinibigay nu,kc po dati po aq master baker kya po ung mg recipe lahat nawawala kaya nakalimutan kna maraming salmt maam Susan says
Hello Bobby! I am so glad you liked the recipe! Maraming salamat din !